
Updated on 2024-01-06
views
5min read
Do you want to learn how to screenshot a Mac in under 10 seconds? Learn about all the ways to take a screenshot on a MacBook using default keyboard shortcuts. The list shows you how to record the Mac screen using the keyboard shortcut (without QuickTime Player). MacBook keyboard shortcuts are enough to capture a screenshot in the desired way, i.e., full-screen, part screen, or specific window. However, the MacBook lacks the option to take a long-form scrolling screenshot.
Plus, the lack of editing options on the MacBook prevents you from modifying the image and using it in a professional environment. And for that reason, we have also outlined a professional third-party application to take a screenshot on Mac.
Part 1: Screenshot Mac With the Best Tool
As mentioned, there are several options to take a screenshot on a MacBook using the default keyboard shortcut. Yet, the MacBook lacks some options, like scrolling endless screenshots and editing options. And that’s where professional screen capture and recording like Eassiy Screen excel.
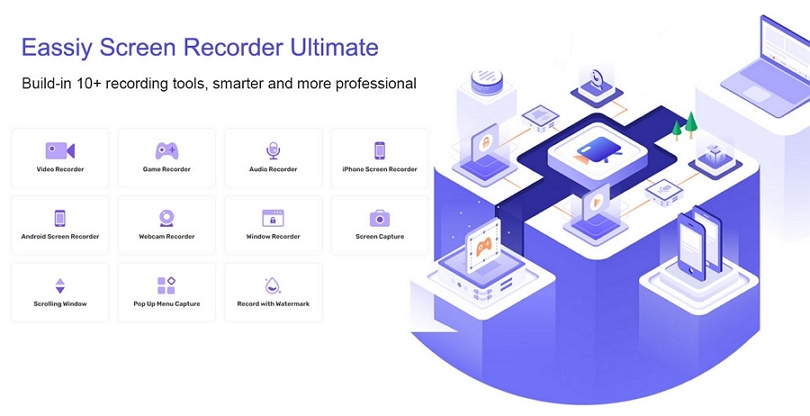
Eassiy Screen Recorder Ultimate
Eassiy Screen Recorder Ultimate is a multifunctional app that allows you to capture a screenshot on a MacBook in any desired way. You can use the Eassiy Screen Recorder Ultimate to take a full screenshot, partial screenshot, or capture only a specific window or application. You can apply the same parameters and record the screen using the Eassiy Screen Recorder Ultimate. On top of that, you can take a screenshot while video recording the screen.
Plus, the Eassiy Screen Recorder Ultimate has a unique screen capture feature, i.e., long-form scrolling screenshots. The long-form scrolling screenshot allows you to include the parts that are not visible on the screen. So, you can capture long-form screenshots quickly and easily. But the most prominent thing about the Eassiy Screen Recorder Ultimate is it presents a wide variety of editing tools. You can use the editing tools to draw shapes, icons, highlighter, markers, and more. The plethora of annotation options allow you to add texts, watermarks, and stamps and brand the image for professional use.
Key Features:
- Capture full screenshots, partial screenshots, window screenshots, and more.
- Capture long-form scrolling screenshots to include anything present in the bottom fold.
- Video Record the screen with webcam and audio. Plus, take a screenshot while recording the screen.
- Tons of editing options like a highlighter, marker, arrows, and text editor (multiple fonts).
- Brand and personalize the screenshot using stamps and watermarks.
- Save the screenshot in any desired format, including .jpg , .jpeg , .jfif , .pjpeg , .pjp, and more. Plus, share it on social channels directly.
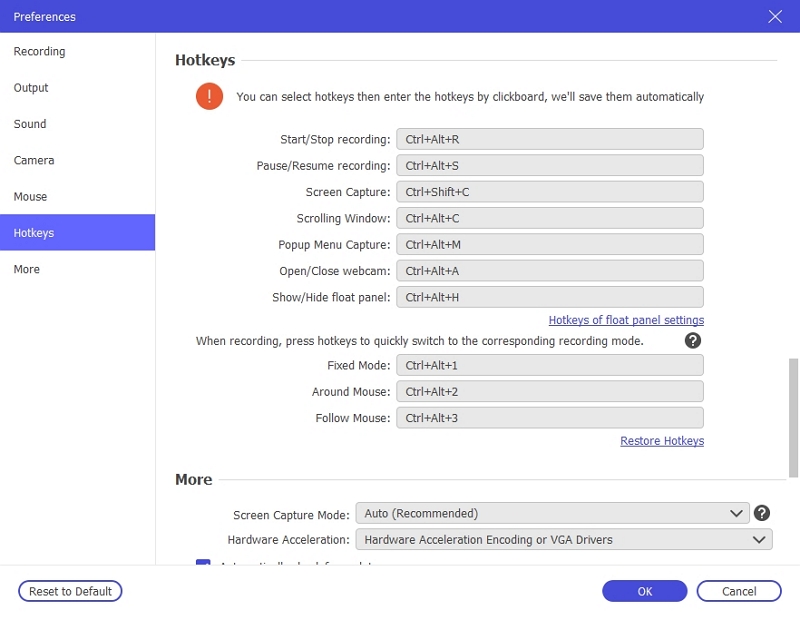
- Customize the keyboard shortcut and use your personal hotkey to capture a screenshot anytime with a single click.
- Capture a small video and convert it into GIF.
- Record Mac screen, iPhone screen and Android phone screen.
- Powerful and advanced recording features such as schedule recording, auto-stop recording, gameplay recording and more.
How to screenshot on Mac With Eassiy?
Eassiy Screen Recorder Ultimate is aimed at beginners, so using it is simple. Still, here’s a step-by-step instructions on how to use the Eassiy program to take a full screenshot on Mac:
Step 1. Download and Install the Eassiy Screen Recorder Ultimate program. Launch the application. Open Video Recorder, then choose Screen Capture.
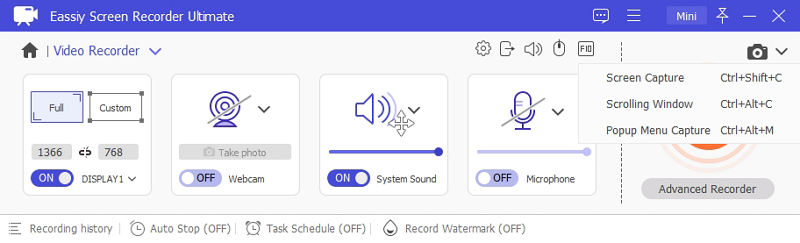
Step 2. Use the crosshair cursor and choose the desired part of the screen that you want to capture. Use the editing tools to draw shapes, annotations, and other shapes or text on the image if needed.
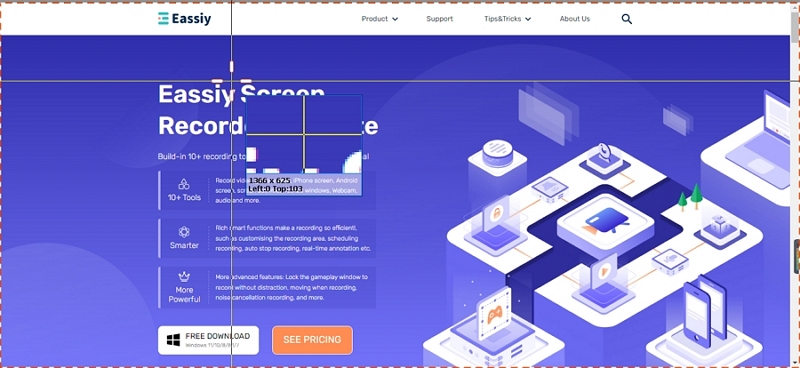
Note: Eassiy Screen Recorder Ultimate also allows you to customize the Settings beforehand, like mouse pointer color at the time of capturing and default options to capture the screen. You can change such options via Preferences.
Step 3. Save the screenshot.
Click on the Save icon to see the Save as options. Type in the name of the screenshot. And choose the format.
That’s how simple it is to capture a screenshot on Mac Pro using the Eassiy Screen Recorder Ultimate. As mentioned, the Eassiy Screen Recorder Ultimate allows you to record the screen if needed.
Part 2: Screenshot Mac With Macbook Screenshot Shortcut
You can screenshot the mac’s entire screen, portion, or window using the default shortcut keys on the Mac screen.
Method 1: Use Shift + Command + 3
The easiest and quickest way to capture a screenshot on a MacBook is to press Shift+Command+3 simultaneously.
Here’s how to take a screenshot on a MacBook using Shift+Command+4:
Press Shift+Command+3 together.
- This will capture the entire screen. To edit the screenshot then and there, click on the thumbnail at the right corner of the screen.
- In the Apple Preview window, edit the screenshot by adding shapes and colors. After editing the screenshot, save it.
- To save the screenshot without editing, wait till the thumbnail disappears. (The screenshot gets saved on the desktop by default).

Method 2: Use Shift + Command + 4
Shift+Command+3 allows you to capture the entire screen. But it does not give the option to capture only the desired part on the screen. And that’s where Shift+Command+4 comes.
Here’s how to take a screenshot on a MacBook using Shift+Command+4:
Step 1. Press Shift+Command+4 together. Once your keyboard shortcut is triggered, a crosshair will appear on the screen.

Step 2. Drag and move the crosshair to select the desired part of the screen.

Step 3. Once you select the portion, release the mousepad or touch button.
- Click on the thumbnail at the corner of the screen to edit the screenshot.
- You can edit the screenshot by using shapes, icons, and highlighters. And then save the screenshot to the desired location.
In case you do not want to edit the captured screenshot on MacBook, simply wait for the thumbnail to disappear. The screenshot will be available on the desktop.
Method 3: Use Shift + Command + 4 + Space bar
There is also a keyboard shortcut to capture only a specific window on the MacBook.
Here’s how to capture a specific window on a MacBook using Shift+Command+4+ Space bar:
Step 1. Open the desired window you want to capture. And press Shift+Command+4+Space bar altogether.

Step 2. The mouse pointer on the screen will change to a camera icon once you trigger the keyboard shortcut, i.e., Shift+Command+4+Spacebar.
- Click on the specific window or menu to capture the screenshot on the MacBook.
- To exclude the window or menu shadow from the screenshot, press the Option key with the shortcut, i.e., Shift+Command+4+Space bar+Option together.
Step 3. Click on the thumbnail at the corner of the screen to edit the screenshot. You can wait till the thumbnail disappears to save the window or menu screenshot without editing. The screenshot will be available on the desktop.
Method 4: Use Shift + Command + 5
Often, MacBook users open the QuickTime Player to record the screen. However, the MacBook also includes a screenshot to record the screenshot using a keyboard shortcut.
Here’s how to screen record on MacBook using Shift+Command+5:
Step 1. Press Shift+Command+5 together.

Step 2. Once the keyboard shortcut, i.e., Shift+Command+5 is triggered, and you will see on screen options to manage the recording beforehand.
- Select the Record Entire Screen icon to record the video of the entire screen.
- Choose the Record Selected Portion icon (dotted) to specify the screen area you want to record.

Step 3. After specifying the type of recording, click on Record to begin the screen recording. In case you have chosen the Record Selected Portion icon, you will see a box with broken lines. Drag and specify the desired area using the edges.
Step 4. Click Record to start the recording.

Step 5. Press Command+Shift+Esc together to stop the recording. Once you stop the recording, a new window will appear. Change the name of the recording and save it to the desired location.
Part 3: Screenshot Mac FAQs
1. Where do screenshots go on Mac?
By default, all versions of MacBook save the screenshot on the desktop. However, on Mojave and later versions, you can change the default location via the Options menu in the Screenshot app.
2. Where are screenshots saved on mac?
Any screenshot captured on the MacBook via default methods like discussed above gets saved on the desktop. However, if you use third-party apps like Eassiy Screen Recorder Ultimate, the screenshot and recordings will be available in the Recording History panel. You can also save the screenshot to a local folder by specifying it in the app beforehand.
3. How To Crop a Screenshot on Mac?
You can use Command+Shift+4 to crop a screenshot on Mac.
Conclusion
There you go! As promised, this guide shows you how to take a screenshot on a MacBook in under 10 seconds. You can use the default keyboard shortcuts to capture a full screenshot, partial screenshot, or specific window screenshot. The good thing about newer versions of MacBook, i.e., Mojave and later versions, allow you to change the default keyboard shortcuts too. Eassiy Screen Recorder Ultimate also allows you to customize the keyboard shortcut. Plus, as mentioned, it provides several options to capture a screenshot in the desired way. And the editing options like watermark and stamps allow you to personalize the screenshot.