
Updated on 2024-01-06
views
5min read
Whether you want to record app demos, give feedback, or simply share your thoughts, iPhone Screen Recorder allows you to seamlessly record content on the go and share it with your friends, team members, and audience. But the problem is many users do not know how to screen record with sound on iPhone. That is why we have compiled a list of all the ways to record the iOS screen with sound.
And also included step-by-step instructions with images, so even the tech illiterates can learn how to screen record on iPhone with sound. In the guide, you will find native tools (free methods) and third-party tools (available with subscriptions).
Part 1: How to Screen Record on iPhone With Sound for Free?
Thanks to Apple’s built-in screen recorder, you do not have to install any app to screencast your iPhone screen. Available on iOS 11 and above versions, iPhone’s Screen Recorder can help you capture video of your screen with both internal and external (microphone sound).
iPhone also allows you to include only the system sound or complete silence. However, you have to follow different steps to capture only the internal sound or both internal iPhone sound and voice.
You can also take live screenshots while capturing the iPhone screen. After the screen recording, the videos are saved to the Photos app automatically. And you can use the built-in editor of the Photos app to edit the screen recording, like remove the unwanted parts or add filter effects. Let’s learn how to screen record on iPhone with sound.
How to Screen Record with Sound on iPhone.
Step 1. Customize Control Center.
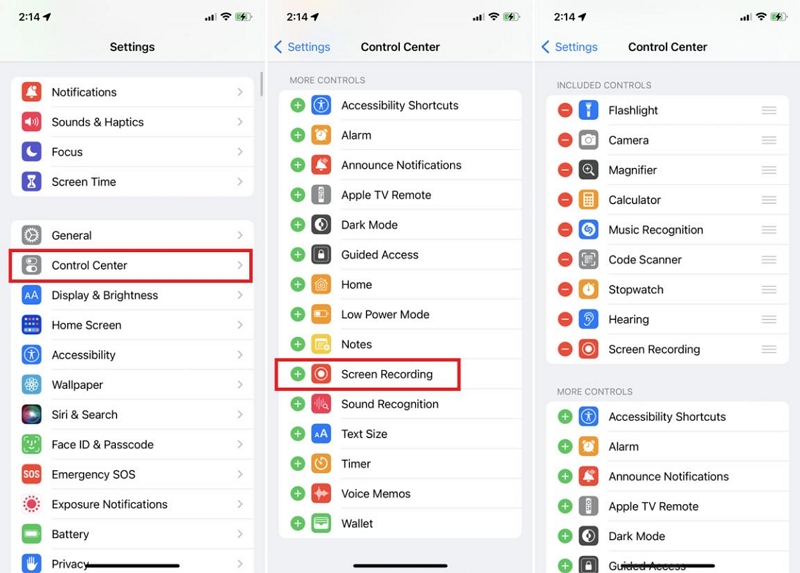
The Screen Recorder is not accessible via the Control Center on many devices. So, you have to navigate to Settings and customize the Control Center options.
- Go to Settings.
- Tap on the Control Center settings.
- Under Control Center, ensure to Turn On the Access Within Apps option.
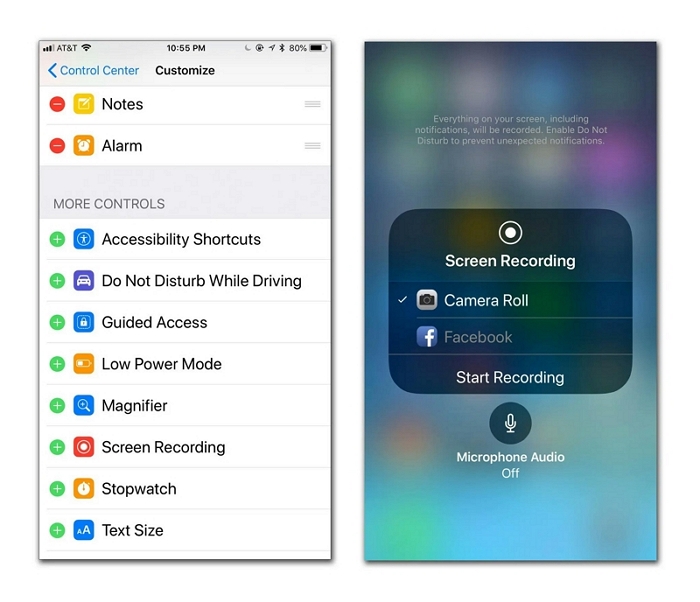
- After that, navigate to MORE CONTROLS.
- And click on the “+” sign assigned to Screen Recorder. Once Screen Recorder is added, you will find it within INCLUDED CONTROLS menu.
Note: There are three ways to include sound on the iPhone.
- Internal iPhone Sound: You can only capture the internal sound while excluding the microphone sound. To do this, turn Off the Microphone while keeping the Ringer turned On.
- Capture Both Voice and System Sound: If you want to include both System sound and Microphone sound (i.e., your own voice), you have to turn On both the Ringer and Microphone access.
- Screen Record without Sound: You can also record the screen without any sound by turning the Ringer and Microphone Off.
In the subsequent steps, you will learn how to screen record with sound, i.e., only capture internal sound on your iPhone. Capture only your voice. And capture both system sound and your own voice.
Step 2. Record Screen With Sound on iPhone.
a. Capture iPhone Screen with Only Internal Sound.
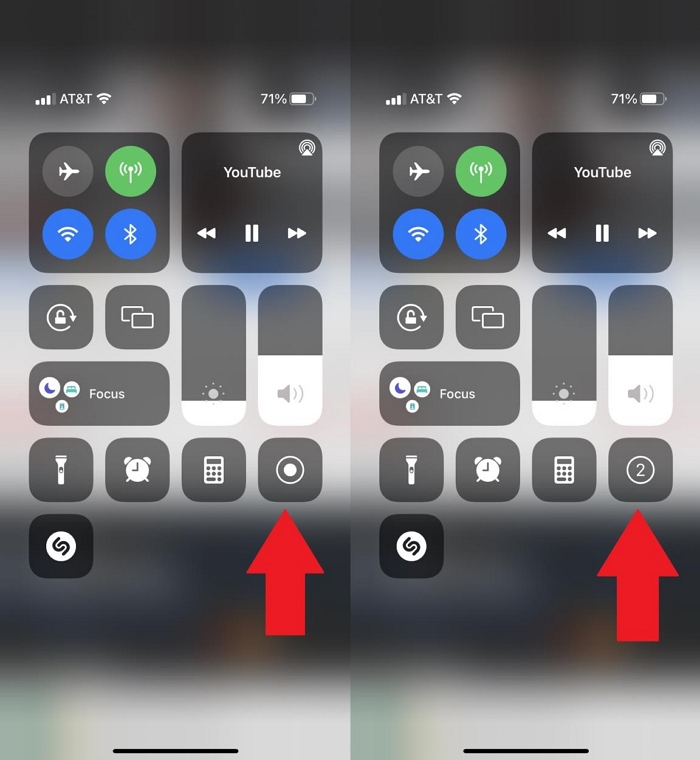
Now open the application or screen you want to record on the iPhone. Swipe up to access the Control Center options. Since you enabled the Screen Recorder option, you will find it under the menu options.
Click on the Screen Recorder (Circular) button. iPhone’s built-in Screen Recorder gives you a 3-second countdown to prepare for the screen recording. Go back to the screen you want to record.
b. Capture both Internal Sound and Microphone sound on iPhone.
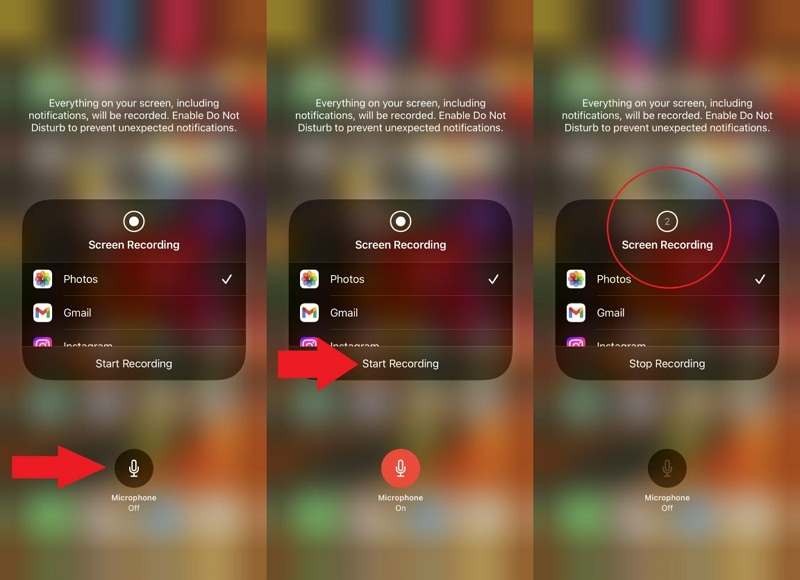
Access the Microphone Settings before recording the screen to include both iPhone app sound and microphone sound. To do that, long-press on the Screen Recorder option instead of tapping it once. You will see a new menu pop-up with a Microphone option.
- Click on the mic icon to turn On the Microphone.
- And click on Start Recording to screencast the iPhone screen.
c. Record Screen Without Sound on iPhone.
To only capture your own voice, turn Off the Ringer on the iPhone. And ensure to turn Off the Microphone.

Step 3. Stop the Recording.
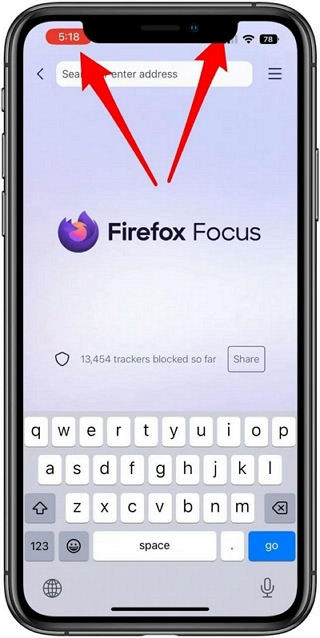
Go through the screen recording and capture everything you want. And regardless of the sound options on iPhone, you will see a timer (red rectangle box) on the top-left corner of the screen.
- Click on the Timer to stop the recording.
- You will see a pop-up on the screen asking you to confirm to end the recording.
- Click on the Stop.
That’s how to screen record with sound or without sound on iPhone. You can access the recorded videos via the Photos app. Note that there is no option to capture only your own voice while excluding the internal sound on iPhone while screen recording.
But that’s not the only drawback of using the iPhone’s built-in screen recorder. For instance,
- You cannot record for long (after 3-4 hours, the recording stops).
- The screen recordings occupy space on your iPhone.
That is why we have listed other methods in this guide to help you record without internal sound and only voice on your iPhone.
Part 2: Screen Record iPhone With Third-party App
You can also install a third-party app to record the iOS application to get added functionality. One such free screen recorder for iPhone to capture the screen with sound on iPhone is Loom.
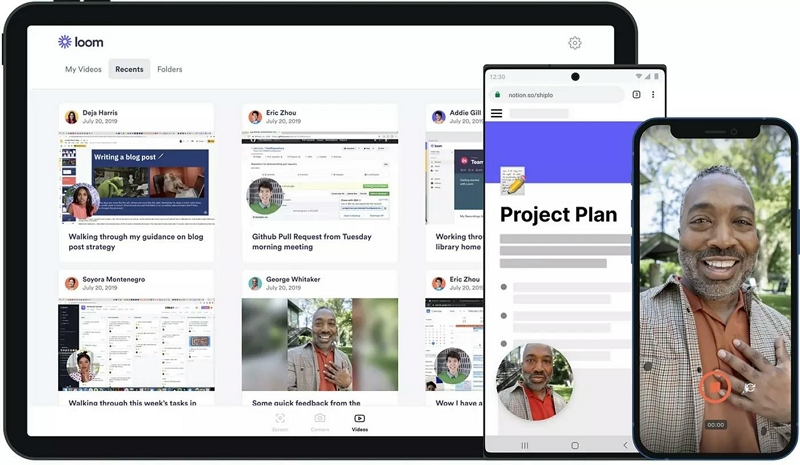
Loom iOS Screen Recorder
Loom, unlike the iPhone’s built-in Screen Recorder, allows you to capture screen, camera, internal audio, and microphone sound on iPhone. Not only this, but unlike the iPhone’s built-in screen recorder, the recordings are saved directly to the cloud, saving you tons of internal space. Of course, you can download the video to the iPhone’s local storage if needed.
However, given that it allows you to share the video with a URL, you do not even have to download the video, given it will be accessible in the cloud. Another benefit of using Loom is its social capabilities.
For instance, if you are recording the screen to explain something to your teammates or friends, Loom’s social integrations will be valuable, as you can view the real-time engagement, comments, and others’ viewpoints.
All in all, Loom is a simple application. Given its self-explanatory interface, you will not have any problems recording the screen on iOS seamlessly. Nevertheless, if you want to edit the video, you have to navigate to Loom’s computer program.
Key Features:
- Capture screen, camera, microphone, and internal sound on iPhone.
- See engagement, views, and comments in real time.
- All the video recordings will be saved on the cloud.
- You can edit the recordings via Loom’s Mac or Windows tool.
- Adjust the speed of the screen recording.
- You can download the video to your iPhone’s local storage if necessary.
How to Use Loom to Screen Secord with Sound on iPhone?
Step 1. Download Loom’s iOS application from the AppStore.
After downloading the application, you have to customize the Control Center settings. To include Loom Screen Recorder in the Control Center,
- Go to the Settings menu.
- Navigate to Control Center and open it.
- Move down to the MORE CONTROLS option.
- And click on the “+” icon next to Loom.
Once done, you will see the Loom in the INCLUDED CONTROLS menu.
Step 2. Record the Screen with Sound on iPhone using Loom.
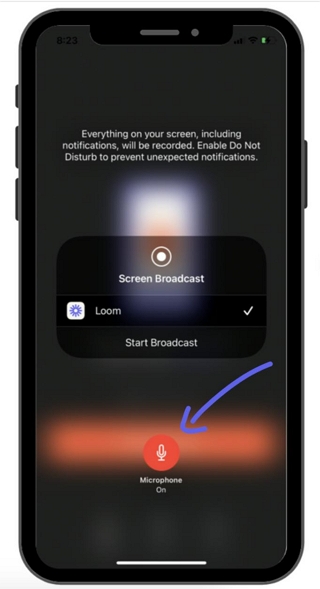
Navigate to the Control Center and long-press on the Record button.
- Select Loom from the pop-up menu options.
- And click on the Microphone if you want to include both internal and Microphone sounds in the screen recording.
- Click on Start Broadcast to record the iOS screen with sound.
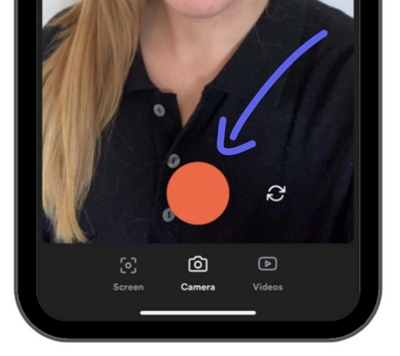
Step 3. Click on the Rotate icon to record with the Camera and sound. During the recording, you can switch between the Camera and Screen using the Rotate icon.
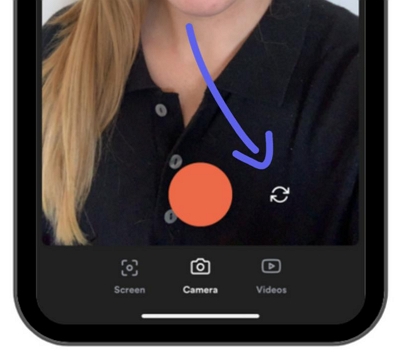
Step 4. Click on the Red button to end the recording.
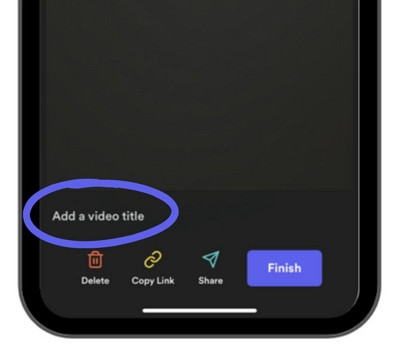
Step 5. Type in a title. And share the video recording via the URL or Share button. Click on the Finish button to save the screen recording to Loom’s cloud storage.
If you use the Share button and share the video recording via in-app, you can see the engagement (views, comments, reactions) in real time.
However, if you use the URL to share the video with a non-member of Loom, you cannot see the real-time insights. As mentioned, you can log in to the desktop app and edit your screen recordings.
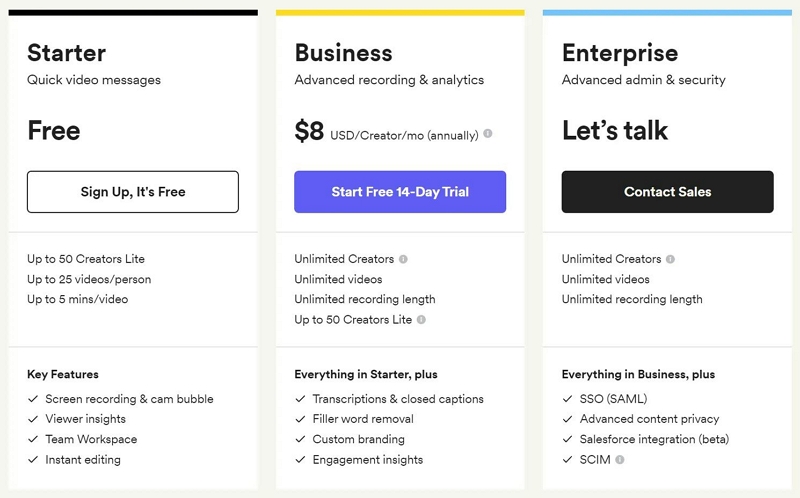
Loom iOS application is free so you can record the screen on iPhone with sound without a license (up to 25 videos). However, you must purchase the license if you want to edit the recording using the desktop program.
Coming to the next part, some of you might be looking for a tool to record the iPhone screen with sound from the computer. If yes, scroll down because there is a way to record the iOS screen via a computer.
Part 3: How to Screen Record iPhone With Sound From a Computer?
We have included two methods to screen record iPhone with sound from a computer. One way, i.e., using QuickTime, is accessible only to users who have a Mac device. In contrast, the second method, i.e., Eassiy Screen Recorder, allows you to record an iPhone screen with sound, camera, annotation tools, and more via the Windows device. Read on to learn how to do that.
Method 1: Screen Record iPhone With Sound From Mac using Quick Time
Many of you might be familiar with QuickTime as a media player. However, Apple’s native QuickTime can do more than play multimedia files. For starters, you can use it to edit videos, change speed, trim, and apply effects. But what’s substantial is you can use QuickTime (on Mac OS X 10.10 Yosemite and later) even to record the iPhone screen with sound.
The benefit of using QuickTime is simple, and all the videos are stored on the Mac device, saving you space on your iPhone. Additionally, QuickTime allows you to record the iPhone screen in superior video quality than iPhone’s native screen recorder. Plus, you can use some advanced options like including the Mouse cursor in the screen recording or not.
Like the native screen recorder on iPhone, QuickTime Player allows you to include both internal and external sound while recording the iPhone screen.
Key Features:
- Record the iPhone screen in high-quality.
- Include both internal and external sound in the iPhone recording.
- Edit the recordings using the built-in video editor in QuickTime.
- Save the recordings to the Mac and save iPhone space in MP4.
- Include mouse clicks in the screen recording.
How to Screen Record iPhone with Sound with QuickTime Mac?
You will have to connect the iPhone and Mac using a lightning cable. Once you do that, you have to permit the Mac to access the iPhone files. As soon as you connect the iPhone to the Mac, you will see a notification; click on “Trust” to record the screen with sound using Mac. Now follow these simple instructions to screen record iPhone with sound:
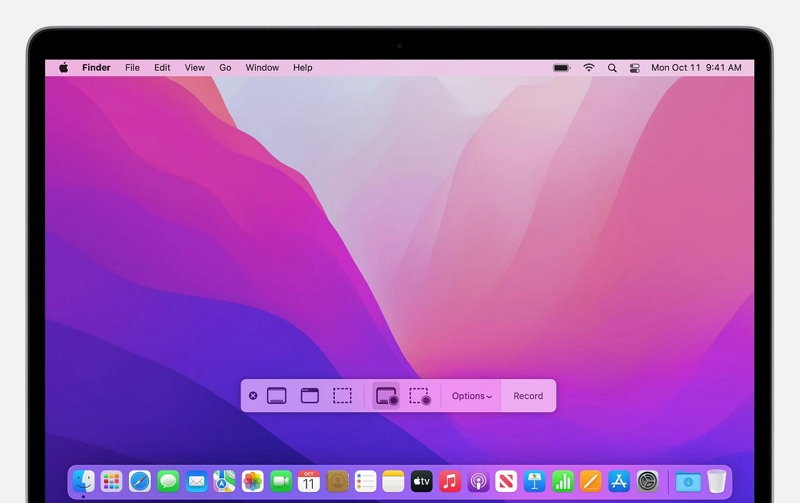
Step 1. Customize the Settings in QuickTime.
- Connect the iPhone to the Mac via the lightning cable.
- Open the QuickTime Player.
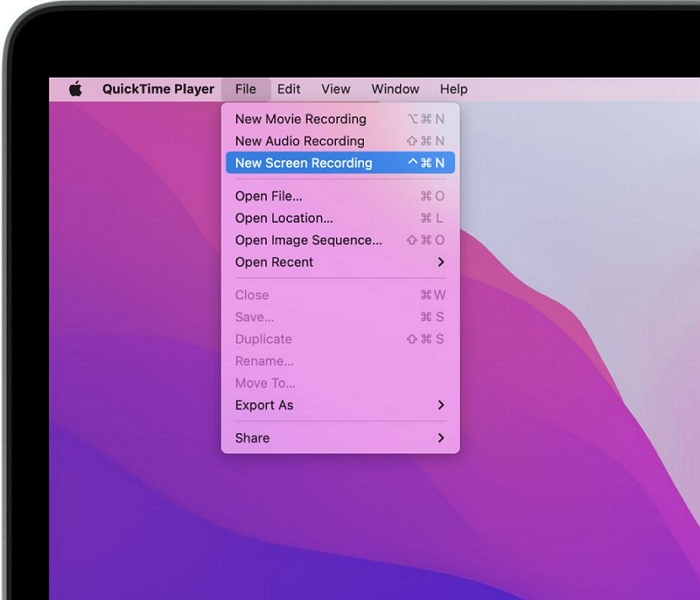
- Go to File.
- And choose New Movie Recording.
Step 2. Choose the iPhone which you want to screen record with sound.
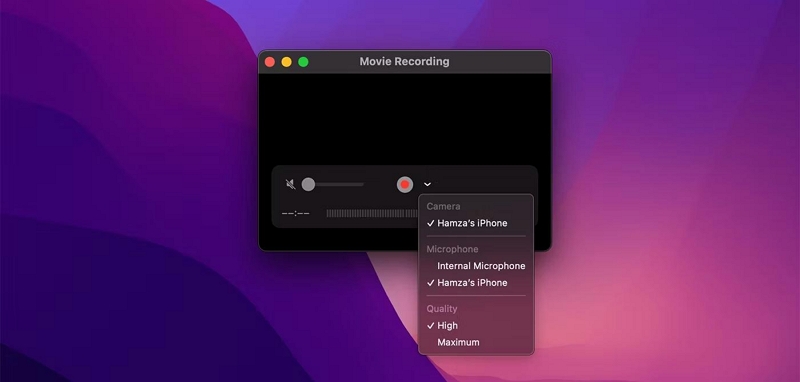
Clicking on the New Moview Recording, the recording menu will pop-up.
- Click on the arrow next to the Record icon.
- Under the Camera options, choose the iPhone connected to the Mac.
- Choose High or Medium under the Quality options. This option determines the video quality of the screen recording.
Record iPhone with sound with QuickTime.
Click on the down arrow again and choose the iPhone to capture iPhone’s internal sound.
Note: If you want to capture an external sound, connect a mic and choose the mic from the external sound option. You can also select Mac’s microphone for voiceover by choosing the name under the microphone. Be that as it may, you cannot decide to record your iPhone’s sound and external sound when using QuickTime to record the screen.
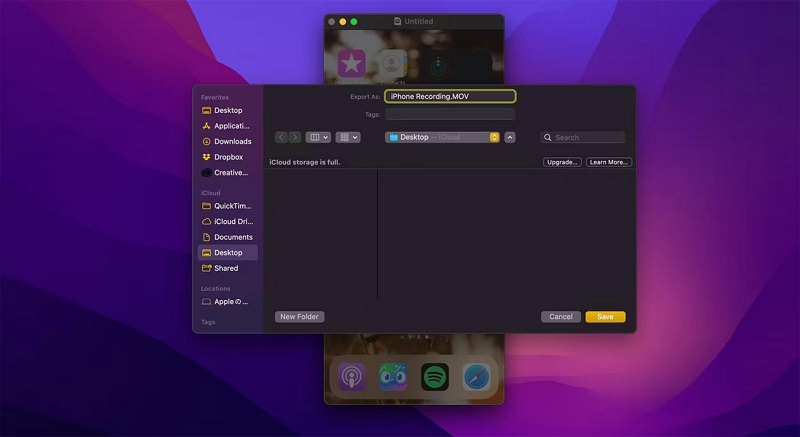
Step 3. Save the Recording.
- To end the recording, click on the Record button.
- Type in a name and choose the location of the screen recording.
- Click on Save on the pop-up menu.
Ensure not to change the orientation while you screen record the iPhone with sound using QuickTime. Doing so, QuickTime will stop recording and you have to restart the process.
Method 2: Screen Record iPhone With Sound On Windows - Eassiy
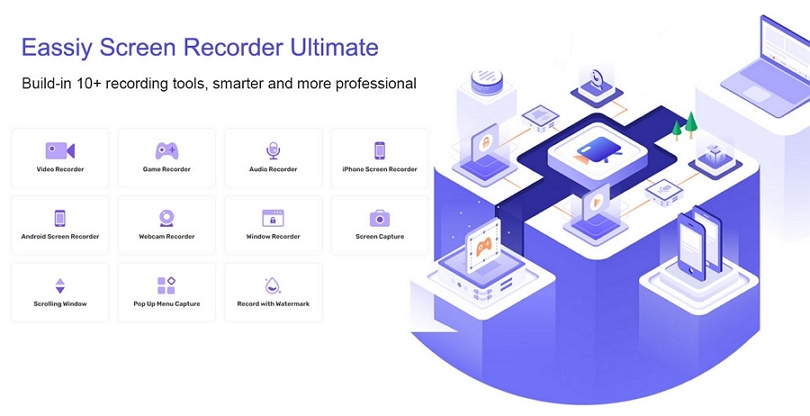
Eassiy Screen Recorder Ultimate is the perfect tool if you are looking to screen record with sound on iPhone via a Windows computer. Unlike any other screen recorders mentioned here, Eassiy offers more functionality. So you can create professional-looking 4K screen recordings seamlessly.
The above tools only allow you to capture the iPhone screen with sound, but Eassiy enables you to manage the sound levels. You can also record the camera and screen simultaneously. And Eassiy comes with an advanced audio management system, i.e., you can manage background interferences, eliminate any noise from the screen recording, as well as enhance microphone sound for clean audio in your screen recordings.
You can also edit the iPhone recordings afterward using the built-in video editor in Eassiy. You can also use annotation tools and draw or doodle during the live recording. Plus, you can use mouse pointers (in different colors and sizes) or make them invisible. If you want to create online instructions, app demos, or professional gameplays for Twitch or YouTube, Eassiy is the tool for you.
Key Features of Eassiy Screen Recorder Ultimate:
- Mirror and record iPhone Screen in 4K up to 60fps via Windows computer.
- Include both internal and external audio in the screen recording.
- Take Screenshots during live recording.
- Create personalized hotkeys and manage the iPhone recording using hotkeys.
- Manage your audio levels using the dedicated audio management system.
- Limit background interferences when including microphone sound in the screen recording.
- Enhance the microphone sound for a clear and smooth voiceover.
- Edit your videos using the trim, auto-split, and other editing tools in the Eassiy Screen Recorder.
- Save the iPhone screen recording on Windows.
- Share the iPhone screen recording to social channels directly.
- Audio Recorder only captures the iPhone’s system sound, microphone sound (or both simultaneously).
Note: Eassiy Screen Recorder (for Windows) also offers several advanced recording functionalities, like Follow Mouse Recorder, Around Mouse Recorder, and Scrolling Screenshots. And you can use all these with the same license.
That is to say, whether it is recording an iPhone screen or a Windows screen, you can use the same tool and create professional-looking online videos, tutorials, app demos, explainer videos, and office presentations.
How to Screen Record iPhone with Sound with Eassiy Screen Recorder?
Step 1. Download and Install Eassiy Screen Recorder on your Computer
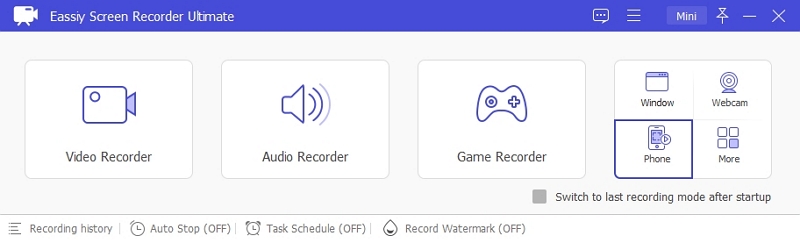
Visit the official website and download the latest version of Eassiy Screen Recorder. Then, install it on your PC. Launch the program and select Phone.
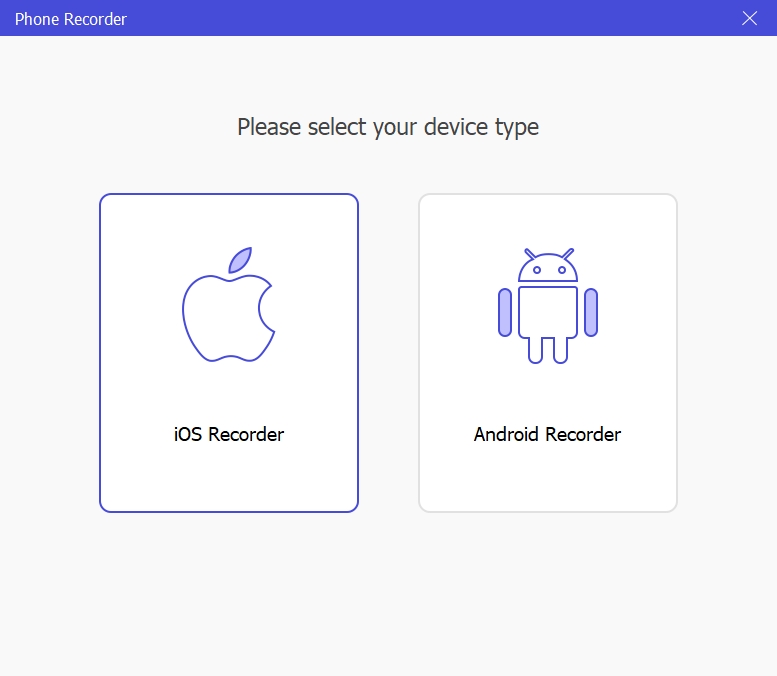
Step 2. Select iOS
Select iOS from the new page and connect your iPhone to the PC using its USB cable.
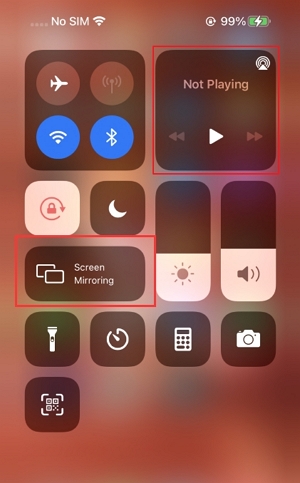
Step 3. Establish Connection
Select Screen Mirroring from the new screen. Open control center in your iOS device and tap Screen Mirroring, then select Eassy Ultimate Screen Recorder.
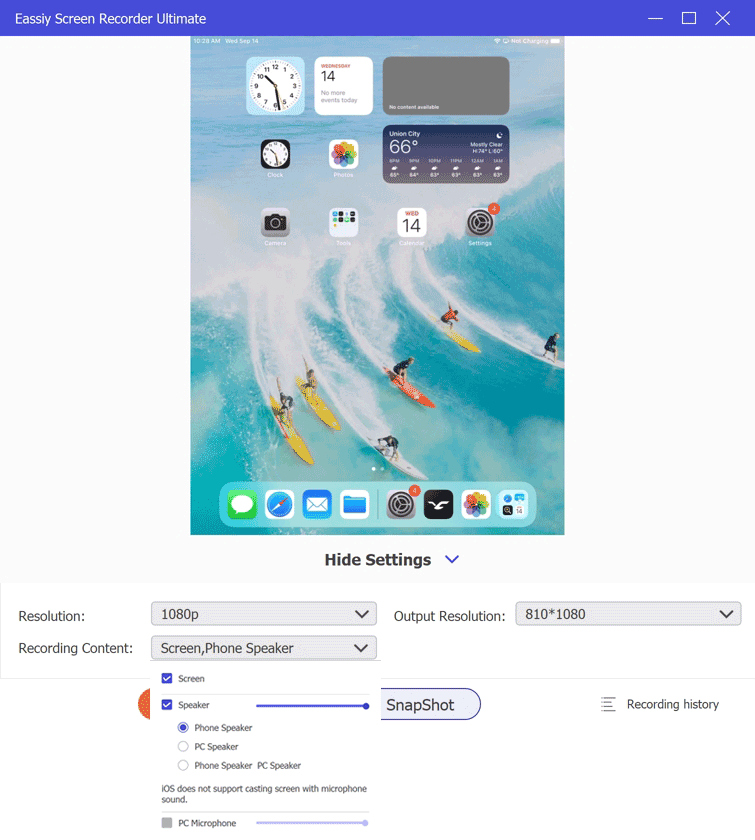
Eassiy will establish the connection with your iPhone and your device’s screen will appear on the computer. Next, click the drop-down next to Resolution and choose the resolution which you wish to record your iPhone screen.
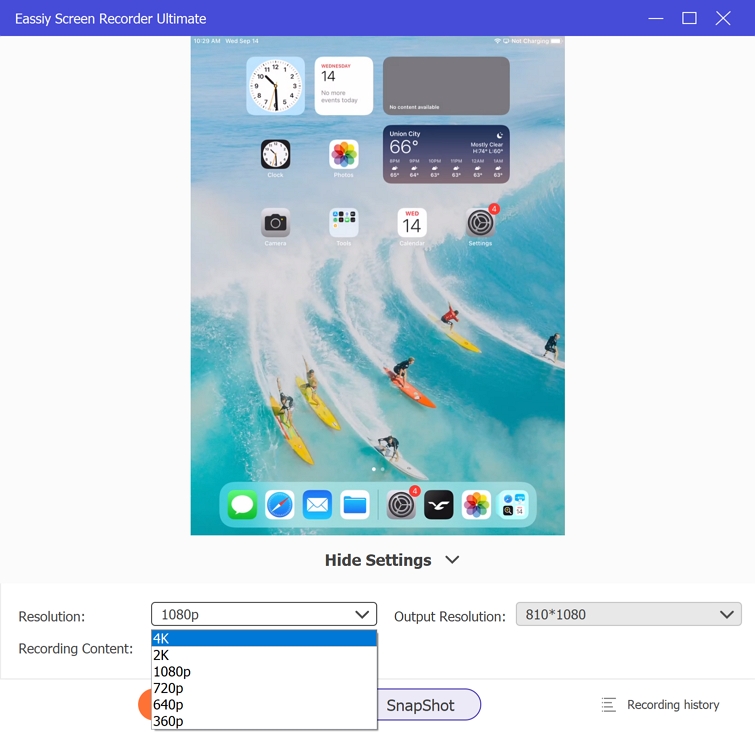
To be able to record iPhone screen with audio, click the drop-down icon next to Recording Content and select Phone Speaker.
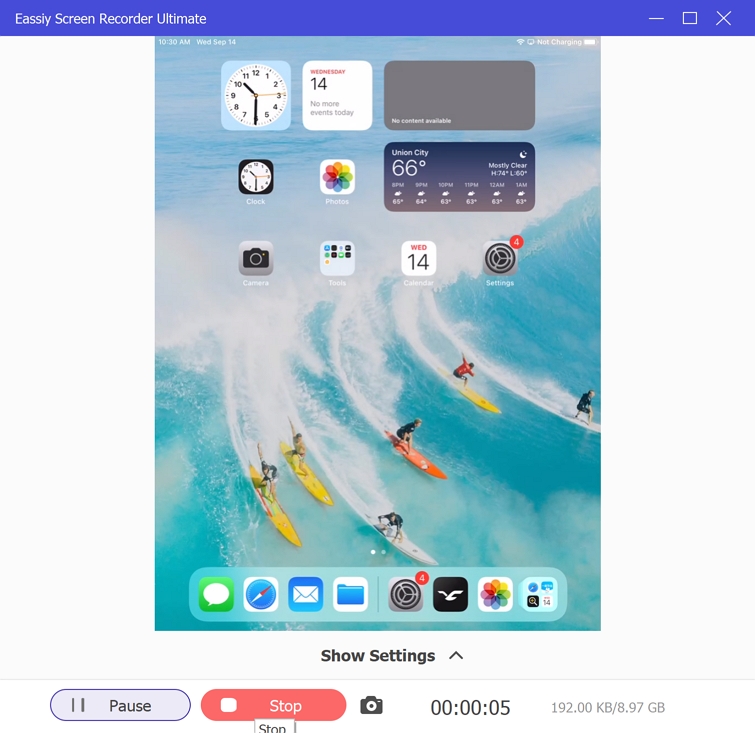
Step 4. Start Recording the iPhone screen.
Click the Start Record button to start recording every activity occurring on your iPhone screen with audio. The Camera icon can also come in handy to take real-time screenshots.
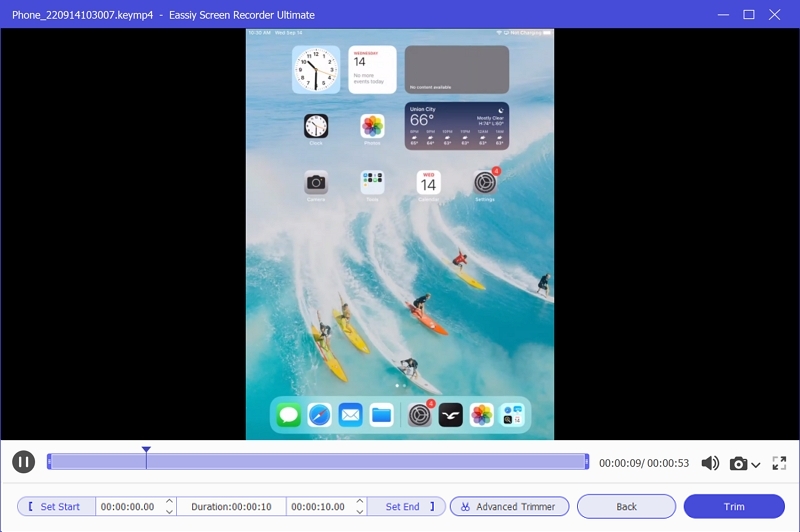
Step 5. Stop the recording.
End the screen recording operation when you’re done by clicking Stop. Then, in the new window, edit and trim your video to a preferred level. Afterward, click Done and Save the recorded video to your PC local storage.
FAQs
1. Can I Screen Record FaceTime With Sound on iPhone?
Yes. You can screen record FaceTime with audio on iPhone. Here’s how:
- Start the FaceTime call.
- Swipe up to access the Control Center.
- And Click on the Record button to start recording the FaceTime call with sound.
- To end, click on the timer on the top-left of the iPhone screen.
2. Can I Screen Record Netflix With Sound on iPhone?
Netflix comes with built-in DRM system to prevent recording. So you cannot use any of the above methods to record Netflix as the screen will go black once you start to record the Netflix screen using iPhone’s built-in Screen Recorder.
Be that as it may, you can mirror the iPhone screen and record Netflix via the Computer using Eassiy Screen Recorder. Retain that Eassiy records the iPhone screen via mirroring, so as far as Netflix technology is concerned, it will not block the screen mirroring, and you can record the screen without the screen going black.
3. Where does Screen Record Save on iPhone?
When you record the screen using the native screen recorder on your iPhone, it will save the recordings to the Photos app. Of course, it consumes a lot of space. That is why it is best to use Eassiy Screen Recorder Ultimate, as all the recordings will be saved to the computer.
In Conclusion
We have shared multiple answers on how to screen record with sound on iPhone. The first method, i.e., the native Screen Recorder is a decent function of the iOS app and given it allows you to include both internal and microphone sound in the screen recording, it should be sufficient for many of you. However, it takes up space.
On the other hand, Loom saves the screen recordings to the cloud storage. But it does not give any editing functionality on iOS. Plus, it is suitable for office-going professionals who have to communicate with teams and colleagues. So, if you are looking for a screen recorder for iPhone (with options to include internal/microphone sound), and editing tools, Eassiy is the ultimate tool for you. It saves the iOS screen recordings on the computer and comes with social sharing options.