





 Help Center
Updated on 2026-09-11
views
5min read
OBS is a very powerful tool, but it is also incredibly complex to set up. You can follow every tutorial, check every box, and still end up with desktop audio not working. This audio issue shows in many ways: sometimes the Desktop Audio level meter moves but the recording is silent, sometimes your mic works fine and sometimes OBS doesn’t register any audio devices at all.
So we have put together this guide that covers every scenario. Whatever your setup — Windows or Mac, wired headphones or a console capture card, this guide shows you exactly how to fix desktop audio not working in OBS.

Case 1. Desktop Audio Meter Moves, but No Sound in Recordings
This is one of the most common problems in OBS. The level meter next to Desktop Audio moves up from green to yellow and red, just as it should when a game or video is playing. But when you stop the recording and play the file, there will be no sound.
This usually means OBS is getting the audio signal, but it is not being saved in your output file. It often happens because of some misconfigurations. Here’s how to find out what’s causing this on Windows and macOS and how to fix them:
Fix 1. Check the Audio Monitoring Setting
Older OBS Studio versions have three options in the audio monitoring menu:
- Monitoring Off: OBS records the audio normally, but will not play it through your monitoring device.
- Monitoring only (Mute Output): OBS lets you hear the audio through your monitoring device, but will not send it to the stream or recording.
- Monitor and Output: OBS lets you hear the audio through your monitoring device and sends it to the stream or recording.
If you want your recording to actually contain audio, select either Monitoring Off or Monitor and Output. Here is how to check it:
- Click the gear icon in the Audio Mixer.
- This will open the Advanced Audio Properties menu.
- Go to the Audio Monitoring section and make sure it is set to Monitoring Off or Monitor and Output if you also want to hear the source through OBS.


Note: OBS Studio 32.1 changed how audio monitoring works. Recent versions only give you two choices:
- Monitoring Enabled
- Monitoring Off
Selecting either will allow you to record the audio regardless. It only makes the difference between whether you want to hear the output during the live session or not.

Fix 2. Check the Recording Track
OBS can record several audio tracks in one file. For example, desktop audio can be on Track 1 and your microphone on Track 2. This is helpful if you want to edit the recording in programs like Premiere, DaVinci Resolve, or Vegas Pro, since you can work with each audio source separately. However, most common media players, such as Windows Media Player or QuickTime, only play the default track, which is Track 1. They will skip anything on Track 2.
So, keep everything on Track 1. In the same Advanced Audio Properties window, look at the Tracks column and make sure Track 1 is checked for Desktop Audio and other audio channels you want to keep. Otherwise, most players will need extra setup to play all tracks.

Fix 3. Play Recordings with Another Media Player
If monitoring is off and Track 1 is checked, try opening the file in a different media player. If the recording was not silent, the problem was with your original player. Also, make sure your system volume is not muted.

Case 2. OBS Detects Mic but No Desktop Audio, or No Audio at All
When you speak into your microphone, the Mic/Aux meter moves as expected. However, the Desktop Audio meter does not respond. In some cases, neither meter shows any activity, which means OBS is not detecting any system sound at all.
Although this issue looks the same on both Windows and Mac, the causes and solutions are different. Begin by finding the section that matches your operating system.
On Windows
Fix 1. Unmute OBS in the Volume Mixer
You may have accidentally muted OBS in the Windows Volume Mixer and forgotten about it. If this happens, Windows will block OBS from playing sound. OBS’s own settings cannot change this.
To check:
- Go to Settings > System > Sound.
- Then, choose Volume Mixer. Find OBS in the app list and make sure it is not muted.

Fix 2. Select the Correct Audio Device
OBS needs to know where your computer’s audio is coming from, so it can capture it. If your computer is playing sound through the speakers but OBS has selected the wrong audio device, OBS won’t be able to detect the sound. As a result, even though your computer is playing audio, the Desktop Audio meter in OBS won’t show any activity.
- Right-click Desktop Audio in the Audio Mixer and select Properties.
- In the window that pops up, check the Device drop-down.

Make sure it is set to your computer’s default speakers — not something else. If OBS is pointed at the wrong hardware, the meter will look alive and OBS will never pick the system sound.

Fix 3. Add Audio Output Capture
If Desktop Audio still does not capture the correct device, you can add a dedicated source for it. Here’s how:
- Click the + button under Sources.
- Choose Audio Output Capture.
- Select the exact output device you want to record.
This will add it as a separate audio channel alongside your existing Desktop Audio source.
Important: Do not record the same device with both Desktop Audio and Audio Output Capture. This can cause duplicate audio or an echo.

Fix 4. Check Your System Audio Devices
If OBS does not record your mic or desktop audio, it may not detect your devices. The output device might be missing, disabled, or set incorrectly in your operating system. Check the following:
- Go to Settings.
- Choose System.
- Select Sound and confirm that your input and output devices are enabled. Make sure their volume levels are raised.

Fix 5. Check Your Antivirus
If none of the above fixes have worked, your antivirus or security software might be the culprit. Some security tools block OBS from accessing audio devices at the system level, which leaves the Desktop Audiometer flat even when everything else is configured correctly. So, here’s how to avoid this conflict:
- Temporarily disable your antivirus real-time protection.
- Open OBS and check whether Desktop Audio starts working.
- If the audio works with the antivirus disabled, turn the protection back on and add OBS to your antivirus allowed apps or exceptions list.
- Reopen OBS. The audio will work normally now without the security software interfering.
On Mac
Fix 1. Use macOS Audio Capture
Older macOS versions do not provide built-in system audio loopback the way Windows does. The microphone works because OBS can pull that input straight from the OS. System Audio, however, is blocked by default.
Note: If you are on macOS 13 Ventura or later with OBS Studio 30 or later, OBS provides a macOS Audio Capture source that can capture all desktop audio. So you don’t have to install a third-party loopback drive at all.

So, on older Mac setups, Desktop Audio will often appear flat and unresponsive. To resolve this, install a third-party audio routing tool like Soundflower or Loopback. These will create a virtual audio device that lets OBS tap into your system sound.

Fix 2. Check macOS Audio Permissions
macOS needs to grant OBS permission to capture system audio. For this:
- Click the Apple menu and choose System Settings.
- Select Privacy & Security.
- Then, choose Screen Recording and System Audio Recording. Make sure OBS is listed and toggled on. Without this, macOS will block desktop audio entirely while still allowing the microphone.

Case 3. OBS Desktop Audio Not Working with Headphones
When you connect headphones — wired or Bluetooth, OBS is supposed to treat them exactly like your regular system audio. Whatever you can hear should get picked up automatically. You hear your game or video playing normally, the level meter will move alongside it in OBS, and the finished recording will contain that same audio.
Sometimes, though, OBS does not detect your headphones. You can hear sound through your headphones, but the Desktop Audio meter in OBS does not move. This means OBS is not capturing any audio.
Here are the possible causes and how to fix them.
On Windows
Fix 1. Select Your Headphones in OBS
Often, OBS continues to use your previous output device. While switching from speakers to headphones is easy on your computer, OBS does not always follow that change. It keeps using the device it was set to before.
Here’s how to fix that:
- Go to OBS Settings.
- Open Audio.
- Find Desktop Audio.
- Select your headphones from the list instead of the default device.
If your headphones do not appear in the list, check your Windows sound settings first. The device needs to show up there before OBS can detect it.

Fix 2. Prevent Bluetooth Hands-Free Mode
Bluetooth headphones have two modes:
- One mode, called stereo mode, gives good sound but does not support the microphone.
- The other is hands-free mode, which lowers sound quality so you can use the headset’s built-in microphone for calls.
Whenever you use the built-in microphone, Windows switches from stereo to hands-free mode to support the microphone. This change lowers the audio quality. However, on some setups, this switch can also cause OBS to lose sound completely. Here’s how to stop that:
- Right-click the speaker icon in the taskbar.
- Open Sound settings.
- Click More sound settings.
- In the pop-up, switch to the Recording tab, right-click your Bluetooth headset microphone and select Disable.
You will need to use a separate microphone in OBS instead.

Fix 3. Turn Off Spatial Sound
Some headsets stop sending audio to OBS when Windows spatial sound is turned on for that device. Many Corsair Virtuoso headset users have reported this problem. Here is what to do to make sure OBS includes the sound from your headset:
- Go back to the Sound Settings menu.
- Select your headphones.
- Turn spatial audio off.

On Mac
Wired headphones rarely cause problems on a Mac. Most issues happen with Bluetooth headphones or AirPods.
Fix 1. Prevent Bluetooth Microphone Mode
Mac Bluetooth headphones have the same two-mode issue as before. When OBS or another app uses the microphone on your Bluetooth headphones, macOS switches the device to a lower-quality mode. This can cause the sound to cut out, just like on Windows.
macOS does not let you disable a Bluetooth device’s microphone directly as Windows does. However, you can stop macOS from using it:
- Go to System Settings. Then Sound.
- Under Input, select your Mac’s built-in microphone. You can also use another mic you actually use. Just avoid using your Bluetooth headphones.
- Quit any other app that might still be using your Bluetooth headset’s microphone, such as Discord.
- Go to OBS Settings and then Audio. Set Mic/Auxiliary Audio under Global Audio Devices to the same non-Bluetooth microphone, not the headphones.
As long as no app, including OBS, try to use your Bluetooth headphones’ microphone, OBS will not drop the connection. The level meter will move, showing the audio captured through your headset.

Fix 2. Check Your Loopback Device (If You’re Using One)
If you use BlackHole, Loopback, or another virtual audio driver to route Mac audio into OBS, your Bluetooth headphones may disappear from the multi-output setup or stop receiving audio. Here, you have to check both macOS and OBS.
Check the Multi-Output Device in Audio MIDI Setup
If you're using an older version of macOS with BlackHole, Loopback, or another virtual audio driver, check that your headphones are still included in the audio route:
- Open Audio MIDI Setup on your Mac.
- Select your Multi-Output Device from the list.
- Make sure both virtual audio device and Bluetooth headphones are still checked.
Also make sure the other output device you use for the audio route is still checked. If the headphones are missing, add them back to the Multi-Output Device.
Case 4. OBS Has No Sound from Capture Card
If you use a capture card to pull footage from your console or from a second PC onto your OBS setup, both video and audio should appear the moment you add the source. But sometimes video comes through the OBS preview perfectly, while the audio mixer will stay completely flat.
Here's what's usually going wrong.

Fix 1. Add an Audio Input Capture Source
First, check whether OBS can actually capture the audio from the capture card. Keep in mind that OBS often treats video and audio as two separate things once they reach your computer. Often, your capture card source might only be grabbing the picture. So you will need a second source pointed at the same card just for audio.
- Go to Sources and click the + button.
- Select Audio Input Capture.
- Give it a name.
- Under Device, pick your capture card. It will show up by name, like "Elgato Game Capture HD60 S+."


If your capture card doesn't appear in that device list at all, the problem is happening before OBS even gets involved. Move on to the other fixes below.

Fix 2. Make Audio Leave the Source Device
A capture card can receive the video signal while the console or PC sends its audio somewhere else. Here, you have to check the source you're capturing from.
Capture from a second PC:
First, check whether the capture card is receiving audio through HDMI:
- Open Windows Settings > System > Sound.
- Under Output, select the HDMI audio device connected to your capture card.
- Play some audio and check whether Windows shows activity on that HDMI output. If the HDMI device itself is disabled or isn't selected as the output, it means the capture card is receiving the video without the audio.
To fix this, use the 3.5 mm audio input on your capture card. For example, the Elgato Game Capture HD60 S+ has a 3.5 mm analog audio input. Connect the second PC’s audio output to it.

This will send the PC’s audio to the capture card, which OBS can then capture along with the video.

Capture from a PS5:
The PS5 will stop sending sound over HDMI the moment anything is plugged into the controller's headphone jack.
To fix and get the sound back in OBS preview, unplug the headphones from the controller, and the PS5 will send the audio through HDMI to the capture card again.

Capture from a Nintendo Switch:
Make sure the Switch isn’t set to Surround Sound.
- Open System Settings > TV Settings > TV Sound and select Stereo.

Fix 3. The Console Is Sending an Unsupported Audio Format
Capture cards typically only understand stereo PCM audio. If your console is sending a different format, like Dolby Digital Plus, the card cannot decode the audio signal. So the Capture Card will send the video to OBS, but no usable audio will reach OBS.
You’ll have to adjust this on your console and the change will reflect in OBS immediately. Here’s how:
- On PS5: Go to Settings, then Sound. Open Audio Output and set Audio Format (Priority) to Linear PCM.
- On Xbox: Go to Settings, then General. Open the Volume & Audio Output menu and set it to Stereo Uncompressed.


How to Record Screen with Audio Without OBS
OBS is not built for simplicity. It asks you to configure everything manually — audio devices, tracks, monitoring modes, and source hierarchies. One wrong checkbox and your entire recording will go silent. Plus, there are a lot of steps just to record a game or a tutorial. Many of you might not want to go through this hassle to record your game or screen.
Eassiy Screen Recorder Ultimate is designed exactly to solve this problem. It gives you the same screen recording controls, with multiple audio sources and advanced options, but makes the recording process simple and easy so that anybody can follow without problems.
There are also dedicated modes for different jobs: Game Recorder, Window Recorder, Audio Recorder, and advanced screen capture tools. When you are done, you can use the built-in tools in Eassiy to trim, merge, and manage your screen recording.
This makes Eassiy perfect whether you want to record a game, a tutorial, a meeting, or your entire screen. Every recording will come out with high-resolution footage and crisp audio. Plus, Eassiy supports your mobile, so you can mirror and record iPhone and Android screens on your computer with internal audio included.
Key Features:
- Export recordings in MP4, MOV, WMV, F4V, and more.
- Provide Noise cancellation and microphone enhancement features.
- Schedule recordings to start at a specific time, even when you are away from the keyboard.
- You can also draw annotations live on the screen.
- Advanced recording options like Follow Mouse, Around Mouse, etc.
- Set up hotkeys to manage screen recording with custom shortcuts.
How to Record Screen with Audio on Windows/Mac
Step 1. Launch Eassiy Screen Recorder Ultimate on your Windows PC or Mac.
Choose your mode and select the recorded section:
- Screen Recorder for full screen or a custom region.
- Game Recorder to lock onto a game.
- Mobile Recorder to mirror your phone and capture it.
- Window Recorder for a single application.
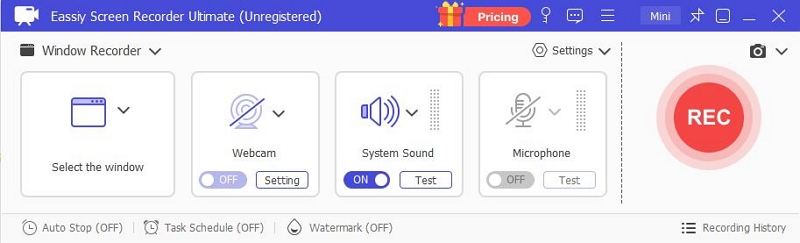
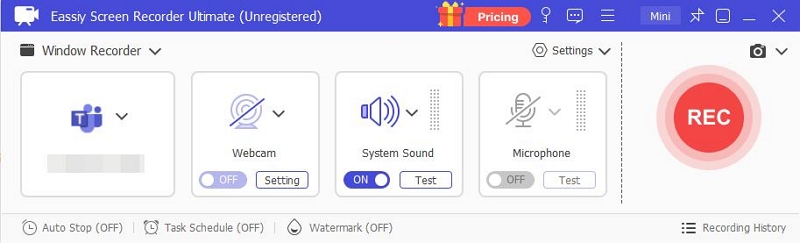
Step 2. Toggle System Sound to capture desktop audio. Use the drop-down arrow to choose your output device. You can use the Volume Mixer to adjust levels for individual apps. Toggle Microphone if you want voiceover.
Step 3. Click REC to start. You can use the annotation tools or pause button during capture if needed. Click Stop when finished.
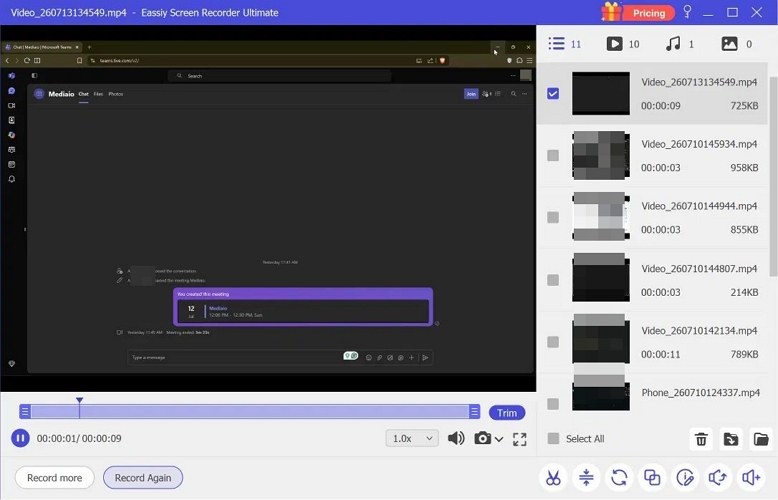
Step 4. The recording will open in the built-in editor. You can simply click Export to save the recording. Or you can use trim, cut the recording using the built-in editor.
Final Words
That brings us to the end of this guide. Whatever desktop audio problem you were facing in OBS, you now have fixed it for good.
But if you want a simpler, more professional tool that records without constant tweaking, go with Eassiy Screen Recorder Ultimate. It captures system sound, microphone, and individual app audio cleanly and delivers high-resolution screen recordings.