






 Help Center
Updated on 2026-07-31
views
5min read
Every gamer has a moment worth saving. The clutch headshot, the last-second comeback or the level that took twenty tries. But Windows doesn't make it obvious how to hold onto these gameplay moments.
That's what this guide is for. We'll show you how to record gameplay on PC. You'll find six solid options, from the built-in Xbox Game Bar to dedicated screen recorders like Eassiy. Each one serves a different need — some are built for recording small clips, while others let you capture full gameplay with webcam and commentary. So you can find the recording tool that fits how you play.
Best Ways to Record Gameplay on Windows PC
The “best recording tool” really comes down to your setup and what you're trying to capture. For instance, your computer specs, the type of content you want, how long you plan to record, and where you want the files to land, all of this changes the answer. Below is a side-by-side look at all six methods.
🖐Swipe right on the table to view the full content.
| Way | System Requirements | Record Content | Record Duration | Output Format & Quality | Output Location |
|---|---|---|---|---|---|
| Eassiy | Windows 7- 11. Minimal CPU/GPU impact. | Game screen + audio. 20+ recording modes, including phone screen. |
Unlimited, until you stop it. Scheduled recording available. |
MP4, MOV, MKV — Customizable resolution and frame rate. | Any folder you choose. |
| Discord | Nitro membership. RTX 2000-series+ or RX 5700-series+ recommended. | Game clip plus voice channel audio. | Fixed clips only — 30s, 60s, or 2 min. | MP4. 720p/30fps free, 1080p/60fps with Nitro. Cloud-compressed. | Cloud storage first. Download to any local folder. |
| Xbox Game Bar | Built into Windows 10/11, no extra install. | Game video, plus game, system, or mic audio. | Up to 4 hours continuous. Background clips up to 10 minutes. | MP4 only, tied to your in-game display settings. | Videos > Captures. Path customizable in Settings. |
| Steam | Steam client installed. CPU-heavy games like Counter-Strike 2 may take a hit. |
Game video, game audio, microphone, selected apps (Discord), system audio. | Background up to your set limit (e.g., 5 hrs/25GB). On-demand unlimited. |
MP4, capped at 1080p. | Steam Recordings (you can export manually to computer). |
| OBS | Windows. Moderately resource-intensive. |
Any source you set up, like screen, game, webcam, multi-source audio. | Limited only by your disk space. | MP4 or MKV, fully customizable. | Any folder you choose. |
| Recording Mods | Available only in supported games (for example, Minecraft with Fabric/Forge). | Depends on the mod — replay data only, or full video and audio. | Unlimited | Varies. Some need a render step, some export directly. | Varies by game. Usually you’ll have to export manually. |
- Choose Eassiy Screen Recorder if you want full control — webcam, multi-source audio, and post-recording trims without switching apps.
- If you wantzero setup and just need a quick clip, Xbox Game Bar is recommended, which is already on your PC. Press Windows + G and go.
- For a serious streaming setup, OBS still wins.
- If you wantcinematic camera angles, use the recording mods available in selected titles. For instance, Minecraft has ReplayMod. It lets you capture the entire world and render the perfect shot.
How to Record Gameplay on PC (Windows 11 or Earlier)
The table above gave you the overview. Here's a detailed look at all six, along with the steps to set each one up. You can jump straight to whichever method fits what you need.
Way 1. Use Eassiy Screen Recorder Ultimate
Eassiy Screen Recorder Ultimate stands first in the list for two primary reasons.
First, it works smoothly with almost any game you want to record. This is because Eassiy is optimized to use very few system resources. So it will run well alongside resource-heavy titles like Cyberpunk 2077, Elden Ring, or Counter-Strike 2.
Second, it also gives you complete control over your recording setup. Its dedicated Game Recorder locks onto your game window and records that alone. You can also add your webcam and pull in audio from multiple sources. You can also adjust each audio level independently, like keeping Discord chat loud, game audio low, and your microphone clear, all from the same panel.
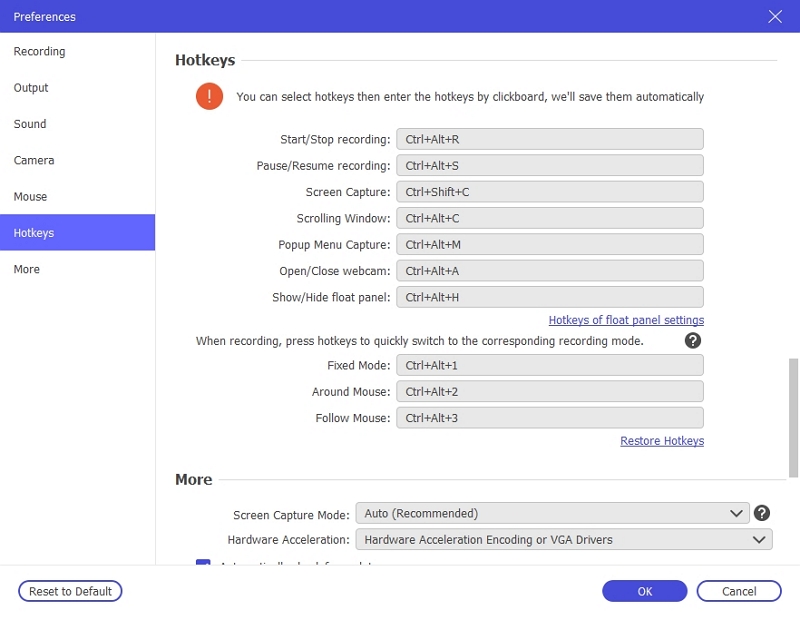
Eassiy also lets you use personalized hotkeys. So you can start, pause, or stop recording without leaving your game. You can even snap a screenshot mid-session or switch recording modes like Follow Mouse or Around Mouse on the fly.
Beyond that, Eassiy also features scheduled recordings, real-time annotation tools, and built-in video editing tools.
Key Features:
- 20+ recording modes to adapt to whatever gameplay you are capturing.
- Records mobile gameplay too, on both Android and iOS.
- Multiple export formats — MP4, MOV, MKV, and more.
- Flexible resolution and quality settings for any need.
Steps to Record Gameplay with Webcam and Audio
Step 1. Install Eassiy Screen Recorder Ultimate on your computer.
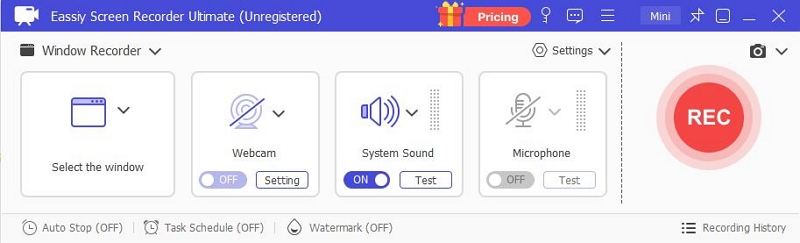
Step 2. Open the main interface. Select Game Recorder from the drop-down.
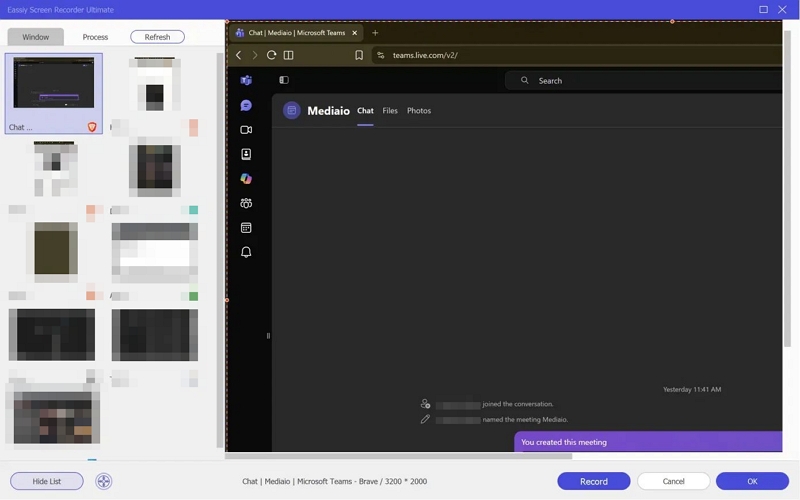
Choose the game window you want to capture.
Step 3. Turn on Webcam, System Sound, and Microphone as needed. Expand the System Sound toggle to adjust levels, such as keeping Discord up while turning down game sound.
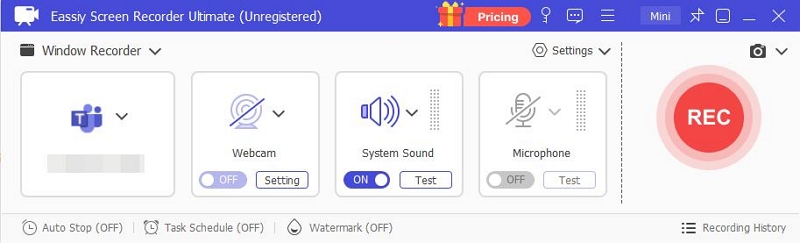
Step 4. Click the red REC button to start.
Step 5. A floating control bar will appear. You can even minimize it to a small circle so it does not distract you during gameplay. Or expand it anytime to access the pause button, annotation tools, or take a screenshot.
Tip: You can customize all hotkeys under Preferences > Hotkeys. Here, you can set your own shortcuts for start/stop, pause, screenshots, and more.
Step 6. When you are done, click Stop.
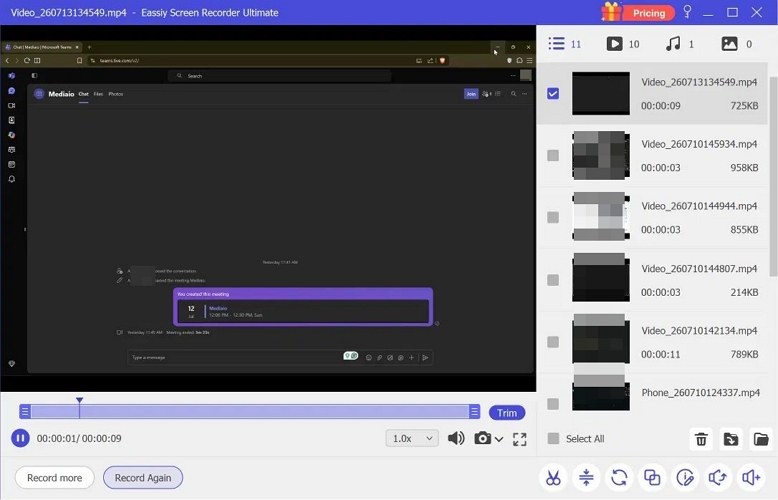
The recording will open automatically in the preview window. Here, you can trim it, export it directly, and do more.
Way 2. Record Gameplay with Discord
Discord recently brought a Clips feature to Windows users. Right now, it's limited to Nitro members only.
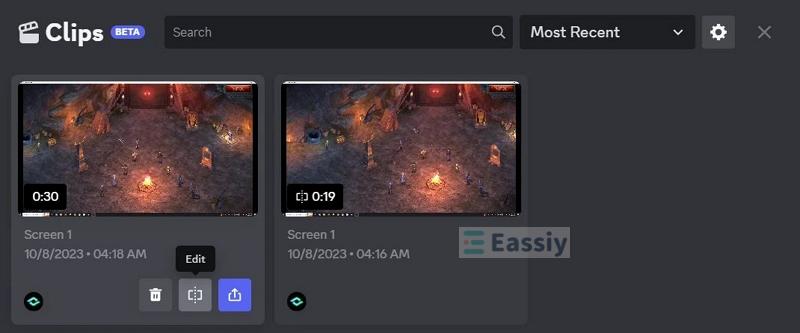
Unlike Eassiy Screen Recorder Ultimate, Clips isn't a full gameplay recorder. It only lets you capture game clips of supported games between 30 seconds and 2 minutes while streaming your game through Discord’s Go Live feature. It can also pick up audio from your voice channel and capture everyone's voice in the video. After recording, it saves all the recordings on your PC’s storage.
Keep in mind, Clips is still an experimental feature for PC users. So occasional bugs are common. Plus, it isn't the best fit for lower-end PCs.
Steps to Use Discord Clips to Record Gameplay
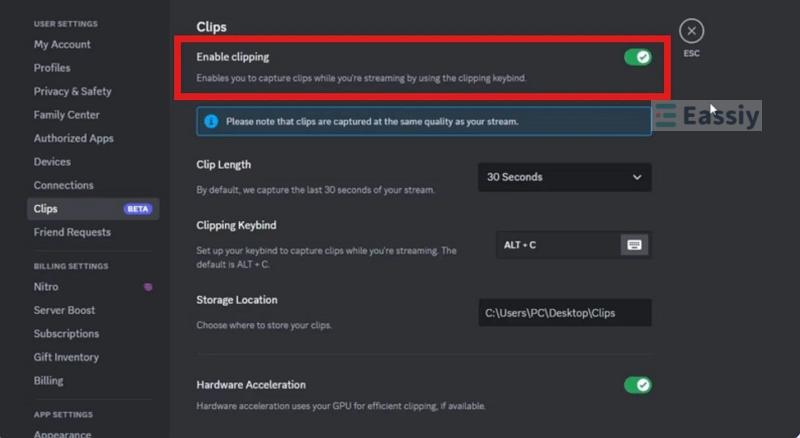
Step 1. Open Discord's User Settings. Go to Clips. Enable clipping if it isn't already on.
Note: This feature will only be available if you meet the minimum requirements: Nvidia GTX 980s/1600s, all Nvidia RTX models, or AMD Radeon RX 500. Also, many users say their game starts lagging right after turning this feature on. If that happens, it’s best to turn it off.
Step 2. Join a voice channel while you're playing your game. Click the Share Your Screen icon above your voice controls.
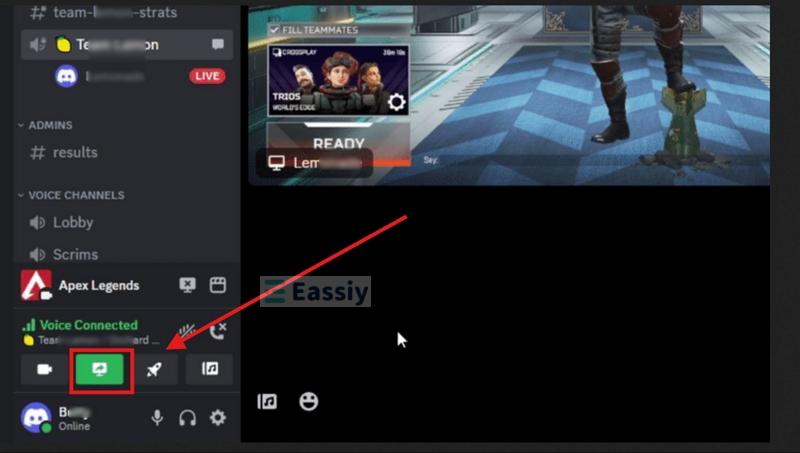
Note: Don't switch to the Screens tab, or Discord won't capture your audio.
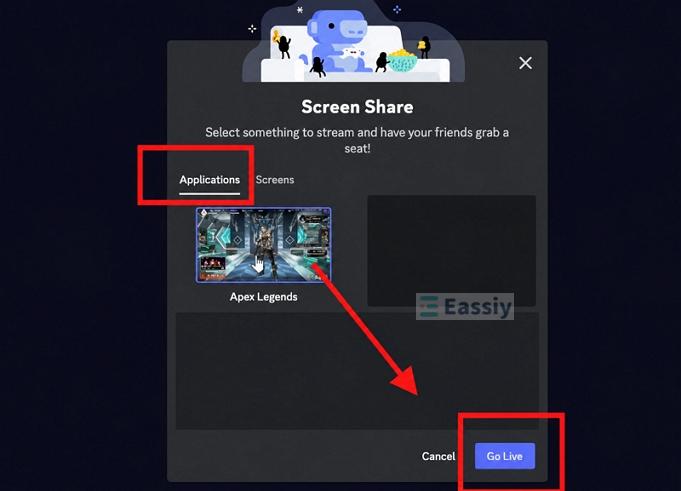
Then in the Screen Share window, select the Applications tab. Choose your game from the list.
Note: Discord will not recognize the game if it isn’t listed in its database or your privacy settings aren't tweaked correctly.
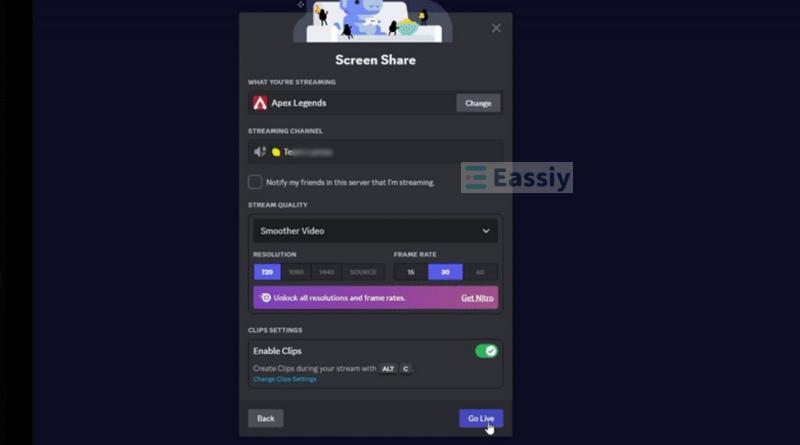
Step 3. Click Go Live.
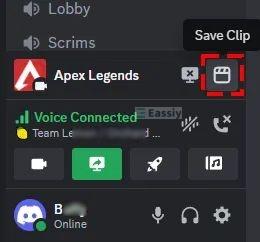
Step 4. Whenever you want to capture a clip, press your clipping keybind (Alt+C). Or you can click the Save Clip button manually.
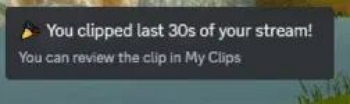
You'll get a notification confirming the clip was recorded.
You can find the clip via the default folder. Discord also lets you edit the clip and share it in your Discord channel itself.
Way 3. Record Gameplay via Xbox App
Xbox Game Bar is the default recording option on Windows 10 and 11. It lets you capture game recordings and capture screenshots as well. And unlike Discord clips, it can also handle full-length recordings. Needless to say, it’s mostly suitable if you play inside the Xbox ecosystem.
The recent AI-powered Game Assist widget is the standout addition. It surfaces guides, recommends strategies, and answers questions without you ever alt-tabbing out.
That said, Game Bar is not built for professional content creation. You will not find webcam overlays, multiple audio sources, or advanced editing tools. For that, you still need a dedicated screen recorder.
Steps to Record Gameplay with Xbox Game Bar
Step 1. Open the game you want to record. Start playing.
Step 2. Press Windows + G. The Game Bar overlay will appear.
Note: If nothing shows up: go to Settings > Gaming > Xbox Game Bar and toggle it on.
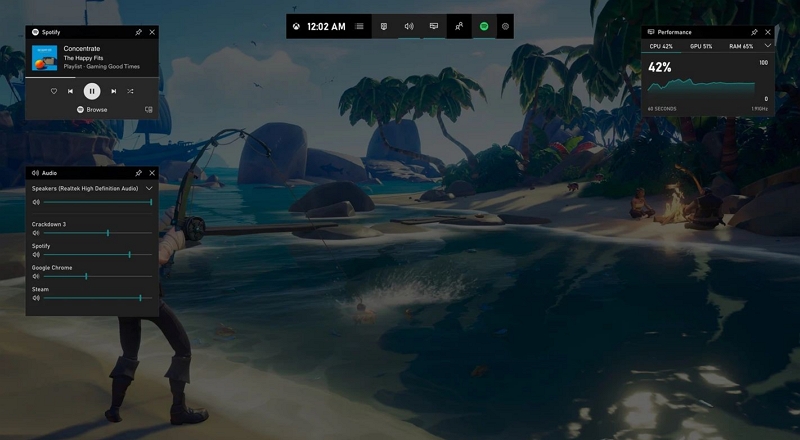
Step 3. Open the Audio widget. Here you choose what to record — game audio only, full system audio, or your microphone.
Step 4. Click the Record button. Or press Windows + Alt + R to start recording instantly.
Tip: Even when you are not actively recording, press Windows + Alt + G to save the last 30 seconds as a clip.
Step 5. Press Windows + Alt + R again to stop. Or click Stop Recording in the widget.
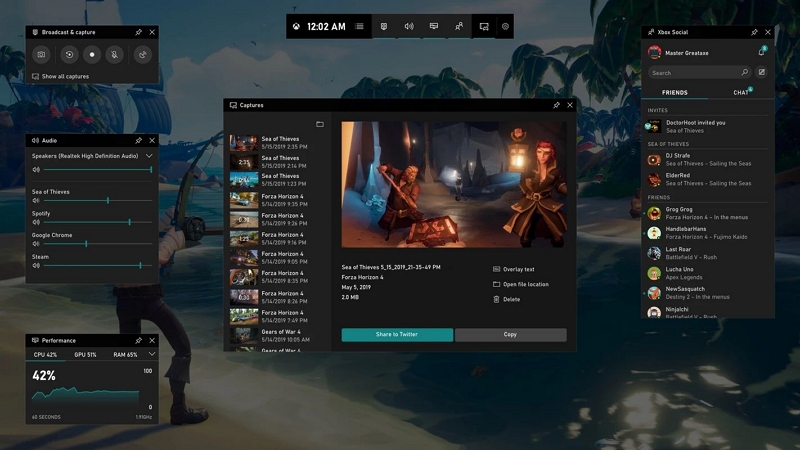
Step 6. Click See My Captures to view your recording right away. The file is also saved in Videos > Captures as an MP4.
Way 4. Use Steam to Record Gameplay
Steam's built-in recorder works for both Steam and non-Steam games. It offers two recording modes for different needs: Record in Background and Record on Demand.
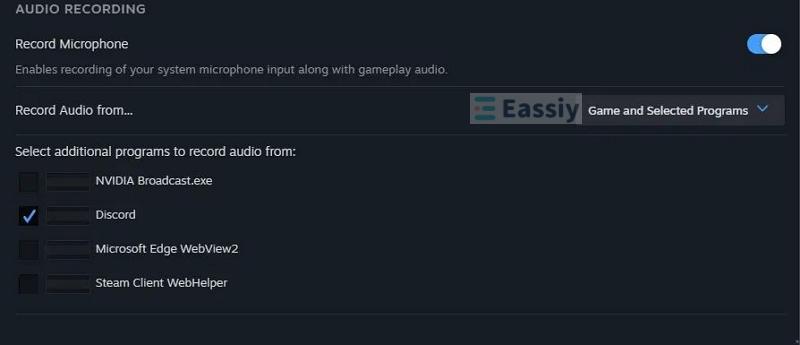
Steam can also pick up more than just game audio. It keeps a dedicated option to capture Discord audio or all sounds playing on the computer. Once the recording is done, it will also let you trim the clip and export it as an MP4.
It's not perfect, though. Steam caps recordings at 1080p. It does not support webcam overlays. You cannot share clips longer than one minute through Steam chat. And resource-heavy games like Counter-Strike 2 will be affected by this feature running in the background. Still, any performance hit is not visible while playing normal games.
Steps to Record Gameplay with Steam
Step 1. Make sure Steam is updated to the latest version. Open the program. Click Steam in the top-left, then select Settings.
Step 2. Open Game Recording from the left sidebar. Under Recording Mode, choose either Record in Background or Record on Demand.
- Record in Background: This will keep a rolling buffer of your gameplay. You can set a cap, say 25 GB or five hours, and Steam will record continuously and keep up to your set storage limit. This is perfect for catching highlights you did not plan for.
- Record on Demand: Steam will only record when you press the shortcut. This mode is better for planned content like YouTube videos or walkthroughs.
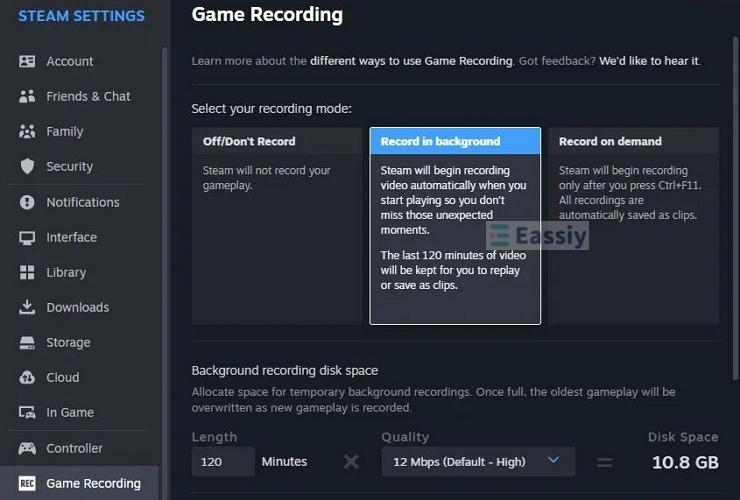
Step 3. Set your background recording length, storage cap, and quality. You can also change the raw recordings folder location here.
Step 4. Scroll down to Audio Recording. Choose whether Steam records only game audio or Game and Selected Programs to include Discord and other apps.
Step 5. Start your game.
- If you chose Record in Background, Steam begins automatically as soon as the game launches.
- If you chose Record on Demand, press Ctrl + F11 to start recording. You can customize this shortcut in the same Game Recording settings.
Note: Steam will only record the game window. It doesn’t give you the option not your desktop or unrelated apps. For non-Steam games, add them to your Steam library first and also make sure the Steam Overlay is enabled.
Step 6. While playing or after finishing, press Shift + Tab to open the Steam Overlay. At the top, you will see the Game Recording Timeline. Scrub through the event markers to find the moment you want.
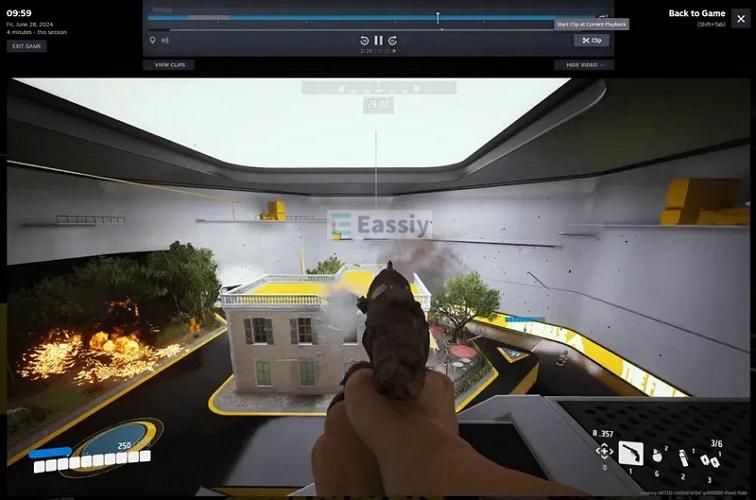
Step 7. Click Clip.
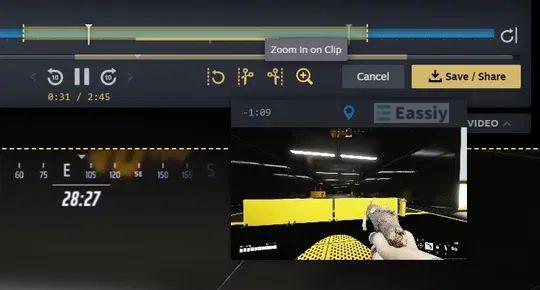
Drag the yellow start and end handles to trim the section. Preview it, then click Save / Share.
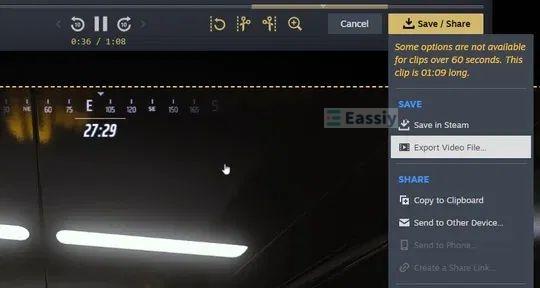
From here you can:
- Save in Steam to view later under Recordings and Screenshots.
- Export Video File to save as MP4 on your computer.
- Copy to Clipboard or Create a Share Link.
Way 5. Screen Record Game with OBS
OBS Studio is pretty much synonymous with game streaming. But now it is optimized just for game recording as well.
Like Eassiy Screen Recorder Ultimate, OBS is known for its granular control. However, its interface is more complex and takes time to learn. Still, OBS gives you complete control over how your gameplay is recorded. You can optimize it for simple screen recording with audio capture and webcam overlay, and pull in other screens alongside your game. It also comes with an advanced audio mixer. So you can capture audio from different sources: the game, Discord, and any other channel.
And if you want to stream your games live, OBS really stands out. It lets you broadcast your game live to Twitch, YouTube, and Facebook Live.
Steps to Record Gameplay with OBS Studio
Step 1. Install OBS Studio from the official website. Run the installer and follow the prompts for Windows.
Step 2. Open OBS. Under Scenes, click the + button. Name your scene, for example, Game Recording.
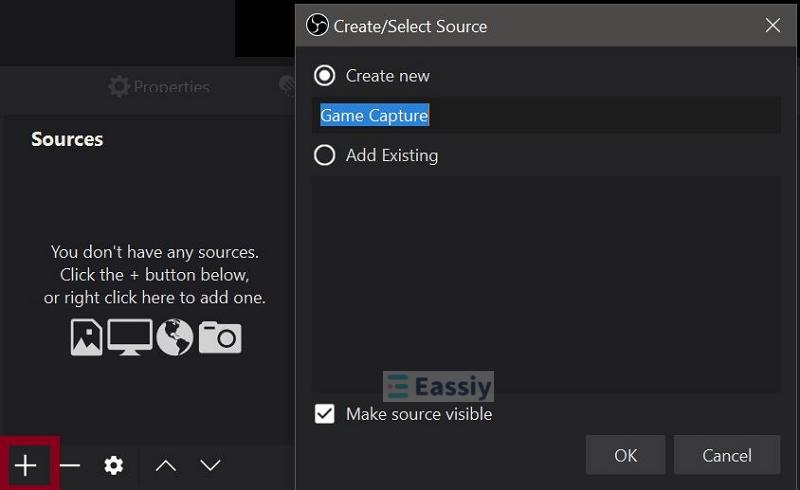
Step 3. Under Sources, click the + button. Choose Game Capture to record your game. Or pick Display Capture if you want the entire screen. Add Video Capture Device if you want your webcam in the corner. You can also add other sources like text, banners, overlays, etc.
Step 4. Click Settings. Then go to Output, set your Recording Path, pick the file format — MP4 or MKV and choose your encoder. MKV is safer if OBS crashes, since it won't corrupt the file.
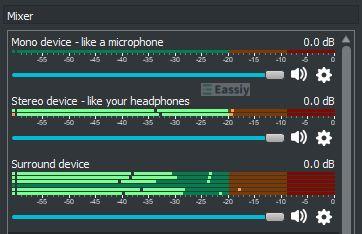
Step 5. Go to Audio Mixer. Turn on the Audio inputs you want to capture and adjust their levels. For instance, you can route your microphone, Discord, or other apps.
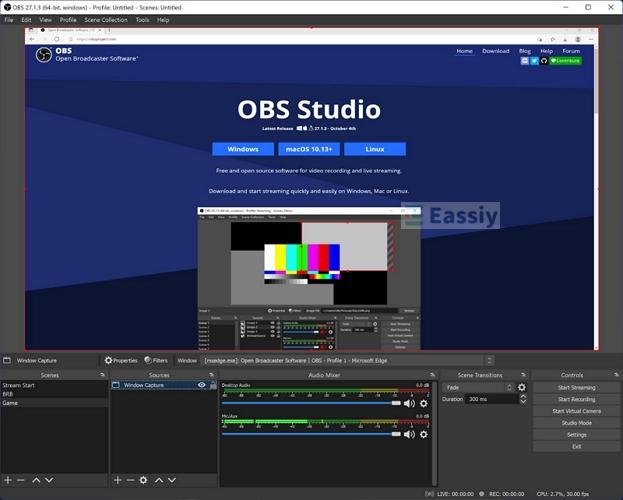
Step 6. Back in the main window, click Start Recording. Play your game. When you are done, click Stop Recording. Your file saves to the path you set.
Way 6. Capture Gameplay Through Recording Mods
Some games, like Minecraft, GTA V, and Garry’s Mod, come with dedicated recording mods or replay tools built specifically for them. Unlike the tools above, these mods only work inside the one game they're made for. In exchange, they can record the game in a way a general screen recorder can't.
Minecraft is the best example. It features many recording mods built for different tasks. Some, like record-able, work like a traditional recorder built right into the game — press a button, and you will get an MP4 file on your computer. Others, like ReplayMod, are designed to capture everything that happens in your world as you play. Then, it lets you reopen the session later, fly the camera around, and export cinematic shots from angles you never actually played from. You can read more about Minecraft recording mods here.
Final Words
We have seen six options for capturing your gameplay on Windows. Each one serves a different need. Some are suitable for quick clips and others are for full professional setups. You can pick the one that matches your workflow.
Eassiy Screen Recorder Ultimate definitely stands out for its flexibility. Whether you want to record a small clip or a long recording, it uses very little of your system resources while giving you advanced recording controls, such as webcam overlay, annotation tools, multi-source audio, and built-in editing tools.