
Updated on 2026-06-23
views
5min read
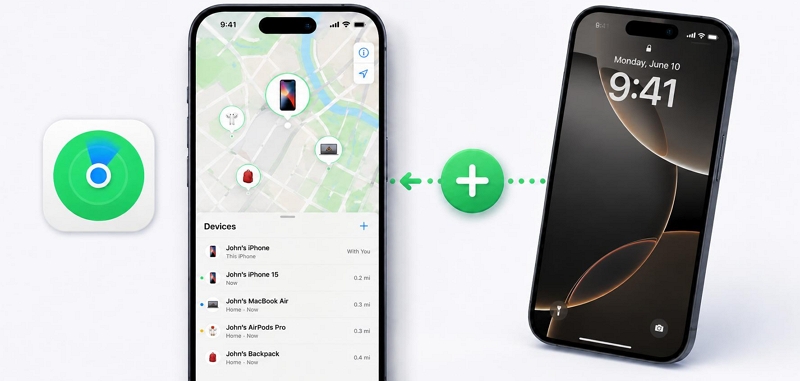
Find My is one of those features you don't think about much until you actually need it. When you want to track more than one iPhone, whether that's a second device of your own, a family member's phone, or a friend's, Find My is the best feature for this. It’s best that you know exactly how to add another iPhone on Find My iPhone before the need arises. This guide will show you three ways to do it, each suited to a different situation. You’ll also see what to do if Find My disappeared from your iPhone after a repair.
Overview of Ways to Add Another iPhone on Find My iPhone
So, there are three native iPhone ways to add another iPhone to Find My. The right one depends on whose phone it is and how long you need to track it. Here's a quick breakdown before diving into the steps:
| Method | Best For | Apple ID Required? | Permanent or Temporary? |
|---|---|---|---|
| Sign in with Same Apple ID | Tracking your own second iPhone, such as a spare device or work phone. | Yes, the same Apple ID on both iPhones | Permanent (while signed in) |
| Family Sharing | Locating a family member's iPhone. An example could be your child, spouse, or elderly parent. | Yes, you’ll need separate Apple IDs | Permanent (while in Family group) |
| Share Location in Find My App | Tracking a friend's location. For instance, during a trip or meetup. | Yes, separate Apple IDs will suffice. | Temporary or indefinite, it depends on the user's choice |
How to Add Another iPhone on Find My iPhone
Each method below walks you through the simple steps for adding another iPhone on Find My and what to expect along the way. So start with a method from the overview above that fits your situation.
Add Another iPhone on Find My iPhone with Same Apple ID
If you own the second iPhone, perhaps it’s a spare phone, a work device, or an old iPhone you still occasionally use, then the simplest approach to take is to sign in with your Apple ID on it and then enable Find My in its Settings. Both iPhones will then appear under the same Apple ID in Find My.
Do this on the second iPhone:
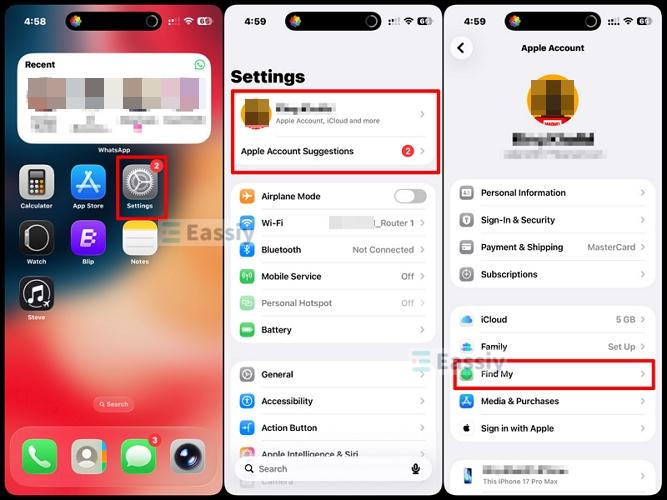
- Open Settings and choose Sign in to your iPhone (if not already signed in), then enter your Apple ID and password.
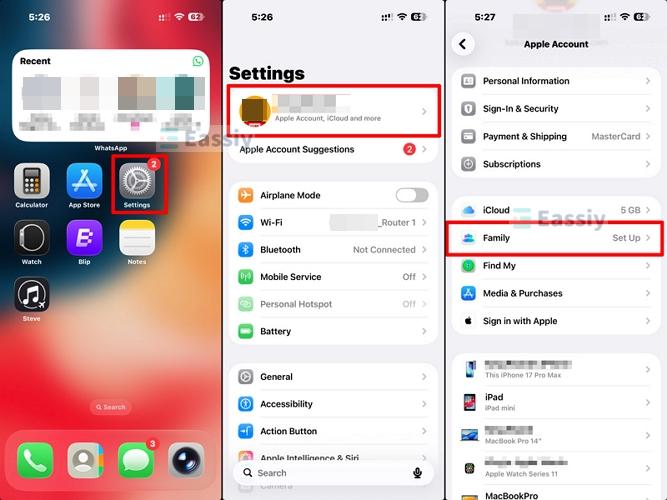
- Go to Settings > tap your Apple ID name > choose Find My.
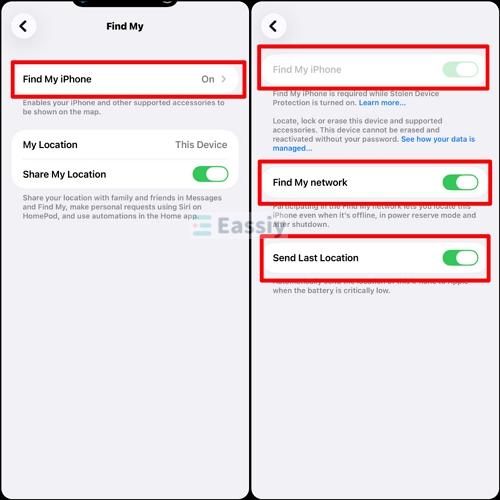
- Tap Find My iPhone and toggle it On. Also, enable Find My network and Send Last Location since you’re already here.
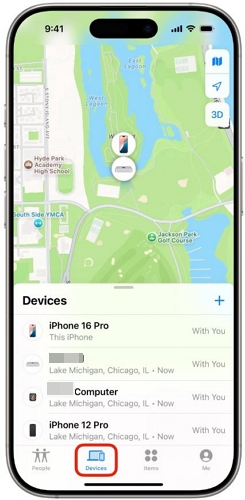
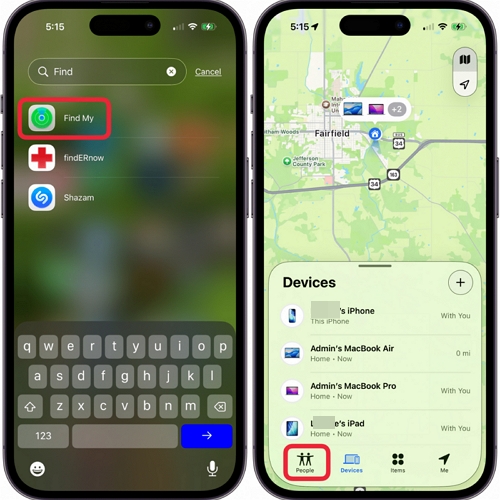
- Open the Find My app on your main iPhone. Both devices will now appear under the Devices tab.
Note: This method gives you full device tracking and not just location. You can play a sound, enable Lost Mode, and remotely erase the second iPhone from your primary device if needed.
Add Another iPhone on Find My iPhone with Different Apple ID
When the second iPhone belongs to someone else, like a family member or a friend, you can't sign in with your Apple ID on their device because it would sync your personal photos, messages, and contacts to their phone. Their phone would also start backing up to your iCloud.
Instead, there are two options you can try: Family Sharing for long-term tracking of a family member's device, or the Share Location feature in the Find My app for a more flexible, consent-based approach.
Option 1. Use Family Sharing
With Family Sharing, up to six people can pool their Apple IDs into one group and every device in that group shows up in Find My. For parents keeping tabs on a child's iPhone, or households that simply want to know where everyone is at any given time, it's hard to beat for sheer convenience. The person setting it up is called the family organizer and their location is shared automatically once the group is created while other members can then choose whether to share theirs.
How to Add a Second iPhone to Find My iPhone:
On the organizer's iPhone:
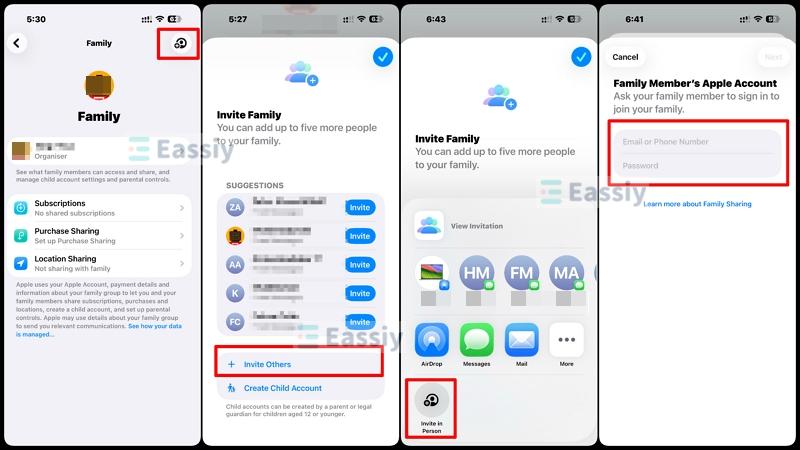
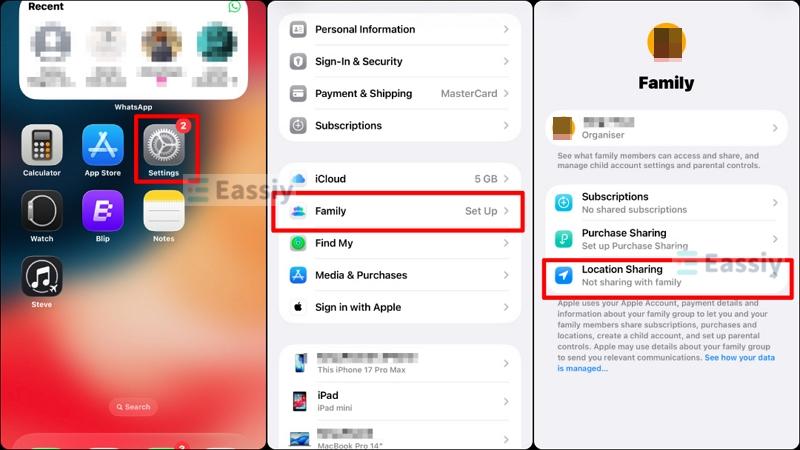
- Go to Settings > tap your Apple ID name > select Family.
- Tap the person + icon at the top right of your screen, then choose +Invite Others. Select Invite in Person if the family member is with you, then hand them your iPhone and have them enter their own Apple ID and password to join immediately. An invitation will be sent to their iPhone.
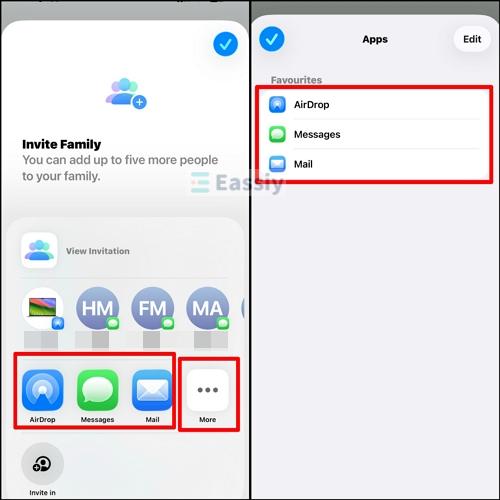
- Alternatively, you can invite remotely via AirDrop, Messages, or Mail, where an invitation will be sent to their iPhone. And for more sharing options, tap the More button to see additional apps.
- Once they accept, open Settings > Family > Location Sharing and toggle on sharing for that family member.
On the invited member's iPhone:
- Accept the Family Sharing invitation in the notification, under Settings > Their name > Invitations, or via Messages if that’s how you sent the invite.
- Go to their Settings > Their Name > Find My and ensure both Find My iPhone and Share My Location are toggled on.
- Next, open their Find My app, go to the People tab, tap [Your Name], and select Share My Location.
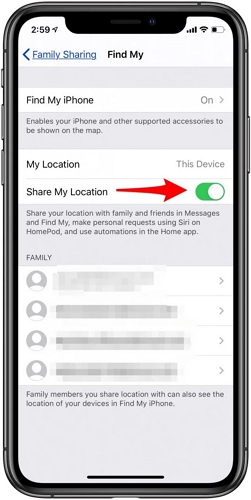
Each family member controls whether they share their own location. Their iPhone will appear under your Devices tab automatically once they join the Family group, but their location pin only shows up under People after they've chosen to share their location with you.
Option 2. Share Location in Find My App
No Family Sharing setup needed here. This works with pretty much anyone. A friend, a colleague, a family member who isn't in your Family group, is all fair game, as long as they have an iPhone. Both devices stay on their own Apple IDs throughout. The person sharing their location opens Find My, chooses how long they want to share for, and sends the request. The other person gets a notification and can either accept or ignore it.
How to Add Someone Else's iPhone to Find My iPhone:
On the iPhone whose location you want to share (the other person's phone):
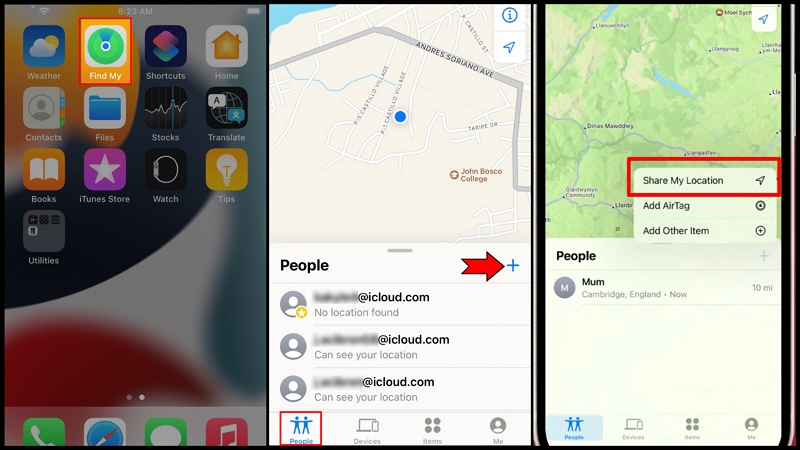
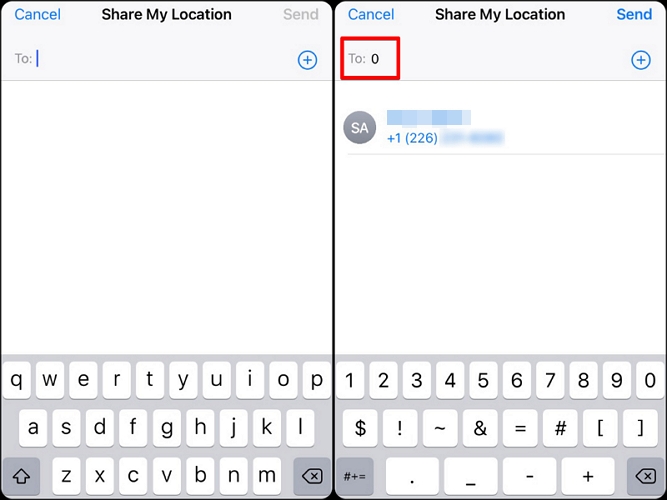
- Open the Find My app, select the People tab at the bottom, and tap the + icon. Select Share My Location.
- In the To field, type your Apple ID or search for your name in the person’s contacts card (this sends the location request to your iPhone).
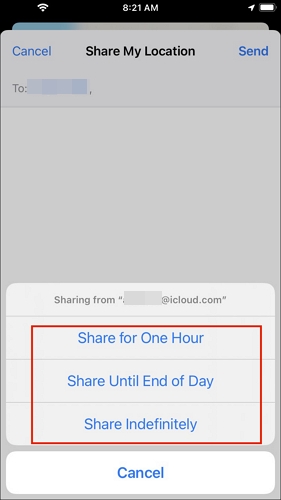
- Select how long to share: For One Hour, Until End of Day, or Share Indefinitely. Hit Send.
On your iPhone:
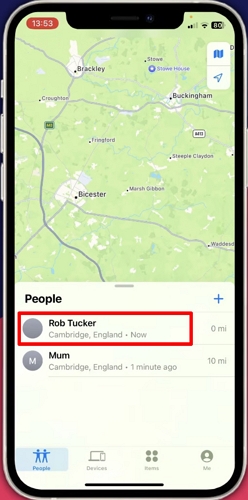
- Accept the location sharing request when it arrives. Their iPhone will now appear under the People tab in your Find My app.
- To see their location on a map, open Find My > People > tap their name.
After you accept their location share, Find My may give you the option to share your location back, but this is optional. You can decline if you'd rather they not see where you are.
FAQ: How to Add iPhone Back to Find My iPhone After Repair
Apple requires Find My to be turned off before any authorized repair, as a security measure to verify device ownership. But after the repair is done, Find My won’t turn itself back on automatically. You have to do it manually. In most cases, a simple restart does it. But if Stolen Device Protection was active before the repair, there's an extra step involved.
Way 1. Restart iPhone
Before changing any settings, try a restart first. Repairs sometimes leave the iPhone in a state where Settings hasn't fully refreshed. A restart clears that and often makes Find My appear exactly where it was.
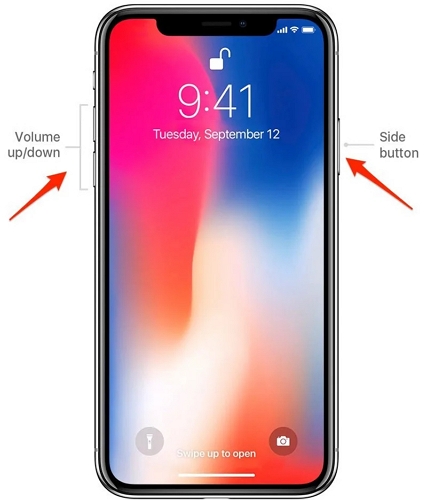
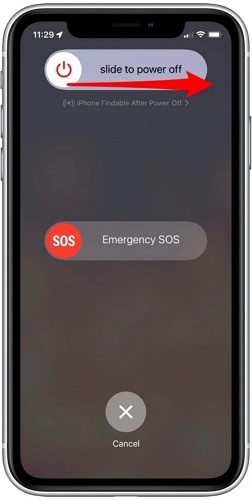
- Press and hold the Side Button and either Volume button until the power slider appears.
- Drag the slider to turn the iPhone off, then wait 30 seconds.
- Hold the Side Button again until the Apple logo appears to turn it back on.
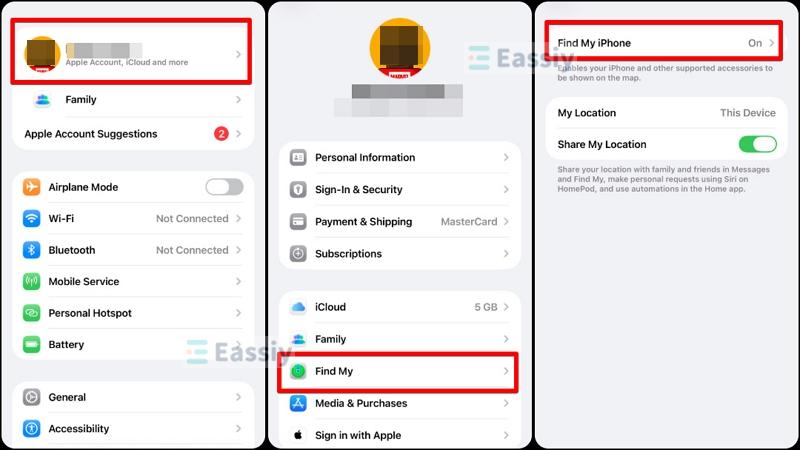
- Once restarted, go to Settings > tap your Apple ID name > Find My > Find My iPhone and toggle it back on.

If Find My was already showing as on, but your iPhone still wasn't appearing in Find My on another device, toggle it off and back on as this re-registers the device with Apple's servers.
Way 2. Re-enable Both Stolen Device Protection and Find My iPhone
Here's something that catches a lot of people off guard: after a repair, Find My sometimes can't be turned back on at all. Meanwhile, the toggle is just grey and unresponsive. Stolen Device Protection is almost always the culprit. These two features depend on each other to work. The way around it is to turn off Stolen Device Protection first, restore Find My, then switch the protection back on once that's sorted.
Note: If you’re away from home or work, Stolen Device Protection can add up to a one-hour delay before sensitive settings changes go through. If that timer kicks in, just sit tight until it clears before moving on.
- Go to Settings > Face ID & Passcode (or Touch ID & Passcode on older models). Enter your passcode.
- Scroll down, tap Stolen Device Protection and switch it off. Confirm with Face ID or Touch ID when prompted.
- Now go to Settings. Tap your Apple ID name > Find My > Find My iPhone. Then toggle Find My iPhone Off.
- Head back to Face ID & Passcode > Stolen Device Protection and turn it back on, followed by enabling Find My iPhone again.
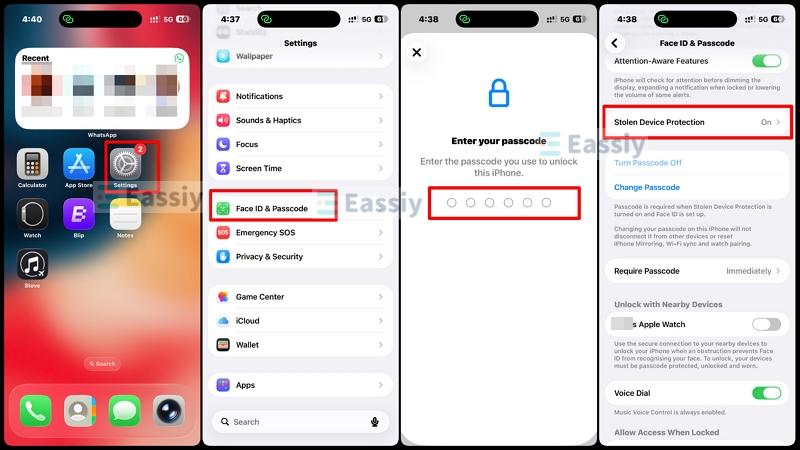
Getting Stolen Device Protection back on isn't always straightforward after a repair. The feature has its own checklist: 2FA, a device passcode, Face ID or Touch ID, Find My, and Significant Locations must all be enabled before the toggle becomes available again. A toggle that’s greyed out after the repair almost always means one of those isn't turned on yet, so check through them one at a time.
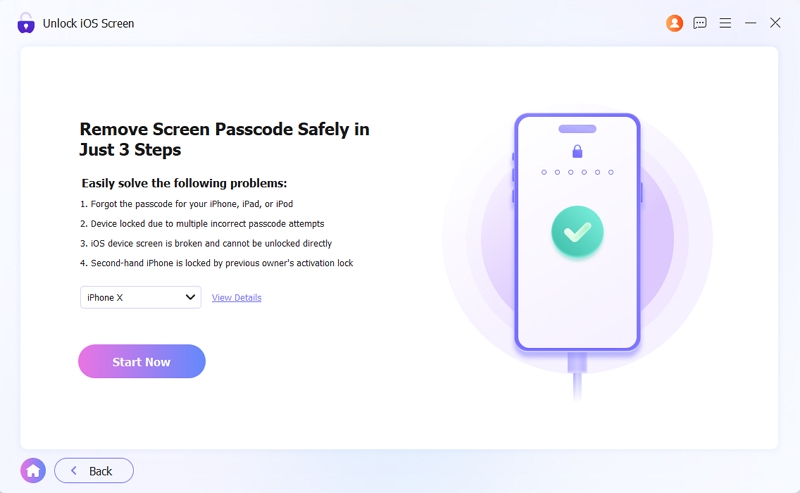
Way 3. Erase iPhone with Eassiy iPhone Access
If the methods above still cannot make your iPhone appear in the Find My app again, you can consider erasing the iPhone using Eassiy iPhone Access. Eassiy can factory reset your iPhone in just a few clicks with a high success rate, helping to remove system glitches, including issues such as faulty Stolen Device Protection that may prevent Find My from working properly.
After the reset, you can sign in with your Apple ID to disable Activation Lock and set up your iPhone again. Finally, go to Settings and enable Find My iPhone, and your device will appear normally in the Find My app.
Key Features:
- Erase iPhone without iTunes, iCloud or Apple ID.
- Remove Apple ID without needing a password, useful when Apple ID is locked or the device is used.
- Turn off iCloud Activation Lock without Apple ID or previous owner.
- Remove iTunes backup encryption without a password, enabling you to back up iPhone with iTunes again.
- Remove the SIM lock to use your phone with your desired carrier.
Steps to Erase iPhone Using Eassiy
- Download Eassiy iPhone Access on your Windows PC or macOS. Install and open it. Then, select Unlock iOS Screen.
- Plug a USB into the iPhone and connect it to your computer. Select Trust on the iPhone if prompted, then click on Start Now. Eassiy will begin downloading the firmware it will use to restore the device.
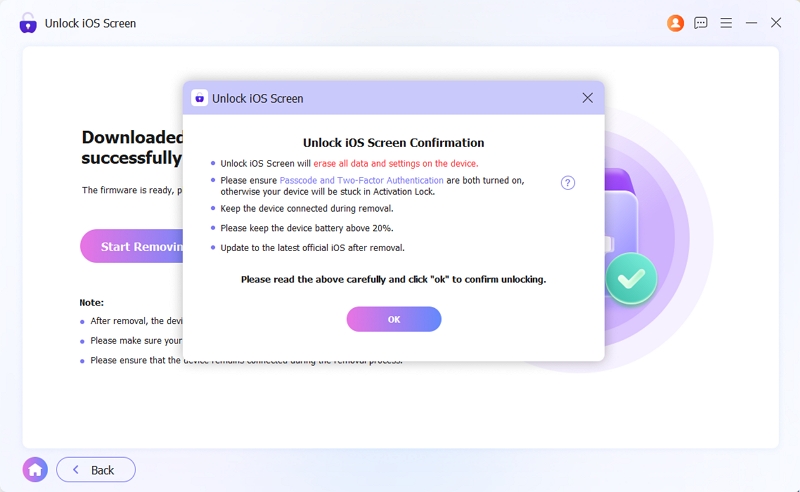
- Once the firmware has finished downloading, an "Unlock iOS Screen" window will appear. Select OK, then Confirm Again to begin the reset process.
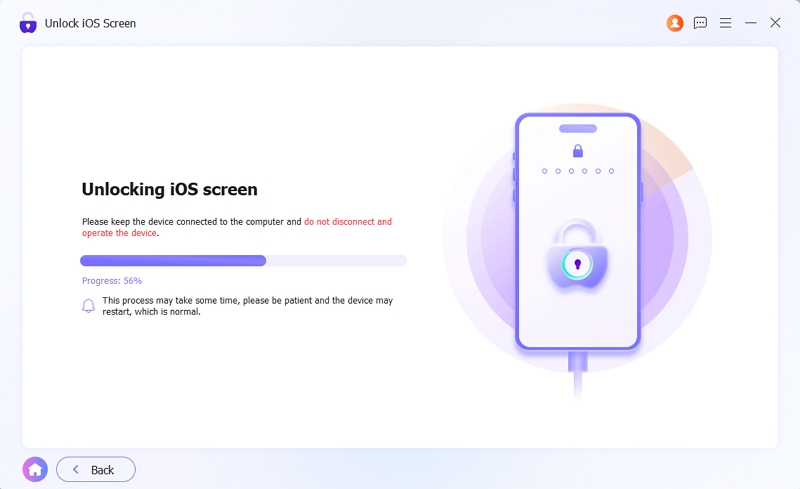
- The tool will start erasing your iPhone once you confirm.
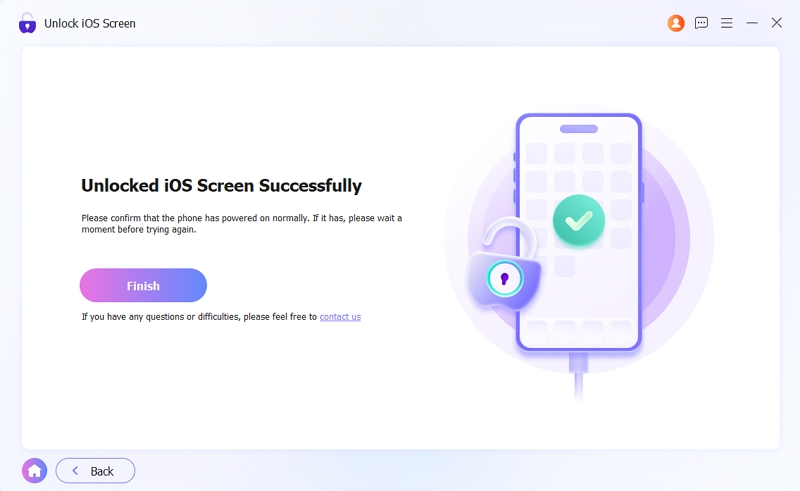
- When the unlocking procedure is done, "Unlocked iOS Screen Successfully" will appear. Select Finish. The iPhone will restart and can be set up.

After reset, you will see the Hello screen. Before continuing with setup, you need to enter the Apple ID and password to remove Activation Lock first. Once the iPhone is set up with your Apple ID again, go to Settings > Apple ID name > Find My > Find My iPhone and enable it before doing anything else. This time, you will find your iPhone displayed on Find My map.
Final Words
Adding another iPhone on Find My takes a few minutes, regardless of which method you use. For your own second device, signing in with the same Apple ID is all it takes. For a family member's phone, Family Sharing gives you permanent, reliable visibility. And for a friend or anyone outside the family, the Share Location option in the Find My app keeps things flexible and consent-based.
If Find My went missing after a repair, a restart usually brings it back. But if Stolen Device Protection is in the picture, you'll need to temporarily disable it first before the toggle reappears. And for cases where the iPhone is stuck and won't cooperate at all, Eassiy iPhone Access is a reliable way to clear everything and start fresh!