
Updated on 2023-02-07
views
5min read
iOS 11 and later versions added a screen recording function to the iPhone and iPad, allowing you to screencast video of your device’s screen. While capturing video, you can also include internal audio and microphone sound. This means you can seamlessly record gameplays and create product demonstrations or business presentations on your iPhone.
Be that as it may, many users need to learn how to turn on screen recording on iPhones or iPad. But fret not! This guide will teach you how to turn on Screen Recording on iPhone and iPad. Plus, you will learn how to use Screen Recording on iPhone and iPad. So, scroll down to learn about Screen Recording on iPhone and discover how to use it. If you do not like what iPhone Screen Recording offers, we have also mentioned an alternative that allows you to create professional-looking videos conveniently.
Part 1: Here Is How to Turn on Screen Recording on iPhone?
Firstly, your iPhone should be running on iOS 11 or later versions to access the Screen Recording feature. Second, on some iPhone’s, the Screen Recording function is available in the Control Center itself. However, on some iPhone’s, you have to customize the Control Center options and include the Screen Recording manually.
So, if the Screen Recording function is turned On by default, you do not have to turn on Screen Recording manually. Follow along to learn how to turn On Screen Recording on iPhone and also check whether the option is turned On by default or not.
Here’s how to customize the Control Center and add Screen Recording:
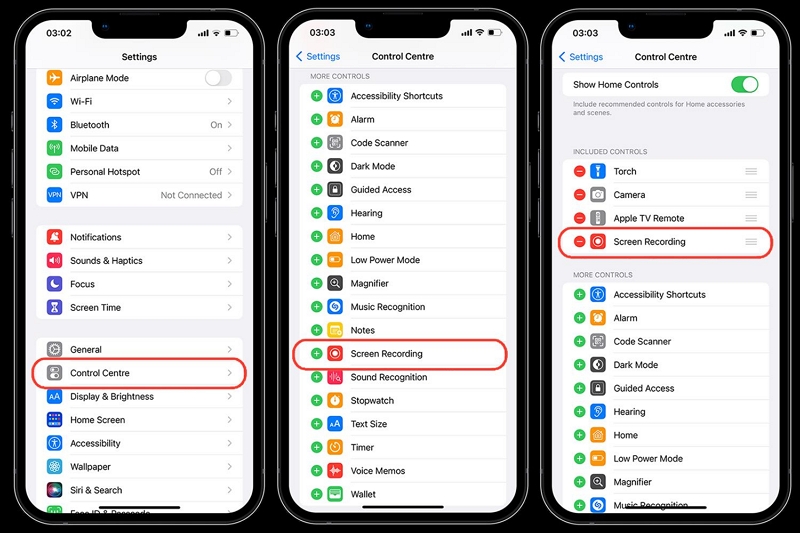
Step 1. Go to Settings on the iPhone.
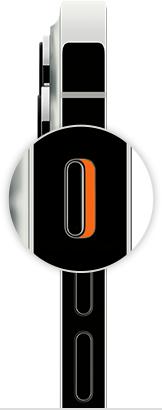
- In the third group of the Settings menu, click on Control Center.
- Turn on the toggle assigned to the “Access within apps” option. Access within apps means the Screen Recording will not turn off when you want to record some app, like games or WhatsApp messages. If you do not turn this on, the Screen Recording will turn dark whenever you record the contents of the application.
- After turning On the Access within apps feature, click on More Controls.
- And click on + icon assigned to Screen Recording.
- Once you add the Screen Recording function, you can find it under the INCLUDED CONTROLS menu options.
- Navigate to More Controls.
This means you can access the Screen Recording function via the Control Center with a single click whenever you want to record the iPhone screen.
As mentioned, the Screen Recording feature is embedded within all iPhones and iPads running on iOS or later versions. However, the quality is hidden on some devices, and you have to customize the Control Center options to access it. Also, you do not have to customize the Control Center whenever you want to record the iPhone screen. Instead, once you turn it on, the Screen Recording will sit on the Control Center menu and allow you to record the screen conveniently.
Part 2: How to Use iPhone Screen Recording Feature?
After adding the Screen Recording function to the Control Center, follow these steps to learn how to use the iPhone Screen Recording feature. Once again, the above-mentioned steps are crucial and are mandatory if you want to record the iPhone screen. Now, follow these steps to use iPhone Screen Recording feature:
Step 1. Start the Screen Recording.
- Open the application or tab that you want to capture on the iPhone.
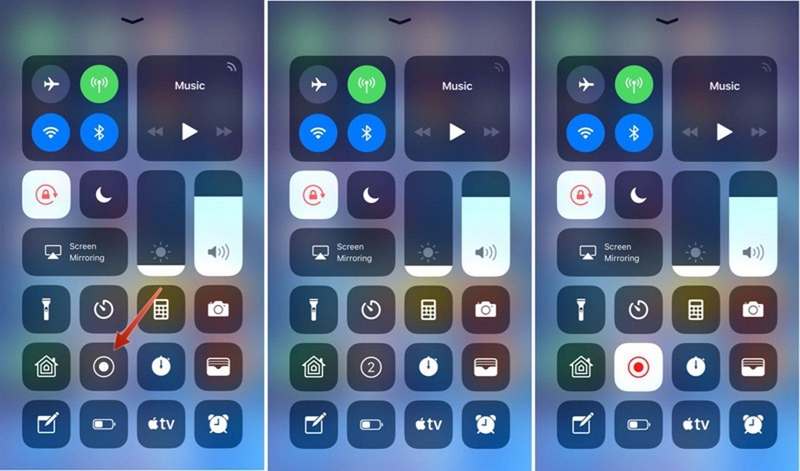
- Swipe down from the top-right corner of the screen to access the Control Center.
- Single-Click on the Record icon to start recording the screen.
This option allows you to record the iPhone screen with internal sound. If you want to record the iPhone screen with your voice and internal sound, follow step 2. Otherwise, skip to Step 3 after enabling the Screen Recording function on iPhone.
Step 2. Record Screen With Sound on iPhone.
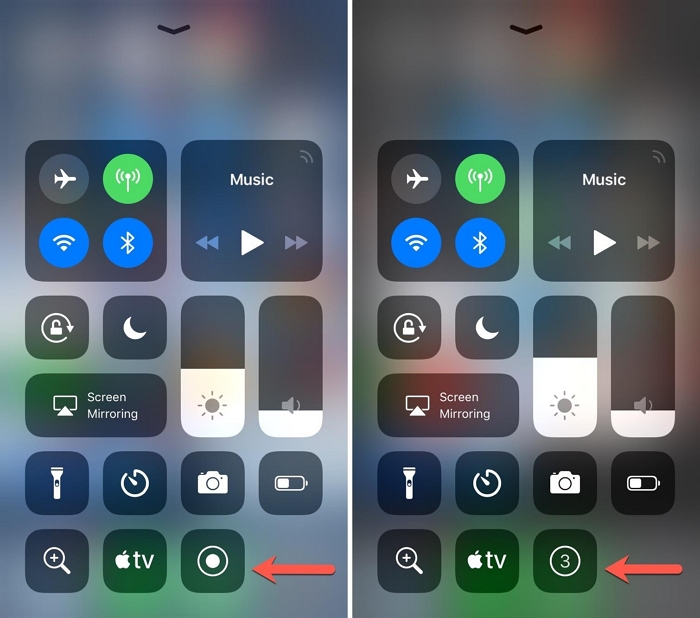
Tap and hold the Record button (dot within a circle) to access the Microphone. Furthermore, there are three ways to include sound in your Screen Recording on iPhone. That is, if you want to record only internal sound, both microphone and internal sound, or record without any sound.
Here's what you have to know about capturing your iPhone screen with/without sound.
a. Capture iPhone Screen with Only Internal Sound.
Swipe-down from the top-right corner of the screen to access the Control Center. Click on the Screen Recorder (Circular) button. The countdown timer will start and the iPhone will start recording the iPhone screen.
b. Record iPhone screen with both Internal Sound and Microphone sound.
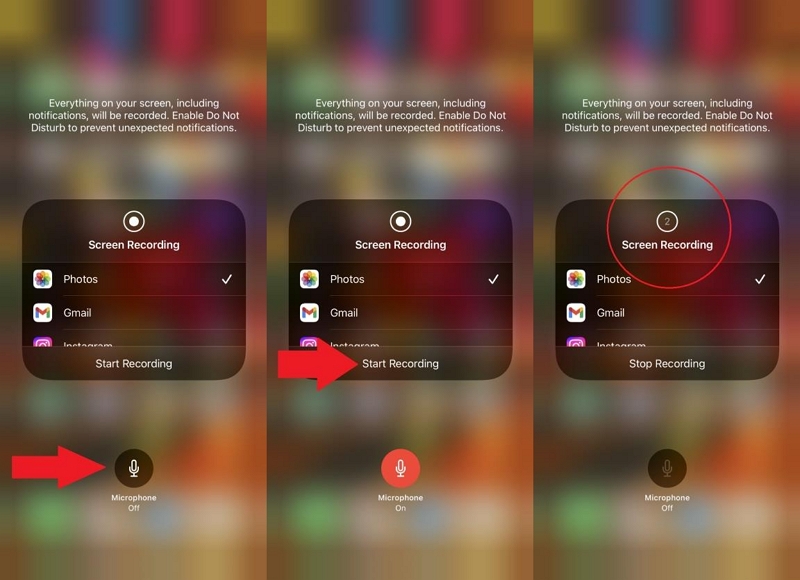
For this function, instead of clicking on the Record button on the iPhone, long-press until you see a new screen with a Mic icon.
- Tap on the Mic icon to turn On the microphone. This means your iPhone screen recording will include internal and external sound, i.e., your voice via microphone. Additionally, while recording the iPhone screen with microphone sound, you will notice that the external sound is not audible loudly. That is completely normal, given it allows you to record your voice more clearly.
- After enabling the microphone, click on Start Recording to cast the iPhone screen with both internal and microphone sound.
c. Record iPhone Screen Without Sound.
There is no option to record only microphone sound and cancel the internal sound when you are using the iPhone's Screen Recording function. However, you can record the iPhone screen without any sound whatsoever.
- To record the iPhone screen with no sound, simply turn Off the Ringer.
- Head back to Control Center and click on the Record icon to start the screen recording.
- Go through the activities and capture everything you want on your iPhone.
Step 3. End the Screen Recording on iPhone.
After you start the screen recording, you will notice a Timer on the top-left corner of the iPhone screen.
- Single click on the Timer to access the menu options.
- Click on Pause to interrupt the screen recording and resume it again.
- Click on Stop to end the Screen Recording.
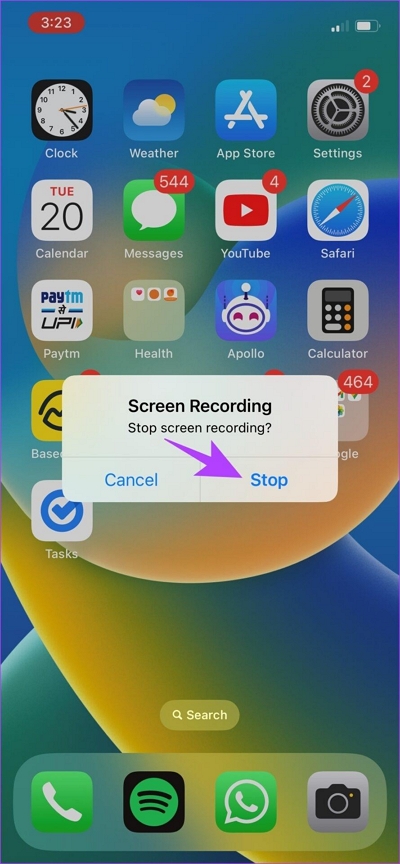
Once you end the recording, it will automatically be saved to the Photos app. You can find the screen recordings from the Photos and use the built-in video editor to trim, change speed, or apply filters and effects to your Screen Recording.
Of course, as can be seen, there are several disadvantages to using the native iPhone Screen Recording. For one thing, it does not allow you to record the screen with only your voice. But that’s not all:
- When you use the native iPhone screen recorder, all the recordings are saved to local storage. This means the recordings will consume a lot of storage space on your iPhone device.
- According to multiple tests and user reviews, the iPhone’s native Screen Recording function is clearly unsuitable for long recordings. It abruptly ends in 3-4 hours.
- The quality of the iPhone screen recordings depends on the available space. In fact, even when you have enough storage space on an iPhone, the recording quality is not that high.
And there’s more to it. For context, the iPhone’s built-in Screen Recording feature does not have any real-time annotation tools to draw, doodle, or add text to your screen recordings in real-time. There is no flexible audio management system to ensure clear sound in the final recording. Furthermore, the video editing features in the Photos app are pretty limited.
All in all, the native iPhone Screen Recording function is incompetent if you are looking to create online tutorials, video lessons, or capture gameplays like a professional. But don’t worry! We have included an alternative to the native iPhone screen recording function that allows you to capture the iPhone screen like a professional.
Part 3: What is the Best iPhone Screen Recording App on a Computer?
Firstly, the biggest issue with the built-in Screen Recording function is the storage space. And that will be persistent even if you use a third-party application; that is why it is best to use a third-party application that allows you to record the iPhone screen via computer. This means you can save the iPhone’s Screen Recording on the computer.
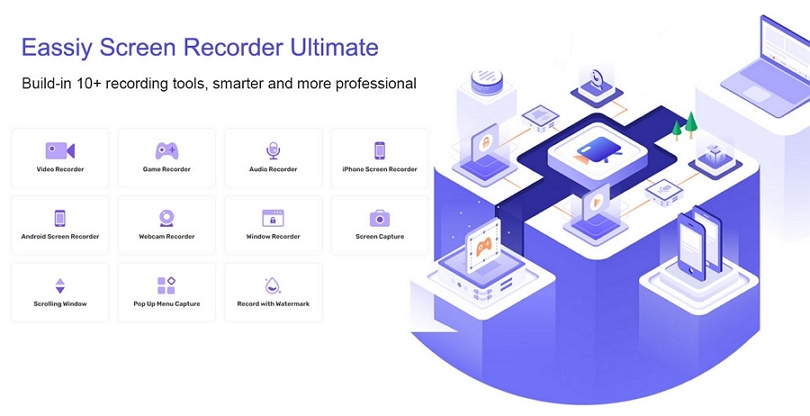
Turns out, there’s a tool made for doing exactly that. And that is Eassiy Screen Recorder Ultimate. Here’s what you have to know about Eassiy Screen Recorder.
Eassiy Screen Recorder Ultimate
Eassiy Screen Recorder Ultimate is an all-inclusive Windows screen recorder. However, as a side feature, the developers have included a function to let you record the iPhone screen via the computer. And the powerful thing is you do not even have to download any tool on the iPhone to record the on-screen activities.
Allowing you to record the iPhone screen in up to 4K quality, Eassiy allows you to include both microphone and internal sound in the screen recording. Needless to say, you can include either microphone or internal sound as needed. Plus, record the iPhone screen without any sound too. But what’s notable is the advanced audio management function in the Eassiy application.
That is to say, you can manage the sound channels coming from the microphone or iPhone’s internal sound before, during, and after the screen recording. So, no matter what, there is no room for error, and you get a clear sound in the output. Not only this, but if you are recording your voice, you can use Eassiy’s cutting-edge denoising technology to limit background interferences and enhance microphone sound during the screen recording.
Plus, you can use real-time annotation tools in Eassiy to draw shapes or insert text during the iPhone screen recording. Now, this doesn’t seem much, but this is particularly helpful when you want to record the iPhone screen for creating online tutorials or video lessons. Or capture gameplay like a professional.
Of course, it doesn’t end there. Eassiy also allows you to create personalized hotkeys and manage the screen recording using just keyboard shortcuts. And above all, Eassiy is really simple-to-use. So, be it a beginner or an expert, you can use Eassiy and record the iPhone screen from the first go.
Key Features of Eassiy Screen Recorder:
- Mirror the iPhone screen and record in ultra-high-definition.
- Eassiy allows you to draw, doodle, and highlight essential aspects of iPhone screen recordings.
- You can save the iPhone Screen Capture to Computer’s local storage and save iPhone space.
- You can create custom hotkeys and manage the recording parameters (start and end as well) using keyboard shortcuts.
- Limit background interferences and enhance microphone sound with a click of a button.
- Tweak audio channels and increase/decrease the sound levels while you record the iPhone screen on your iPhone.
- Use the built-in editing tools in Eassiy to trim, auto-split, and do more such functions to curate your clips professionally.
- Share the iPhone screen captures and screenshots to social channels directly, like Facebook, Instagram, YouTube, and more.
Here’s How to Use Eassiy Screen Recorder:
Eassiy is simple and self-explanatory; you do not need this tutorial to follow through and create killer-looking online tutorials, video lessons, or business presentations with crystal-clear sound. Still, just to introduce you to the Eassiy Screen Recorder, follow through to learn how to use the tool.
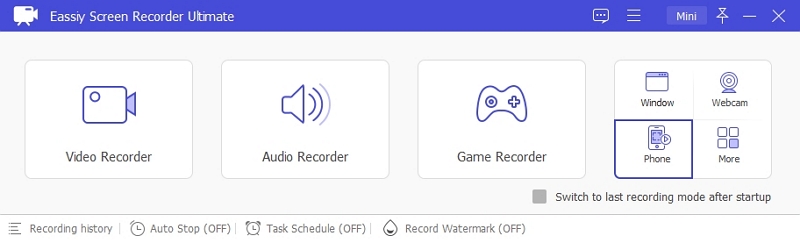
Step 1. Download and Install the Eassiy Screen Recorder on the computer.
After installing the program on the computer. Click on the Phone from the main interface. Select iOS Recorder on the next screen.
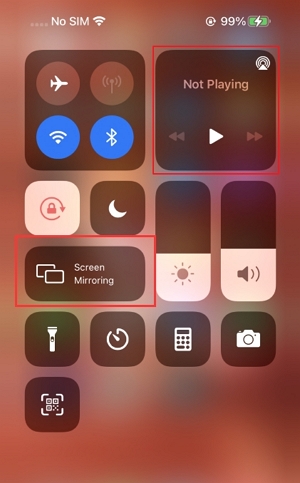
Step 2. Mirror your iPhone screen to the computer
Connect your iPhone to the PC and follow the on-screen instruction to turn on-screen mirroring on your iPhone. Doing so will allow the Eassiy Screen Recorder to establish a connection with your iPhone.
Note: If you do not see the Screen Mirroring option in Control Center, navigate to Settings and include it via Customizing the Control Center options.
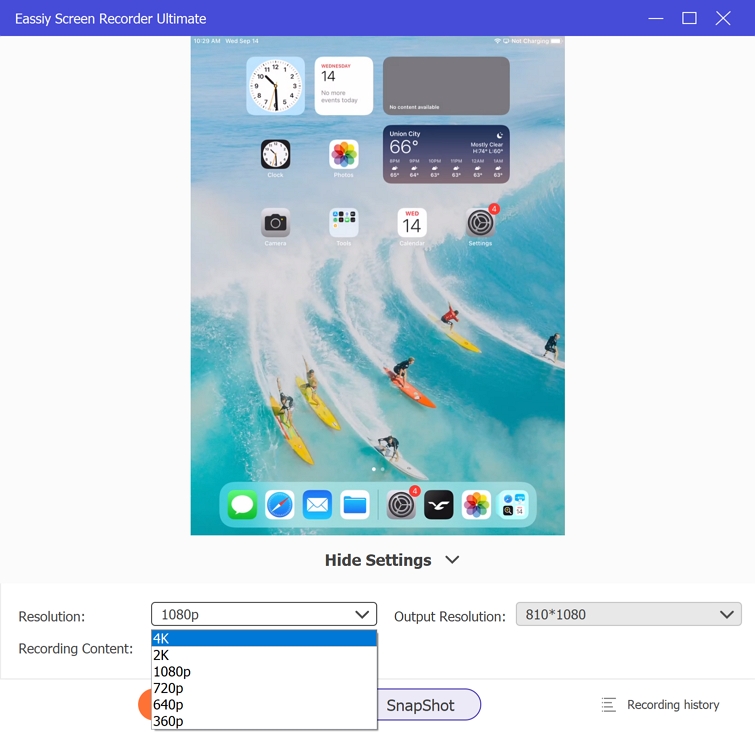
Step 3. Customize the Recording Settings.
On your PC, click the drop-down icon next to Resolution and choose the screen recording quality. Eassiy Screen Recorder supports phone screen recording up to 4k quality.
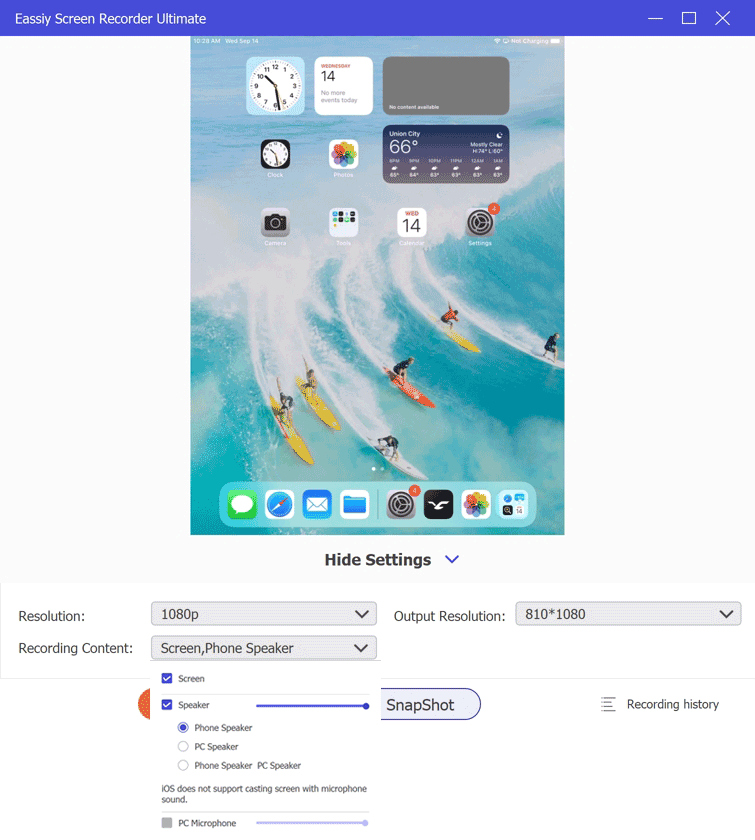
Also, you can adjust the sound channels to record iPhone screen with sound. Just click the drop-down icon next to Recording Content and choose a preferred option to do so.
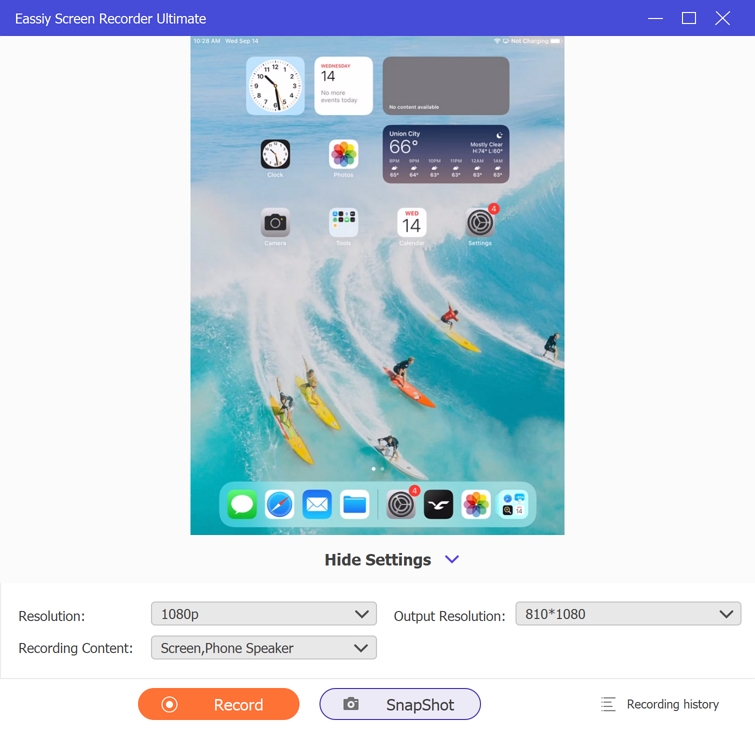
Step 4. Start the iPhone screen recording.
Click on the Record toggle to start the iPhone screen recording. Then, go through the activities that you want to record on your iPhone and include sounds as needed. You can also take real-time screenshots during the process by clicking on the Snapshot button during live recording.
However, as mentioned, Eassiy is not limited to recording the iPhone screen only. You can also use it to record Android devices if you want. Nevertheless, you will realize its true potential when you use it to record the PC Screen. It comes with several flexible recording options, allows you to manage sound levels, annotate the live recordings, and edit them swiftly.
Conclusion
iPhone Screen Recording is a valuable feature, given it allows you to capture anything on your iPhone screen instantly and save it on the local storage anywhere, anytime. But if you are looking to create professional-looking online videos, video lessons, or gameplays, it is best to use third-party tools like Eassiy Screen Recorder. As can be seen, everything is stored on the computer, and Eassiy is feature-rich enough to create videos that share your ideas in the way you want.