
Updated on 2023-05-15
views
5min read
Screen recorder programs are the best way to record what’s happening on the screen and share it with others. Be it professionals looking to create recorded presentations, online tutors looking to create instruction-based video lessons, or gamers looking to share their gameplay — a screen recorder on Windows is useful in many such cases.
But which are the best tools to screen record on Windows 10 and 11 with audio. Moreover, how do you use a screen recorder to capture the screen? Well, scroll down to find out.
Part 1: Best Ways: Screen Record on Windows 10 With Audio Using Efficient Screen Recorder Software
Looking for a simple yet feature-rich screen recording tool for Windows? Eassiy Screen Recorder Ultimate is an app for you!
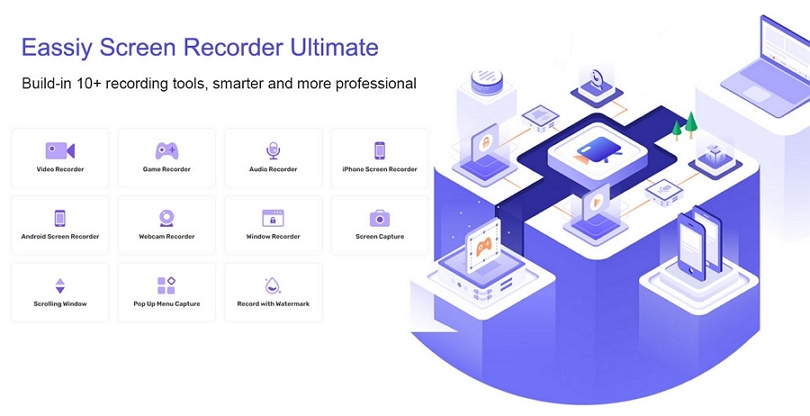
Laden with recording features, Eassiy Screen Recorder Ultimate allows you to record the Windows 10 screen quickly and efficiently as per requirement. Yes, this smart screen recorder tool boasts a wide range of advanced features including customizable hotkeys, auto splits, auto annotation, and lots more to facilitate high-quality screen recording operation.
Coming to the audio part, there are dedicated options to enhance the microphone voice and cancel the ambient noise, and so on. Besides, unlike many other screen recording software, Eassiy is lightweight and its clean UI makes the tool very easy for users at any level to navigate. You can even employ the tool in recording both long and short gameplay without complications.
Key Features
- Record specific sections or the entire screen. Record only audio or webcam. You can move the desired section during live recording.
- Record Android phone screen or iPhone screen with internal audio on computer
- Supports specially designed game recorder to enable users to screen record gameplay on different consoles with high quality.
- Easily hide desktop icons and show a countdown when recording the computer screen.
- Execute scheduled recording to automatically record live stream, gameplay, and other kinds of events.
- Add real-time annotation when recording videos either online or on a computer screen.
How to Use Eassiy Screen Recorder to Record on PC?
Eassiy Screen Recorder Ultimate is one of the most advanced and simplest tools to screen record with audio on Windows 10. What more is Eassiy Screen Recorder Ultimate configurable nature allows anyone to set up hotkeys and customize the program in the way they want.
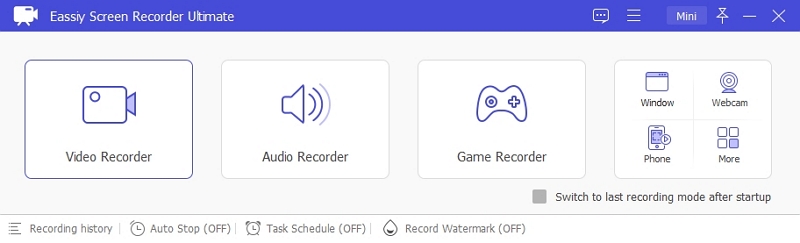
Step 1. Go to the official page of Eassiy Screen Recorder Ultimate. Download and install Eassiy Screen Recorder Ultimate tool on your Windows or Mac device. Launch Eassiy Screen Recorder Ultimate program on the computer. You will see some basic controls. Select "Video Recorder".
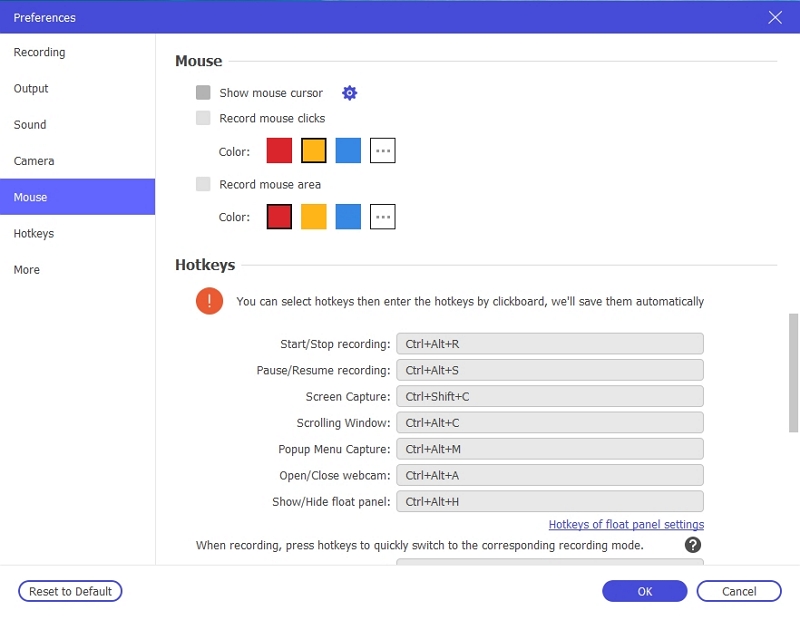
Note: Eassiy Screen Recorder Ultimate allows you can set up hotkeys and configure advance options like show mouse cursor or not, and more such options from the Preferences tab. Just configure the settings as per need and save the settings.
Step 2. Click the REC button to start recording the screen. The program will start recording the entire screen if you have chosen the Full option. You can adjust the screen if you have chosen the Custom option. Once you start the recording, you can press the Camera icon to capture a screenshot.
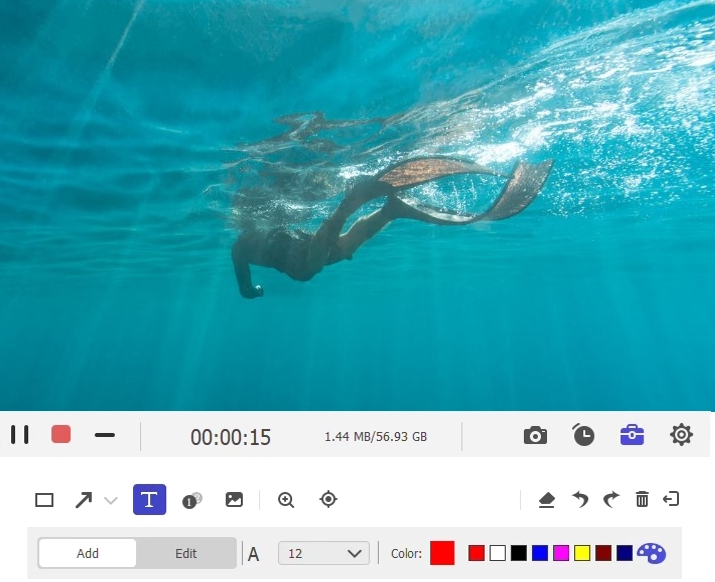
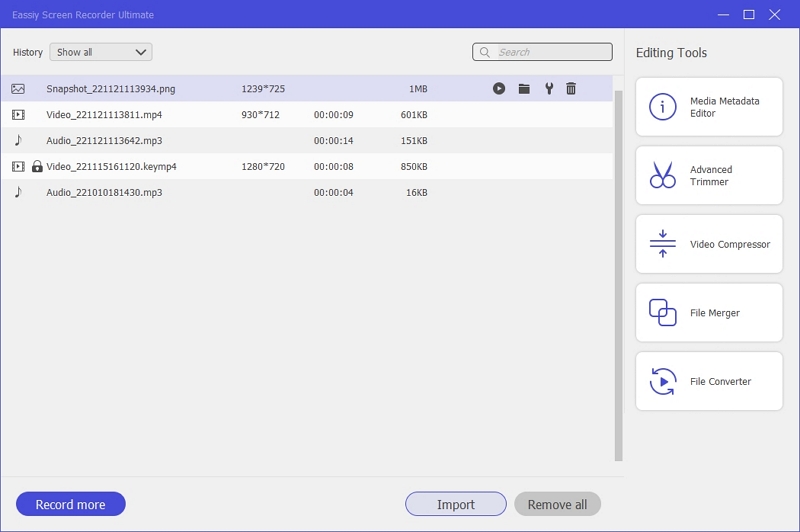
Step 3. You can stop the recording by pressing the pause button. You can access the recorded file, audio, as well as screenshots from the Recording History panel. There are also options to share the multimedia files or save them to the local storage (in another folder).
As mentioned earlier, Eassiy Screen Recorder Ultimate’s simple interface and customizable nature make it very easy to record the complete or specific part of the screen. You can also choose the shape of the recording. Plus, if you are capturing only a part of the screen and want to move to a new area, Eassiy Screen Recorder Ultimate allows you to do so during the live recording. In all, if you are looking for the ultimate Windows screen recorder with the audio tool, you do not have to read beyond this.
Part 2: Free Ways: Screen Record Windows 10 With Audio using the Built-in Game Bar feature
Game Bar, or Xbox Game Bar, is a customizable gaming overlay built-in Windows 10 to allow gamers to record their screen. The tool is intended for gamers and streamers who want to share their gameplay with their friends and followers.
Nevertheless, Game Bar also allows you to record any screen on Windows. This means you can enable the option and record screen on Windows 10 with audio conveniently.

You can record up to 1080p quality and 60 FPS and take screenshots for free. However, retain that Game Bar only works if you have either of these three encoders installed on the Windows 10 computer: Intel Quick Sync H.264, Nvidia NVENC, or AMD VCE encoders. Aside from this, Game Bar is a viable option that proves you do not need costly software to do a simple job like screen recording.
Key Features
- You can record up to 1080p quality and 60 FPS and take screenshots during live screen recording.
- Adjust the microphone levels to customize the audio clarity, sound level, and so on.
- You can customize keyboard shortcuts to screen record on Windows with audio.
- You can link your Twitter account and share your recorded clips directly.
Things to consider before using Xbox Game Bar’s screen recorder Windows with the audio tool:
- Your device must have either of these three encoders installed for the Game Bar to work: Intel Quick Sync H.264, Nvidia NVENC, or AMD VCE encoders.
- There is no option to record in 4K quality like Eassiy Screen Recorder Ultimate.
- There are no advanced options like recording multiple items or scheduling a recording in advance.
- There is no way to hide the mouse cursor. This means your record will include the mouse cursor. And unless you know video editing, there is no way to remove it.
How to screen record with audio on Windows 10 using Xbox Game Bar:
Although Xbox Game Bar is not as advanced as the professional Eassiy Screen Recorder Ultimate, its simplicity and clear options will impress users. Xbox Game Bar is available on Windows 10 and succeeding variants. However, you will have to enable Xbox Game Bar before you can use it to record the screen using it.
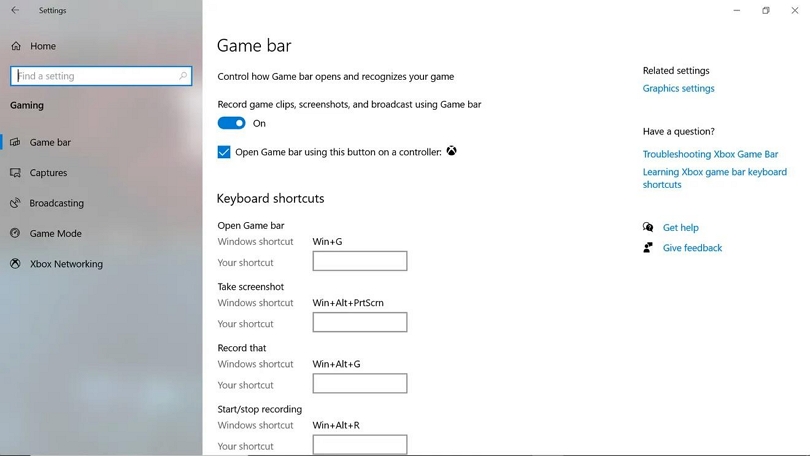
Step 1. Go to Settings on Windows 10 to enable the Windows Xbox Game Bar tool.
- You can press Win+I to open Settings on Windows 10 or 11.
- From the search field in the left pane, type in Xbox Game Bar.
- Click on Xbox Game Bar.
- And select the switch (move it) to enable Xbox Game Bar.
You will also find numerous other options for Narrator, Chatting with friends, and so on. You can enable or disable the functions as per need.
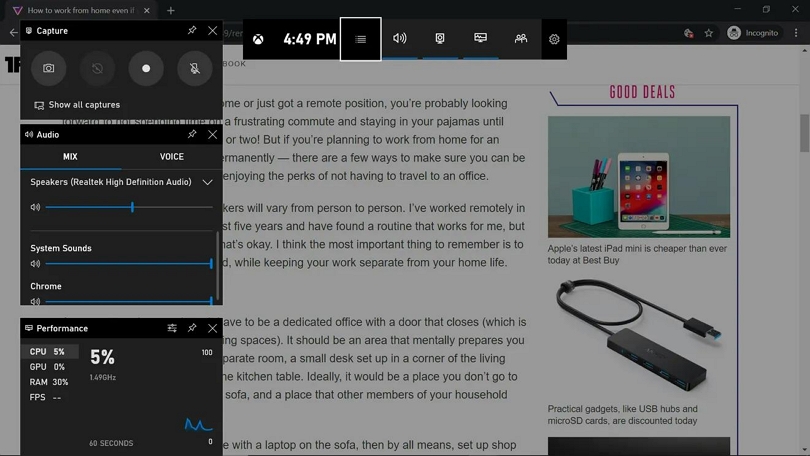
Step 2. Click on Win+G to open the Xbox Game Bar.
- Press the “Record” icon (the white dot in the image) to start the recording. Or you can press Win+Alt+R to start screen recording via keyboard shortcuts.
- Click on the microphone option to enable or disable the internal sound recording.
- Other parameters to choose how much sound you want in the video are also available. (Move the sliders to the right to record the video with full sound and vice versa).
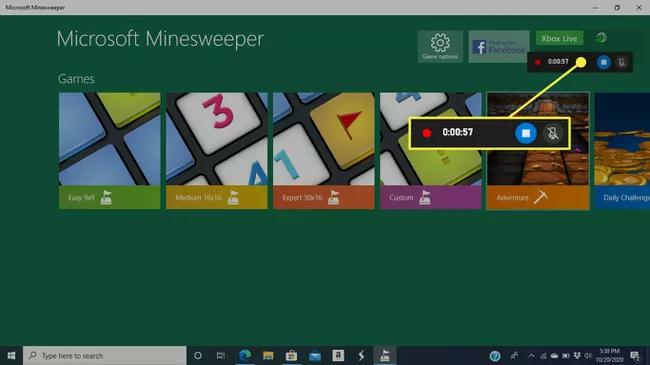
Step 3. Click on the Pause button to stop the recording. Or you can press Win+Alt+R to stop the screen recording via keyboard shortcuts.
- Once you stop the recording, you will see a notification informing, “Game clip recorded.”
- The video will save automatically in the Captures folder within File Explorer. (You can navigate to File Explorer>Videos>Captures manually).
As you can see, Xbox Game Bar is a suitable screen recorder for Windows with audio. However, the tool comes with its own sets of limitations. For instance, you cannot record the screen in 4K.
Moreover, there are no options to record a specific section of the screen. Plus, there is no way to hide the mouse cursor while using the Xbox Game Bar screen recorder for Windows 10 and 11. Nevertheless, it is suitable for one-time needers and non-professionals.
Part 3: Online Ways: Screen Record Windows 10 With Audio Using Online Tools
While the first two tools pretty much sum up screen recording on Windows 10 and 11 with audio needs, here are the three best online screen recorders that allow you to record the screen with audio on Windows 10 and 11.
You may still have to download the tool and record the screen regardless of the online nature of these web apps.
1. OBS Studio
OBS Studio free and open-source screen recorder. And it is dedicated to the streamers looking for a cost-effective option to record screens. The tool is available across all platforms, meaning you can get the OBS studio app on Windows, Linux, and Mac. Needless to say, OBS Studio comes laden with features. To start with its recording features, the tool allows you to capture different types of media in real-time, like images, text, screen, and video.
But it does not end there. OBS Studio also allows you to mix these elements in real-time, so you cannot avoid spending time during post-production. You can set up as many screens as you want and switch between the screens using custom transition.
All in all, OBS Studio will take some time for you to understand all the features. But once you figure it out, you will have your hands on the best screen recorder on Windows 10 that is entirely free to download and use.
Key Features:
- You can capture different types of media in real-time, like images, text, screens, and video.
- OBS Studio also allows you to mix these elements in real-time during live screen recording on Windows 10.
- The Settings panels allow you to configure the tool and personalize it.
- Powerful and advanced options to level up your streaming game.
2. Camtasia Studio
Camtasia is the industry standard when it comes to the recording screen. However, it is costly (think US$ 500 for one license). But for that price, it includes a bunch of video editing tools that allow streamers to take control of their screen recording in any way they want and make it look professional.
Needless to say, there is a learning curve. And you will have to invest a good amount of time before you can use Camtasia comfortably. Given the advanced tools and features, it is best for someone creating online tutorials or is a professional streamer. Nevertheless, when it comes to features, Camtasia offers the best features out there for screen recording.
However, if you are not looking for advanced video editing features, it is best to stick with Eassiy Screen Recorder Ultimate.
Key Features:
- Screen record anything. The entire screen or specific parts. Camtasia’s advanced nature allows you to intuitively capture specific shapes like webpages, its elements, and so on.
- Magic Wand to move the background elements in the video. You can choose to clear a specific part of the background using the same tool.
- There are professional options like converting short screen recordings into gifs with a mouse click.
- Take different images and combine them to make a video.
3. Snagit
Snagit and Camtasia both come from the same vendor. However, unlike Camtasia, Snagit is a tool designed for professionally capturing screen recordings. You will not find any advanced feature like in Camtasia’s toolbox.
The entire idea of Snagit is to allow organizational teams to create captivating visuals via images and videos instead of sharing emails and words.
All the features in Snagit revolve around screen recording on Windows, adding elements, and sharing them with co-workers. So, if you are someone who works in a professional environment and want to communicate via images and videos to share ideas instead of words, Snagit is the tool for you.
Key Features:
- Snagit allows you to screen record anything. The entire screen or specific parts. There are also options for intuitively specific shapes like webpages, their elements, and so on.
- You can capture only custom parts from the screen; moreover, it includes options to capture in panoramic style by scrolling.
- You can grab text from one file or page and paste it to the video or another file easily.
- You can record camera and audio files. The camera option allows you to record two elements at once. For context, you can record the web cam’s videos picture-in-picture and entire screen simultaneously.
Conclusion
All the screen recorders for Windows with audio tools included in the list are exceptional in their rights. Nevertheless, if you are a beginner, and are looking for a simple option to record the screen once or twice, then Xbox Game Bar should be a suitable option.
But in case you are someone who has to record the screen often, then it is best to stop looking beyond Eassiy’s Screen Recording. The reason: there is no other screen recorder for Windows 10 that allows you to use powerful features in a simple manner like Eassiy Screen Recorder Ultimate.