Updated on 2025-06-04
14 views
5min read
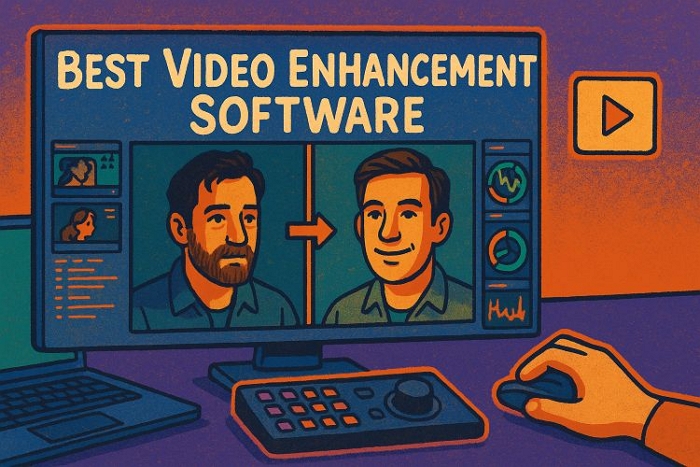
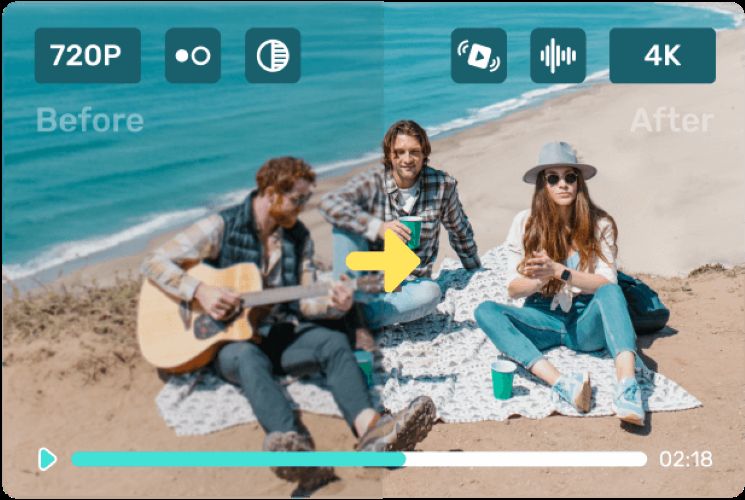
Everyone gets powerful cameras these days. However, the footage we capture still doesn’t always come out right. A slight shake, missed focus, or poor color balance can ruin a great shot. You don’t always get a second shot at capturing a perfect moment, but with the right video enhancement software, you can still improve the video quality. These tools help you restore clarity, correct colors, reduce noise, and bring out the best in your footage with no studio required.
Here, you’ll find the best-in-class video enhancement software for Mac, Windows, and even browser-based platforms. Some offer free trials, others are fully paid. All of them deliver standout results. Whether you’re improving clips that have already been shot or looking for real-time tools that enhance as you record, we’ve covered every essential option.
Tip: Can ChatGPT Enhance Video Quality?

Not directly. ChatGPT can’t render or return an enhanced video file within its chat window.
What it can do is help you identify what’s wrong with a frame, such as blurriness, noise and dull lighting and suggest exactly how to fix it using the right setting and tool of your choice.
6 Best Video Enhancement Software [Post-processing]
Whether it’s a beautiful moment recorded on your phone before you could reach for a better camera or an old clip that deserves a second life, sometimes, the footage is already in your hands. That’s where these six post-processing video enhancement tools come in. They help you restore, refine, and watch it come back to life.
1. Eassiy Video Converter Ultimate
➤ Compatible OS: Windows 7 to 11 & macOS 10.12 and later
➤ Free for: 5 trial uses (full access, no watermark)
➤ Pricing: US$ 39.99/year
➤ Highlights:
- Stabilize shaky footage and remove noise with cinema-grade detail
- Brightness fixes and restore natural color tones
- Upscale to 8K with no quality loss
- 1000+ supported formats: DVD, HD, 3D, and more
- Built-in toolbox: compression, audio sync, format editing

Eassiy Video Converter Ultimate stands out as the most well-rounded video enhancement tool on this list and for good reason. Its full suite of intelligent presets allows you to instantly enhance your footage. You can use Eassiy’s Video Enhancer to:
- Stabilize shaky footage to achieve cinema-grade smoothness.
- Refine noisy or grainy clips, revealing faces, fabric textures, and background details with clarity.
- Revive dim, flat scenes, restoring skin tones, daylight balance, and contrast as if the footage was captured on a professional-grade camera.
Resolution-wise, you can upscale videos all the way to 8K, enhance 360° footage, and even recover lost quality in old or poorly lit clips with impressive results.
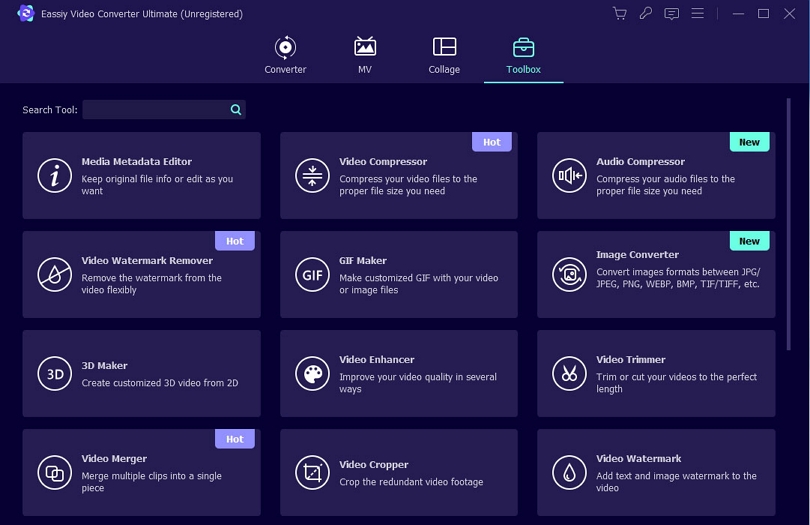
And Eassiy doesn’t stop at presets, you also get over 20 advanced tools that let you fine-tune every aspect of your video. After enhancement, you can trim unwanted sections, adjust audio tracks, insert subtitles, compress large files, and convert to and from over 1,000 formats.
Steps to Enhance Videos Using Eassiy Video Converter
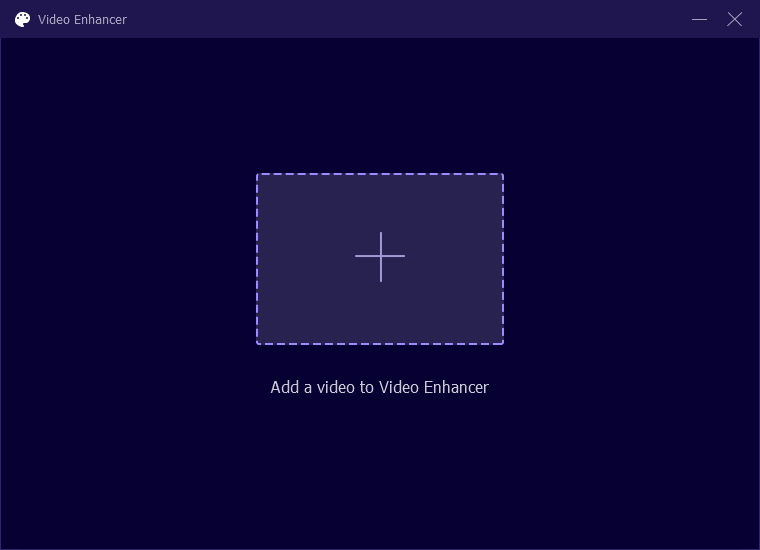
Step 1. Start from the Toolbox tab inside Eassiy Video Converter Ultimate. Among all the tools listed, find and select Video Enhancer to open the enhancement panel.
Step 2. Either tap the “+” icon at the center or drag your video into the upload area to begin.
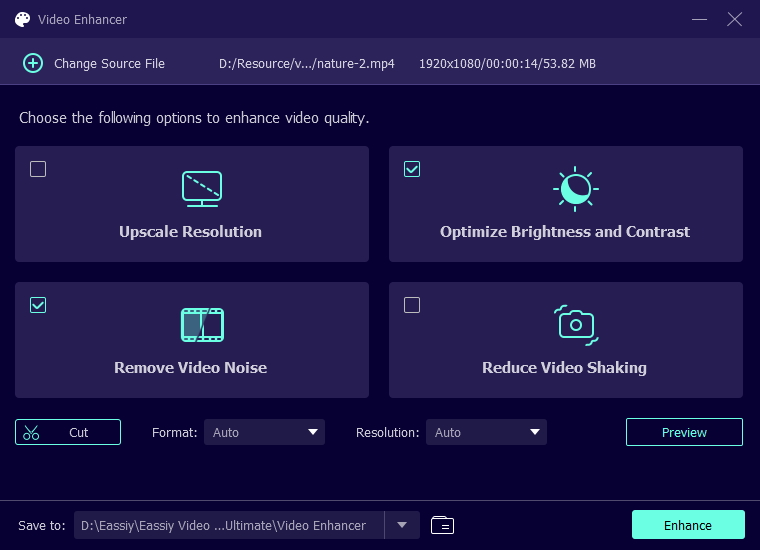
Step 3. With your clip loaded, you’ll see four core enhancement tools: Upscale Resolution, Optimize Brightness and Contrast, Remove Video Noise, and Reduce Video Shaking. Check the ones that fit your goal.
Step 4. Before applying changes, you can tweak the output resolution (up to 4096x2160) and video format using the drop-down below.
Step 5. Hit Preview to watch how the enhanced version will look. This lets you verify everything feels right, from lighting to clarity and movement before making it final.
Step 6. When satisfied, choose your save location and then click Enhance.
Eassiy will save it in your chosen format on your computer.
2. Topaz Labs Video AI
➤ Compatible OS: Windows 10 & 11 (16 GB RAM, 32 GB recommended) & macOS Big Sur 11 and later
➤ Free for: Only its browser version (20 credits on signup, no watermark)
➤ Pricing: US$ 299 one-time (Video AI 7 desktop), Cloud credits sold separately
➤ Highlights: Upscale up to 16K/Frame interpolation up to 150 FPS/Batch enhancement/AI model switching/Auto presets/Cloud/offline processing

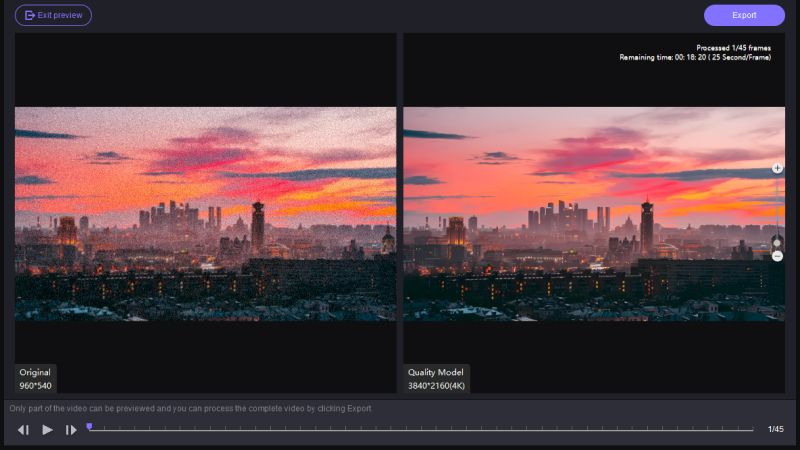
Topaz Labs Video AI gives you both worlds: automatic presets and manual controls. You can choose a ready-made model or fine-tune things like frame rate, sharpness, resolution, and noise reduction however you like. The only catch? It needs a strong GPU to really shine. For smooth previews or quick renders, something like an NVIDIA RTX 4070 or better is ideal. Still, if your system can’t handle it, there’s always cloud rendering, but those credits cost extra, even if you’ve already paid for the software.
Steps to Use Topaz Labs Video AI (Desktop Version)
Step 1. After installing, click Browse videos or drag a file into the upload box.

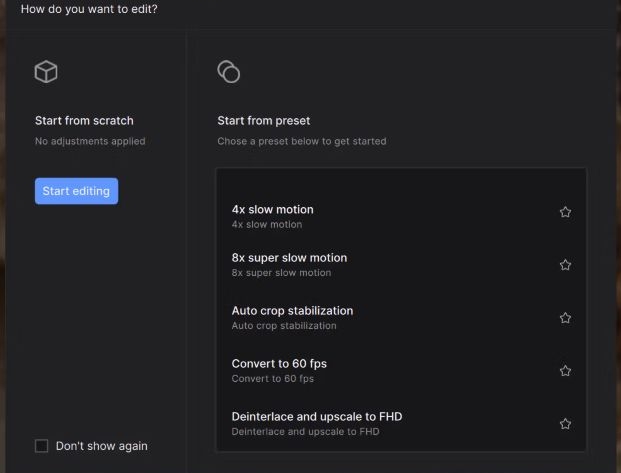
Step 2. In the pop-up that appears, select Start from scratch or pick a preset such as Upscale to 4K, Remove noise, or Convert to 60 FPS.
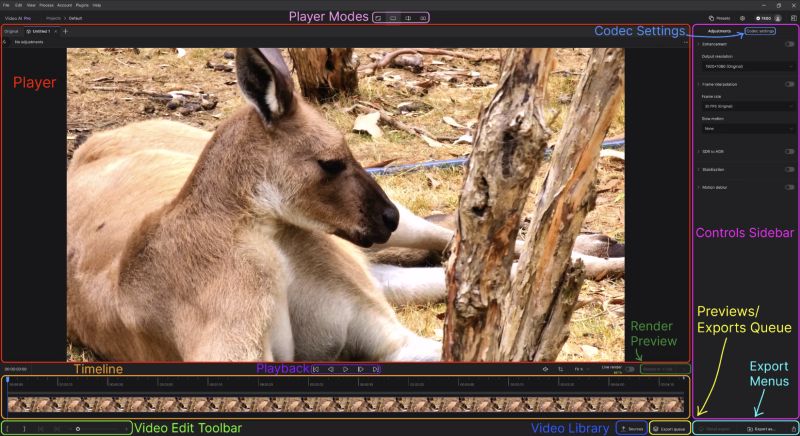
Step 3. Once the video loads into the timeline, use the Controls Sidebar to configure enhancements like frame interpolation, deblurring, stabilization and grain reduction.
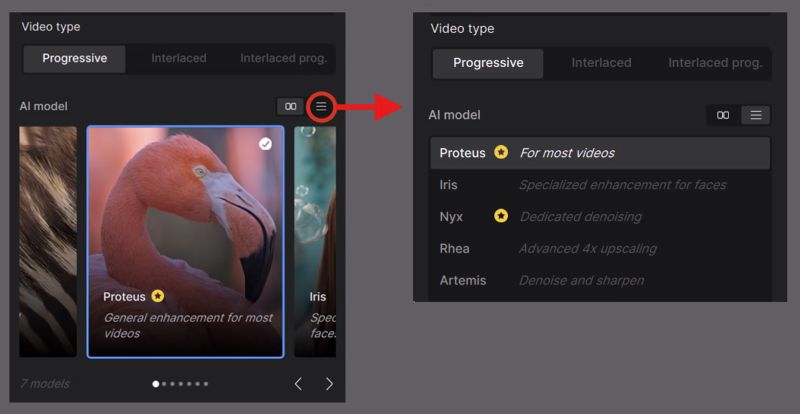
Step 4. Scroll through the AI model options and pick one suited for your project (e.g., Proteus for general enhancement, Nyx for denoising).
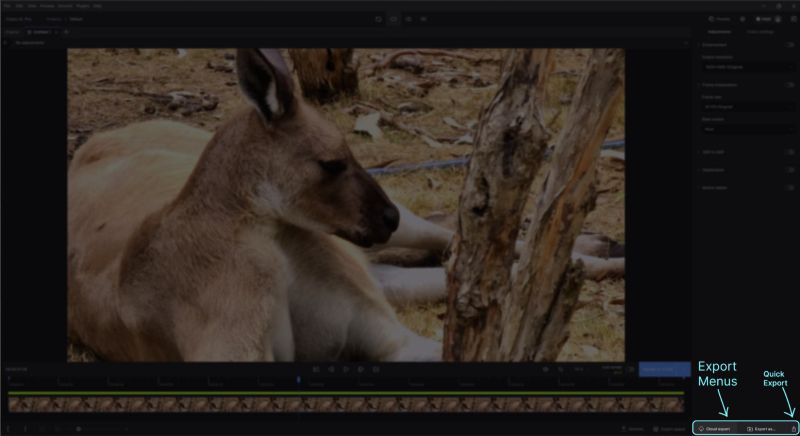
Step 5. After adjusting settings, use the Export Menu to customize the codec and save the output.
3. Adobe Premiere Pro
➤ Compatible OS: Windows 10 and later & macOS Catalina or later
➤ Free for: 7-day trial (no watermark, full access)
➤ Pricing: $22.99/month via Adobe Creative Cloud
➤ Highlights: Batch sequencing support/Precise color correction with Lumetri panel/Export with maximum depth/Supports ProRes, DNxHD, and 4K mastering

Adobe Premiere Pro is the best when you’re working with production-level footage. It’s mainly suited for cases where enhancement means adjusting color, contrast, and audio while keeping every original detail intact.
You get advanced export options like ProRes and maximum depth rendering. The Lumetri Color panel also gives you precise control for grading and visual tone.
Overall, it’s a reliable choice for professionals who want full creative control, but it does require more time to learn and costs more than beginner tools.
Here’s how to upscale a video to 4K using Adobe Premiere Pro:
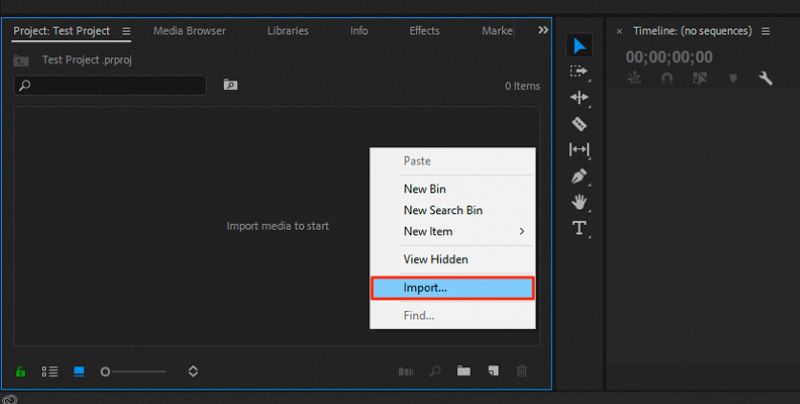
Step 1. Right-click anywhere in the Project panel and choose Import. Select your 1080p video and bring it into the project.
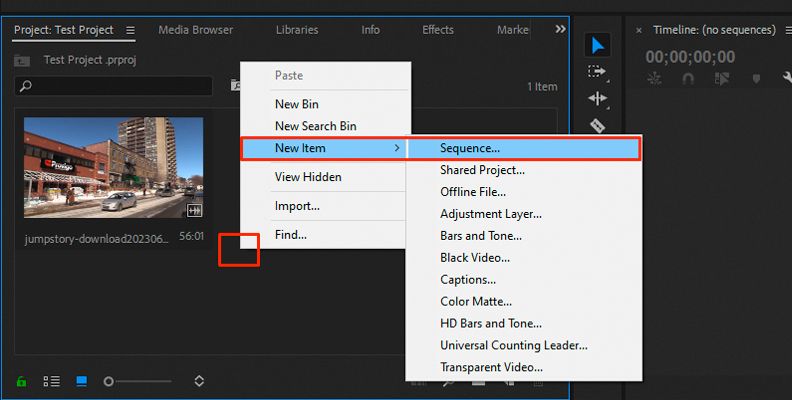
Step 2. Right-click again in the same panel, go to New Item, and then click Sequence.
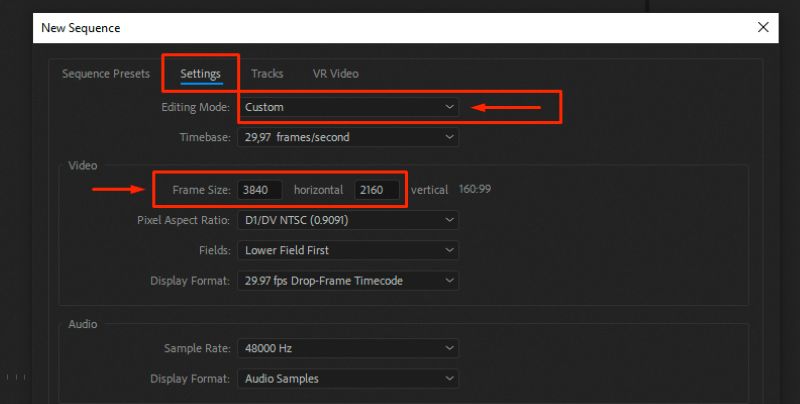
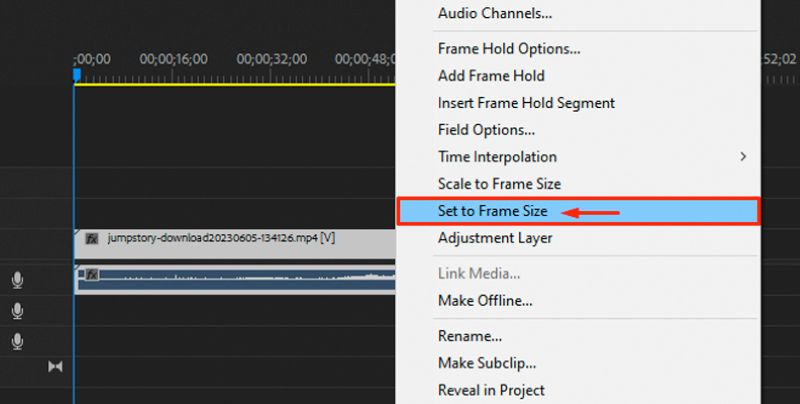
Step 3. In the New Sequence window, switch to the Settings tab. Set Editing Mode to Custom and adjust Frame Size to 3840 x 2160 for 4K.
Step 4. Drag your imported clip onto the new sequence. Right-click the clip in the timeline and choose Set to Frame Size so it scales up cleanly.
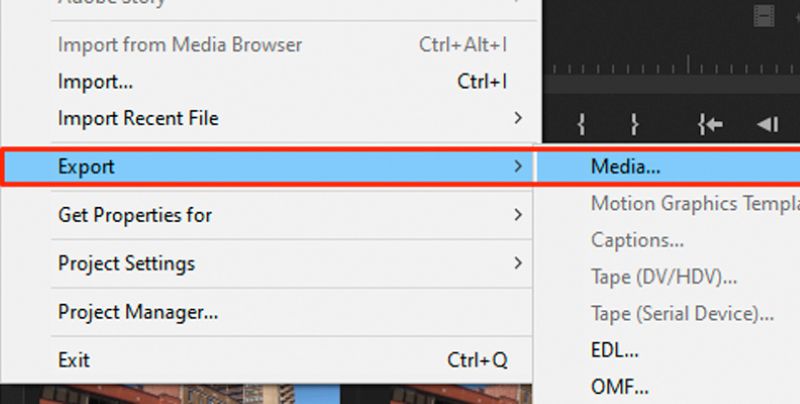
Step 5. Go to File > Export > Media. From the export panel, enable Render at Maximum Depth and Use Maximum Render Quality for the best upscale results.
4. HitPaw Video Enhancer
➤ Compatible OS: Windows 10/11 (64-bit) & macOS 10.15 and above
➤ Free for: Preview only (export disabled in free version)
➤ Pricing: US$ 43.19/month (Windows) & US$ 70.39/month (Mac)
➤ Highlights: AI presets for face, anime, and film/Upscales up to 8K/One-click denoise, deblur, colorize/Batch enhancement with cloud acceleration toggle

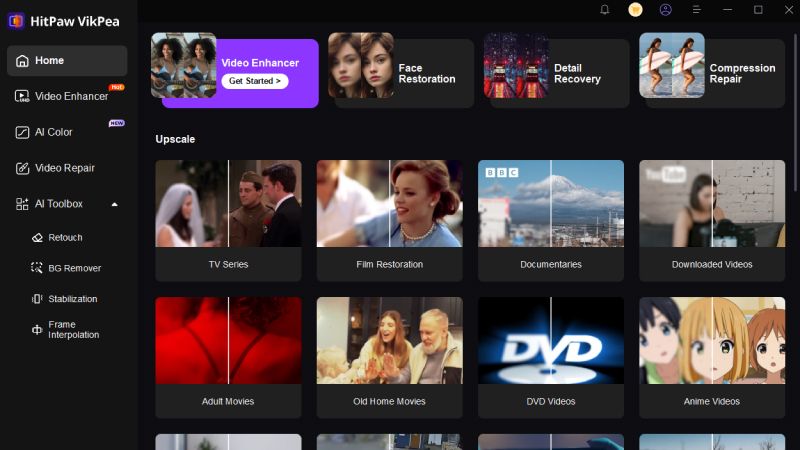
HitPaw VikPea leans heavily into AI-powered enhancement and skips manual control entirely. Instead of sliders or in-depth editing panels, you will get a clean lineup of presets like Face Model, Animation Model, Video Quality Repair, and more. While this one-click system is great for beginners or quick fixes, there’s no real way to fine-tune the results. What you get is what the AI delivers.
The real downside is the pricing. The Mac version costs significantly more than the Windows counterpart, even though both come with the same High Quality V2 AI model. And keep in mind that the free trial only lets you preview results, exporting your video still requires a paid plan.
Steps to Use HitPaw Video Enhancer on Windows or Mac
Step 1. Launch HitPaw and select Video Enhancer from the main screen.
Step 2. Drag and drop your video into the workspace.
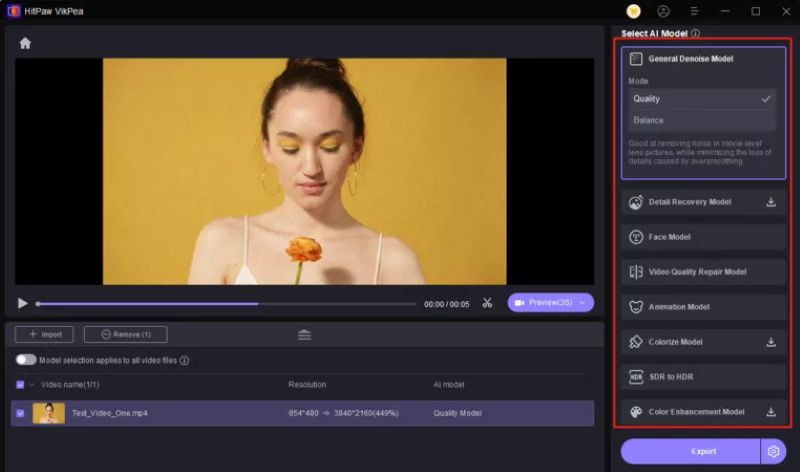
Step 3. From the list of AI models on the right, choose the one that fits your need, like General Denoise Model, Color Enhancement and Face Model.
Step 4. Click Preview to view how much details, sharpness, or color the model has improved.
Step 5. When you're happy with the result, click Export to save the video to your chosen location.
5. AVCLabs Video Enhancer AI
➤ Compatible OS: Windows 10/11 (64-bit, DirectX 12 required) & macOS 12 and later
➤ Free for: Unlimited exports with watermark (video capped to 30 seconds)
➤ Pricing: US$ 39.95/month or US $95.96/year
➤ Highlights: AI-based tool for upscaling/Removes grain and motion blur/Restores old or low-resolution clips/Supports MP4, AVI, and MOV

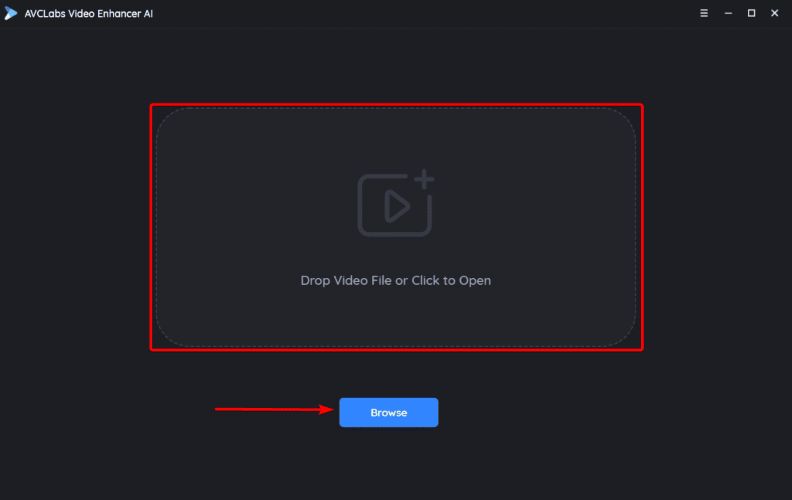
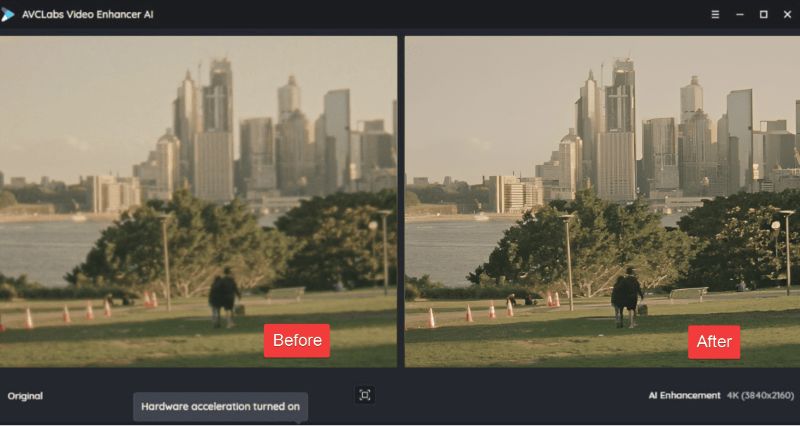
AVCLabs Video Enhancer AI stands in direct comparison to HitPaw VikPea. Both tools are powered by AI and focus on the same set of features: batch upscaling and denoising. AVCLabs does have one major difference: it uses a special transformer-based AI model. This helps it bring back more fine details in blurry or low-quality videos. So, it’s great if your footage looks rough or heavily compressed.
However, it also has some limits. You won’t find any manual filters or sliders to adjust things yourself. And even though it accepts more than 20 input formats, it only exports videos in MP4.
How to Use AVCLabs Video Enhancer AI on Windows or Mac
Step 1. Launch the app and click the Browse button to upload your video from the local folder.
Step 2. From the right-side panel, select the enhancement mode: Standard, Face Enhancement, Colorize, Motion Compensation.
Step 3. At the bottom right, click Start Processing to automatically upscale, denoise, or color-fix your file depending on the mode you’ve chosen.

Step 4. Once the processing is complete, click Open Folder to view your enhanced video.
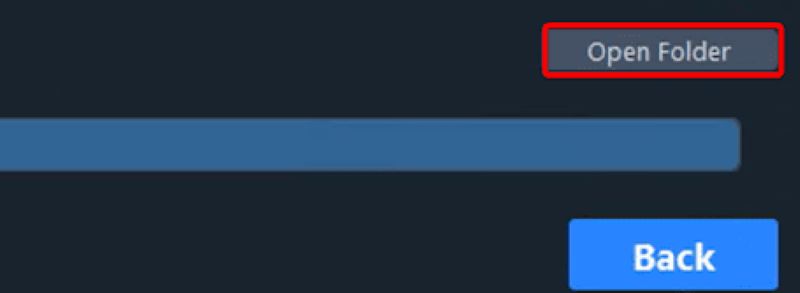
The result will be saved to the output path shown before processing with no manual exporting needed.
6. Davinci Resolve Studio
➤ Compatible OS: Windows 10 (Creator Edition)/11 & macOS 12 and later
➤ Free for: Up to 4K UHD export/Color correction/transitions/basic motion effects
➤ Pricing: US$ 295 one-time license
➤ Highlights: Supports up to 32K @120 FPS/Dolby Vision HDR scopes/Neural engine for AI-based tracking and upscaling/Motion blur, analog damage, scene detection, and more
Davinci Resolve Studio is the editing software of Hollywood. Choose this if you’re planning to stick with one tool for the long run because the learning curve is definitely steep.
The good news? You can start with the free version. It already includes advanced tools for color correction, transitions, and visual styling, which is more than what many paid editors offer.
That said, if you want full access to features like DaVinci Neural Engine (AI tracking and enhancement), Magic Mask, Optical Blur, Grain Filters, and AI-based resolution upscaling, you’ll need the Studio (paid) version.
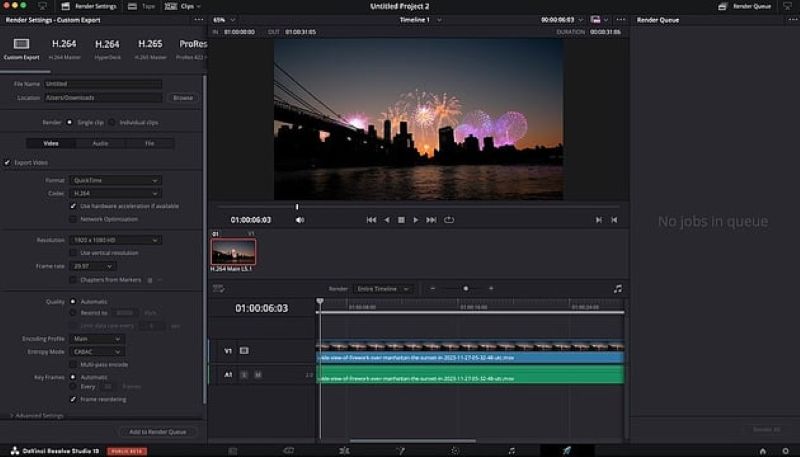
Steps to Enhance Video in DaVinci Resolve Studio
Step 1. Launch DaVinci Resolve Studio. From the main dashboard, select the New Project button.
Step 2. Add your video to the timeline. Drag and drop the clip from the Media Pool into the Edit tab timeline below.
Step 3. Switch to the Color tab. Use the motion effects panel to apply enhancements like Temporal NR, Spatial NR, or Motion Blur, depending on how noisy or shaky your footage is.
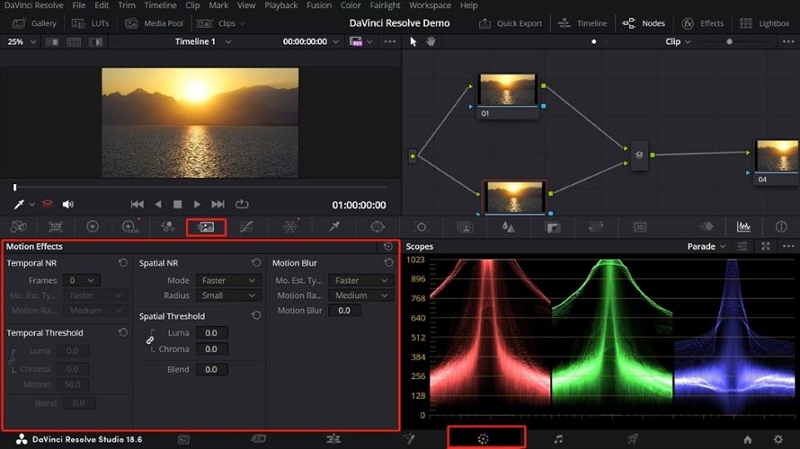
Step 4. If you want to adjust audio or add dynamic elements, open the Fairlight tab for detailed post-audio work.

Step 5. Once done, head to the Deliver tab. Choose MP4 or H.264 as your output format, select the resolution and quality settings, and hit Export.
2 Best Video Enhancement Software [Real Time]

In live situations like surveillance, broadcasting, or field reporting, there’s no luxury of fixing things later. What’s shot is what’s shown. That’s where real-time video enhancement tools come in: they clean up the footage as it's being captured or streamed. Almost all of them use AI-powered algorithms to stabilize video, improve brightness, and reduce noise on the fly. So, if clarity matters at the moment of recording, these are the tools to look at.
Now let’s look at two real-time software options that are built for exactly that kind of job.
1. Canon Video Enhancement Software

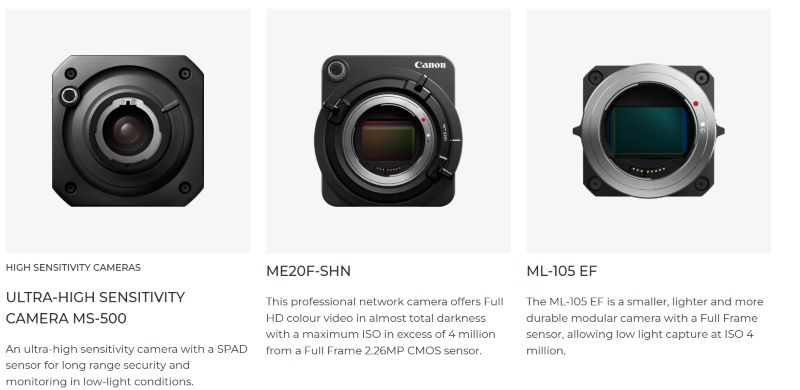
When to use it: This tool is purpose-built for Canon’s own surveillance and high-sensitivity camera systems. It’s a free upgrade for Canon users who want clearer footage, especially in low-light or shaky environments like live broadcasts or security monitoring. The software uses deep learning to process uncompressed 3G/HD-SDI video in real time, enhancing brightness and detail without delay. And it only works with select Canon models, including the MS-500, ME20F-SH, ME20F-SHN, and ML-105 EF.
Steps to Use Canon Video Enhancement Software:
Step 1. Ensure you’re using one of the supported Canon cameras listed above.
Step 2. Use a 3G/HD-SDI cable to connect the camera to a Canon-compatible Linux-based Box PC.
Step 3. Install Canon Video Enhancement Software (v1.2) on the Box PC.
Step 4. From a Windows PC, open a web browser and enter the Box PC’s IP address to access the enhancement tool.
Step 5. Inside the browser interface, you can set areas of enhancement, such as highlight compensation and noise reduction, as per your environment.
Step 6. Once set, the enhanced video can be viewed in real time. You’ll see immediate improvement in the stability, contrast, and clarity of image or video.

2. RealShot Manager

When to use it: Unlike Canon’s enhancement tool, which works only with select live feeds, Sony’s RealShort Manager Advanced software supports both real-time and previously recorded video. It’s primarily optimized for Sony IP cameras but also supports third-party devices, including AXS and IQI-compatible models, offering flexibility across network types.
What sets it apart is its ability to enhance real-time footage using features like SYNCLISM, Motion Detection, and DEPA (Distributed Enhanced Processing Architecture).
Steps to Use Sony RealShot Manager
Step 1. Set up RealShot Manager on your local Windows system (server or admin PC).

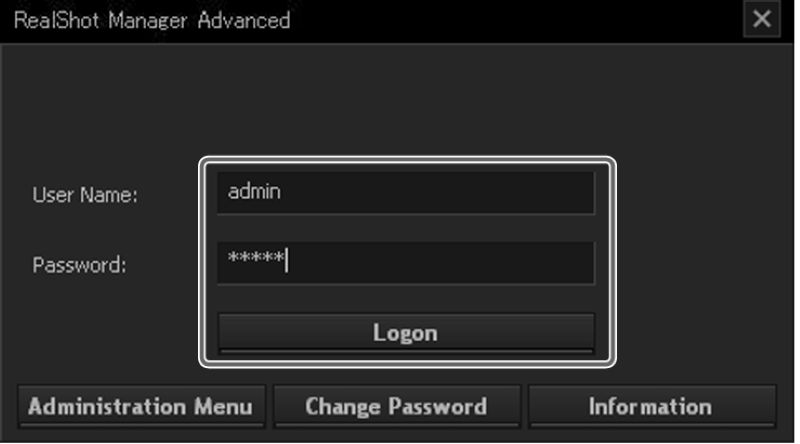
Step 2. Launch the software. When starting for the first time, enter your admin credentials to access the dashboard.
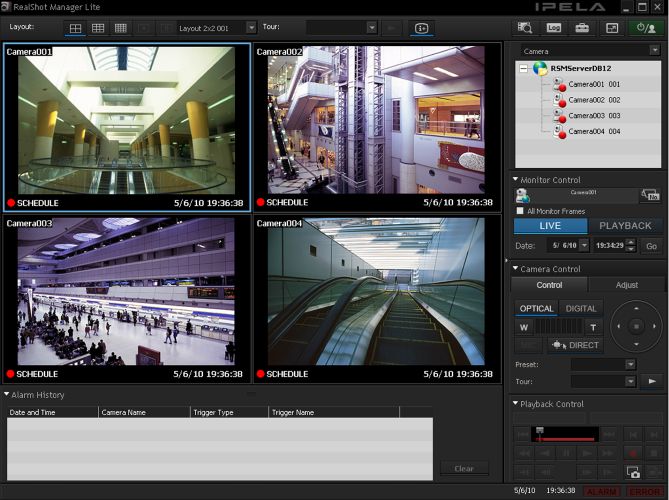
Step 3. From the home screen, the system will auto-detect connected network/analog cameras. You’ll see real-time feeds start populating the layout.
- RealShot Manager will SYNCLISM and DPA enhancements to stabilize, clarify and sync live video. These run automatically, improving video clarity on the fly.
- For recorded footage, use the timeline to scrub through past events. You can pause, enhance, and export directly from the interface.
Bonus: 4 Best Video Enhancement Software [Online]
If you're not working with heavy desktop software or real-time feeds, browser-based AI tools are a great option. These are especially useful for quick video sharpening, upscaling, and color correction without needing to install anything. Here are four well-known online tools to help you get started:
| Tool | Key Features | Limitations | Pricing |
|---|---|---|---|
| Topaz (Browser) |
➤4 AI presets (Standard, Art & CG, Interview, Old Videos) ➤Upscale to 4K ➤Frame interpolation (60–120 FPS) |
➤Requires strong internet ➤No manual control ➤Paid cloud credits needed |
➤Free 20 credits on signup ➤US$ 9 for 100 credits |
| Cutout Pro |
➤Upscale to 4K ➤Format support for MP4, WebM, MOV, GIF ➤File size up to 2GB |
➤No frame-by-frame editing ➤Upload time can be long for large files |
➤ Pay-per-use (US$ 9.90/100 credits) |
| Canva Video Enhancer |
➤Visual presets for mood ➤Animations & motion blur ➤Ideal for social formats (YouTube, Reels) |
➤More aesthetic than technical ➤No real upscaling or denoising |
➤ Free basic plan ➤Pro from US$ 12.99/month |
| Fotor Video Enhancer |
➤Sharpen blurry videos ➤Brighten dark clips ➤AI auto-fix tools ➤Supports MP4, MOV, WebM |
➤1 GB / 5-min limit ➤Only basic enhancement options available |
➤US$ 3.33/month (Fotor Premium) |
Conclusion
There you go. Every major category of video enhancement software covered. Just remember: browser tools are great for convenience, but they often come with trade-offs like limited control or file size restrictions. Even among the desktop tools, some are entirely AI-based, while others require extra manual control for every video you edit.
Eassiy Video Converter Ultimate is the way to go if you want professional-level precision, total creative control, and a beginner-friendly interface. Eassiy gives you intelligent presets and deep manual tools to deliver quality results every single time. More importantly, it offers 5 free video edits, so you can experience the enhancements before committing.