
Updated on 2026-07-03
views
5min read
Hi,
I’m trying to install an app on my Android phone but got the prompt “insufficient storage space”. So I decided to browse through my device for large data files that I can quickly get rid of so I can install the app. During my search, I discovered a file category labeled “Others” to occupy the majority of the storage space on my phone. Please, how can I clean the other storage so I have enough space to bring in the new app? Kindly assist with the corresponding guide.
Are you familiar with the situation above?
Well, undoubtedly, the other storage category is one of the sections that take up the majority of the internal storage space on an Android mobile device. Cleaning this storage category is crucial if you are looking for a simple yet effective way to enhance the internal memory storage of your Android phone so you have enough space to bring in new data and boost your device to work at an optimal level.
There are several ways to delete other storage on your Android device, but this post will focus on the best 5 recommended by Android experts. Ready to learn these techniques? Then read on, as we share our detailed comprehensive guide with you.
Part 1. What Is Android Other Storage?
Other storage is one of the many storage sections on your Android mobile device where junk data files from installed apps, browsers, downloads, and more, are stored for future reference. Some of the data files stored include caches, cookies, history, failed backups, and more.
You might be wondering why your device is keeping such data/information. Well, it is very necessary so you don't have to always enter personalized details each time you load an app or revisit a browser.
Part 2. How to Check Android Other Storage?
Viewing the other storage section on your Android phone is super easy. You can apply the procedure shown here:
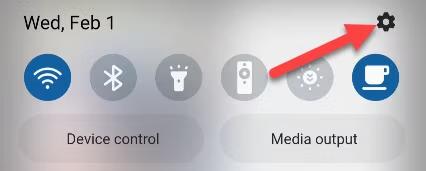
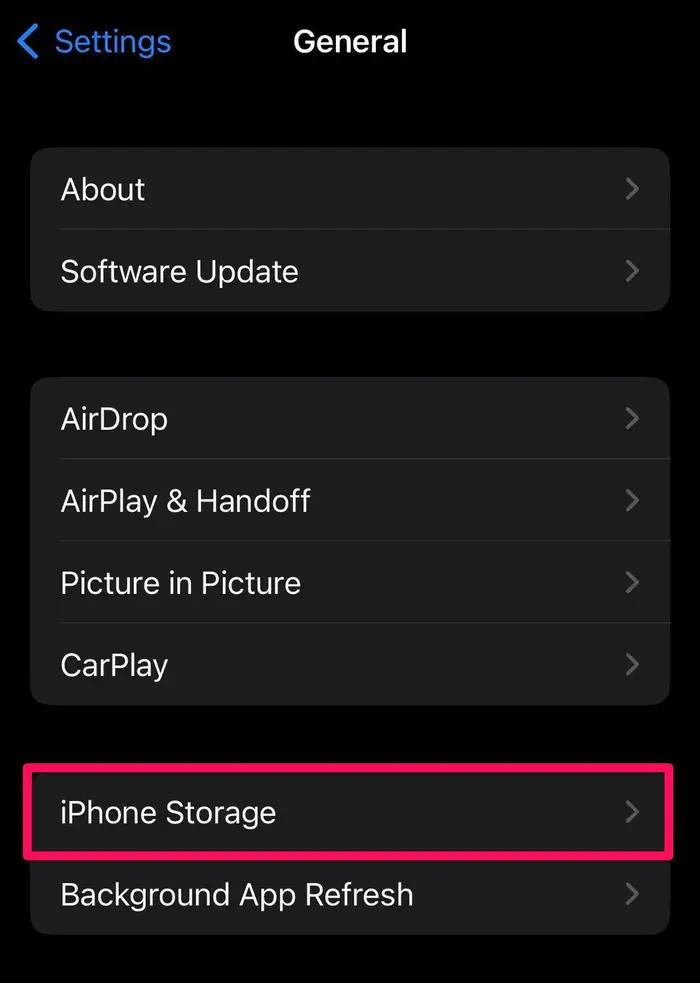
- Swipe down from the top of your phone screen, and click on the cogwheel or gear icon to access the Settings menu panel.
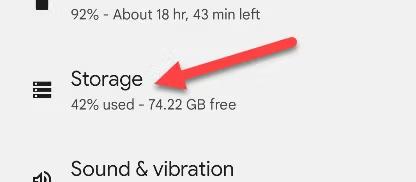
- After completing the above, scroll down the screen that pops up and select Storage (for Google Pixels, and non-Samsung mobile phones).
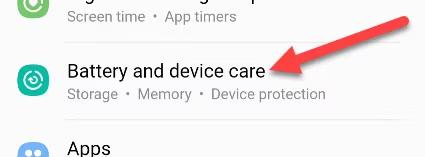
- If you use a Samsung Android phone, kindly navigate to where you have the Battery and device care tab, click on it and select Storage on the next screen that comes up.
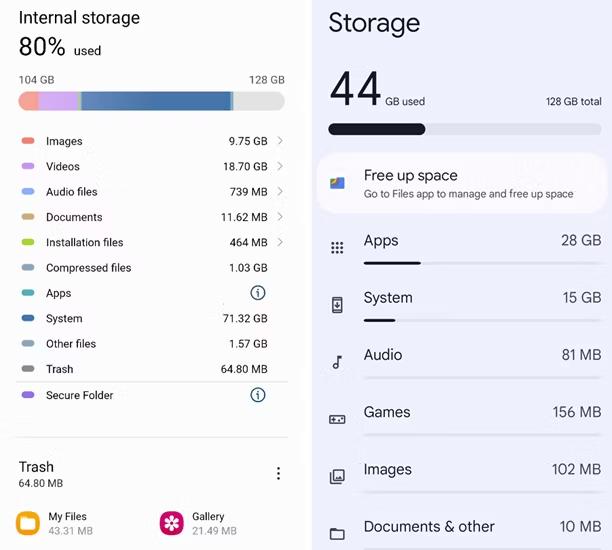
- Now wait a few minutes for your Android phone to analyze its system for data on it. The page displayed down here will come up:
Part 3. How to Clear Android Other Storage Manually
Select and apply any of the 5 methods below to delete the other storage section on your Android mobile device:
1. Delete Useless Apps
Do you have some apps on your Android phone that you aren’t using or interacting with? It’s time to get rid of them from your device, as they often create caches, cookies, logs and more, which add up to the other storage category.
This approach is simple and costs nothing. However, it can take time to finish if you have multiple apps you want to delete from your mobile device. Here’s the stepwise guide to follow to delete useless apps from your Android:
- Unlock the Android phone to access your Home Screen.
- Next, open the app menu, and locate the useless apps on your device. Once found, hold down on the app until you find the interface below:
- Select UNINSTALL to get rid of the app from your device.
Alternatively, you can use the approach down here:
- Launch the Google Play Store on your Android mobile device.
- Next, click on your display picture at the upper right corner of your screen to access the screen shown below:
- Select Manage apps and data from the list of options displayed.
- Click on the Apps button, and select any useless apps on your phone.
- After that, click Uninstall on the next page that pops up.
2. Clear Caches for Each App
All apps on your mobile device store caches in the other storage section, so all personalized info can be easily synced each time to want to use them. With caches, you don’t have to stress with recollecting the details provided when logging in an app in future.
While caches are cool to store, they cause your device to malfunction when in excess. To avoid such, deleting or clearing them would be helpful. You can follow the instructions shared below to clear caches for each app on your Android mobile phone:
- Bypass the screen lock security feature on your Android phone, and swipe down your screen.
- Click the cogwheel or gear logo situated at the upper right corner of your screen, and the Settings menu will open.
- Navigate to the Apps section, and your Android phone will direct you to a new screen labeled Apps.
- Click on one of the apps, then hit the Clear cache button.
- Do this for all apps you have on your Android phone, so you can reduce the storage consumed by the other storage category on your device.
3. Remove and Reinstall Apps
Another simple technique to clear other storage on your Android phone is to remove and reinstall the apps on it. This helps you reduce the caches, cookies, and history data stored in the other storage category.
While this approach sounds easy, you might have to dedicate some hours to finish it, depending on the number of apps you have on your device. You can remove and reinstall apps by applying the simple guide shared below:
- Firstly, you have to remove screen lock on your Android phone by entering the corresponding unlock details.
- After that, hold down on each app (ensure it’s not a system app), and click UNINSTALL to remove the app from your phone.
- Once done, connect your device to a reliable data network, and launch the Google Play Store app.
- Enter the app name in the empty search field, and hit the enter button.
- Now hit the Download button to commence the reinstallation of the app.
- Do this for all apps you have on your Android mobile phone.
4. Backup and Wipe your Phone
Here is another effective technique to clear the other storage section of your Android mobile phone. All you need is to backup your important data (both content and settings), then proceed to wipe the device (reset it).
Since this technique is a two-in-one approach, we will start with how to backup first. Check and apply any of the three backup procedures shared below:
1. One-Click to Backup Android Phone without Data Loss
A quick and safe way to keep your important data off the internal storage of your Android mobile device is via a professional data backup tool like Eassiy Phone Transfer. With Eassiy Phone Transfer software, you can back up various types of data from an Android phone/iPhone to a Windows computer. Some of the data files supported on this software include: contacts, photos, voice memos, messages, audio, music, videos and more. Definitely, you can also count on it to help you restore backed-up files without a hitch.
Besides data backup, Easily Phone Transfer supports data transfer, as it ensures excellent migration of data between two mobile devices. Whether you are looking to move data from Android to Android, iOS to iOS, or iOS to Android, this software should always come in handy.
Key Features
- One-click to backup and transfer your data without compromising the quality.
- Backup, Transfer, and Restore different types of data files at an excellent speed.
- Eassiy Phone Transfer is very easy to use. This software has an interactive interface that anyone from different walks of life can easily navigate around.
- It’s readily available for installation on all Windows computer systems.
Stepwise Guide to Backup Android Phone with Eassiy Phone Transfer
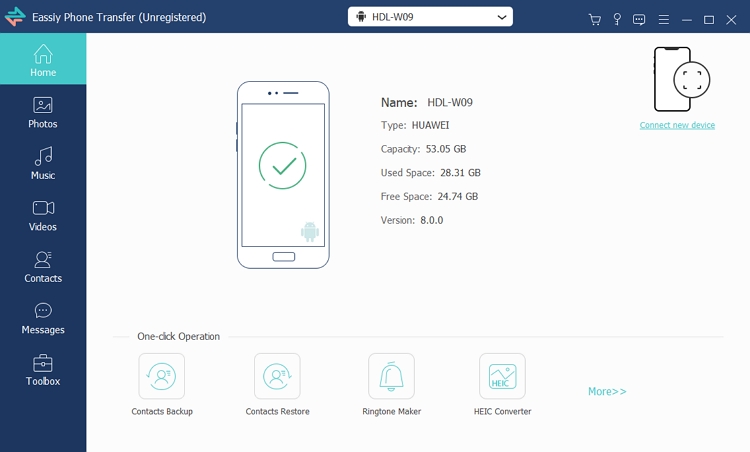
Step 1: Install the Eassiy Phone Transfer software on your PC, and launch it by clicking the appropriate icon on your screen. Connect your Android device to the PC using the right cable and wait for the software to recognize it. Once it does, a screen showing your device details will come up.
Step 2: Proceed to change USB connection settings to File Transfer. You may have to download and install Eassiy Phone Transfer app on your Android phone if you haven’t done that in the past. Once all of these have been put in place, all recoverable data on your Android phone will sync with the software. Select any of the data icon on the left sidebar.
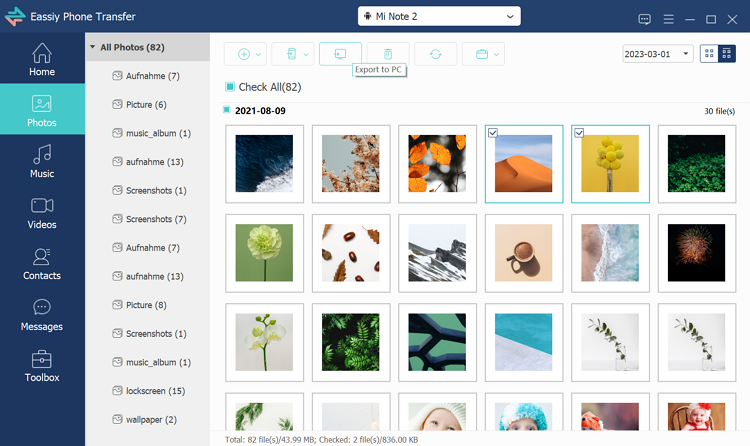
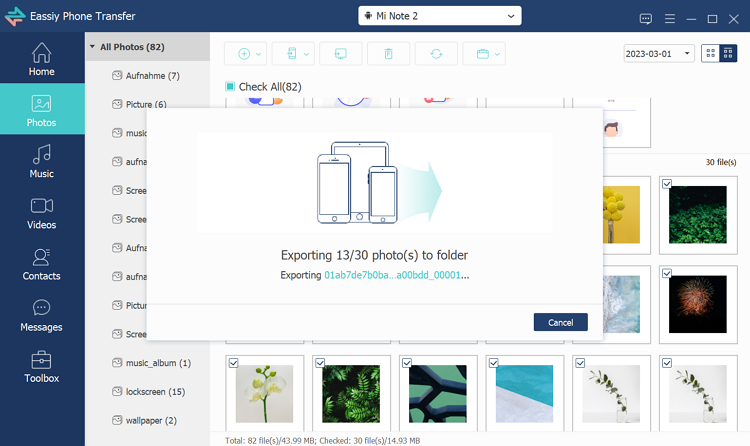
Step 3: Now choose the data to backup using Eassiy Phone Transfer, then hit the Export to PC icon to backup data off your Android mobile device.
2. Use Phone’s Built-in Function
Another simple way to backup your data on Android is via the built-in backup function. This feature lets you keep your important data such as photos, videos, contacts, SMS, and more, safely off your Android mobile device.
To move your data off your Android internal storage system using the built-in backup function, use the steps down here:
- Go to the Settings panel on your device by tapping on the gear icon on your Home Screen.
- Select System > Backup.
- Ensure the backup function is enabled, and choose the data to backup.
Limitations
- Limited storage space to back up your data.
- Backup can take several hours or days to finish depending on the file size.
- It doesn’t support all your Android data.
3. Use Google Drive/OneDrive
With cloud storage services like Google Drive and OneDrive, you can also move your data off your Android internal storage system. Both Google Drive and OneDrive store your backup data perfectly, however, they provide limited storage space which can be expanded once you subscribe to a premium package.
Check out the stepwise guide for each of these storage media:
Backup Android Data with Google Drive
- Click on the Files icon on your Android device, then navigate to the bottom, and hit the Browse button.
- Next, select a category underneath the Category section when the next interface appears.
- Choose the files you would like to move to Google Drive by holding down on them.
- Once done, click on the More button at the top of your screen, and hit the Back up to Google Drive icon to proceed.
Backup Android Data with OneDrive
- Install OneDrive on your Android phone via Google Play Store.
- Launch it, and log in to your account using the right credentials.
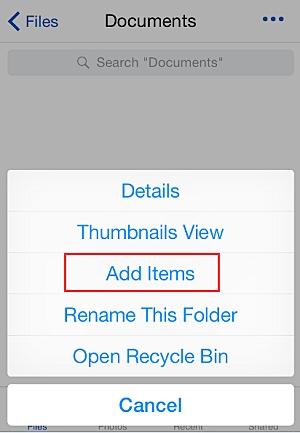
- Locate the three horizontal icon at the upper right corner of the page, click on it, and select Add Items.
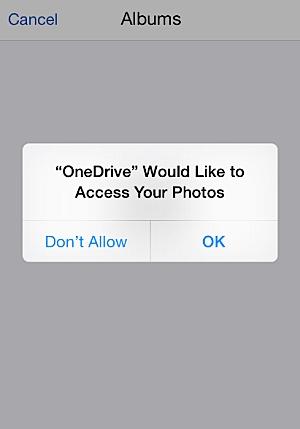
- Next, a prompt requesting you to grant OneDrive access to your phone storage will come up. Click OK to proceed.
- Choose the data to back up, and hit the right buttons to complete this guide.
5. Restore Applications
Lastly, we have app restoration as another wonderful trick to clear the other storage on your Android phone. This technique comes in handy since messaging and gaming apps like WhatsApp and others record chat history, and gaming data respectively, both of which take up large storage in the other storage category.
Restoring the corresponding apps would help you clear data, and increase storage space on your device. Use the steps below to restore the application on your Android mobile device:
- Open the Files menu page on your Android phone.
- Hit the Clean Up icon, and another interface will pop up.
- Select Storage manager to proceed.
- Next, your phone will scan its system for restorable data.
- Hit the Application restore, and choose the app to restore.
Tips: Recover Android Data Deleted By Mistake Using Android Data Recovery
For folks who forgot to back up their crucial data before resetting or restoring their Android phone, you can count on Eassiy Android Data Recovery software to help you retrieve your missing data. It retrieves data such as call logs, contacts, messages, videos, voice memos, and 16+ more with no quality loss.
Eassiy Android Data Recovery boasts of excellent data recovery operations as it brings back your data with high precision and accuracy. It provides a flexible approach to retrieve data, as it allows you to preview, and select your desired data to recover to avoid overwriting. It works perfectly with both rooted and unrooted Android devices.
Steps to use Eassiy Android Data Recovery for Phone Backup
Get the right version of the Eassiy Android Data Recovery software installed on your PC/Mac. Run it and use the instructional guide below to recover your lost data files:
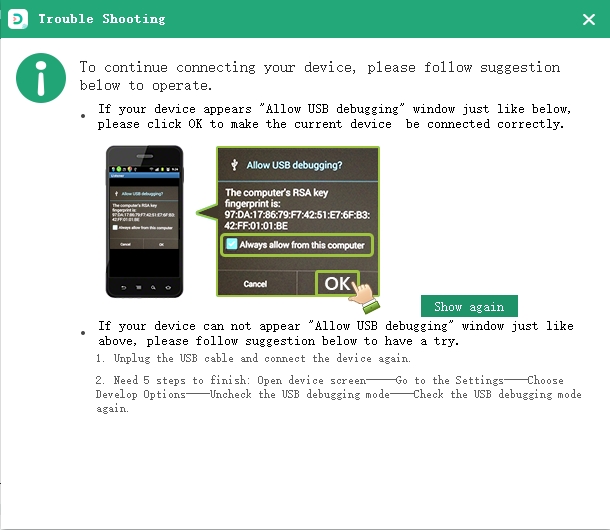
Step 1: Connect the Android phone to PC/Mac using the most suitable USB cable. Once Eassiy Android Data Recovery software detects your device, it display a guide for you to activate USB debugging. Use the guide accordingly.
Step 2: Next, a new interface with the different categories of files that your can recover on your Android phone will come up on your PC/Mac screen.

Check the box next to the category of file you want to retrieve, then hit the green Next button at the bottom left corner of your screen to proceed.
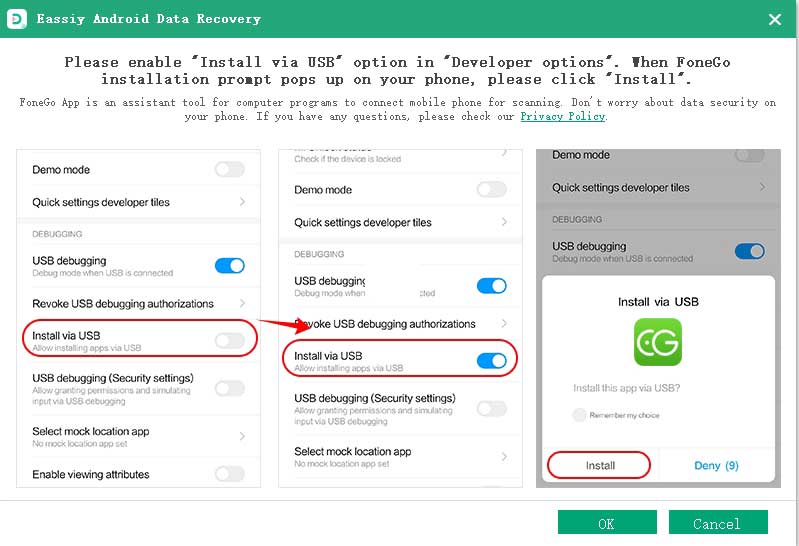
Step 3: Now, a download prompt will come up on your Android phone. Kindly click on the corresponding buttons so Eassiy Android Data Recovery can be installed on your device.
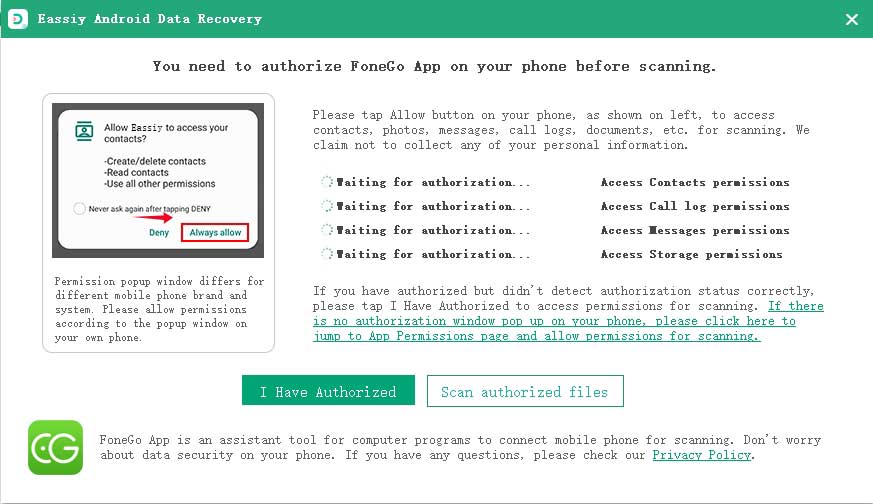
Once done, grant Eassiy access to your Android internal memory by clicking Allow when the corresponding prompt appears on your phone screen.
Step 4: Now, click on Scan Authorized Files when the interface shown below appears on your PC/Mac screen:
Wait patiently for the scanning to finish, and a new page showing all the recoverable data on your Android phone will come up, just like the one below:
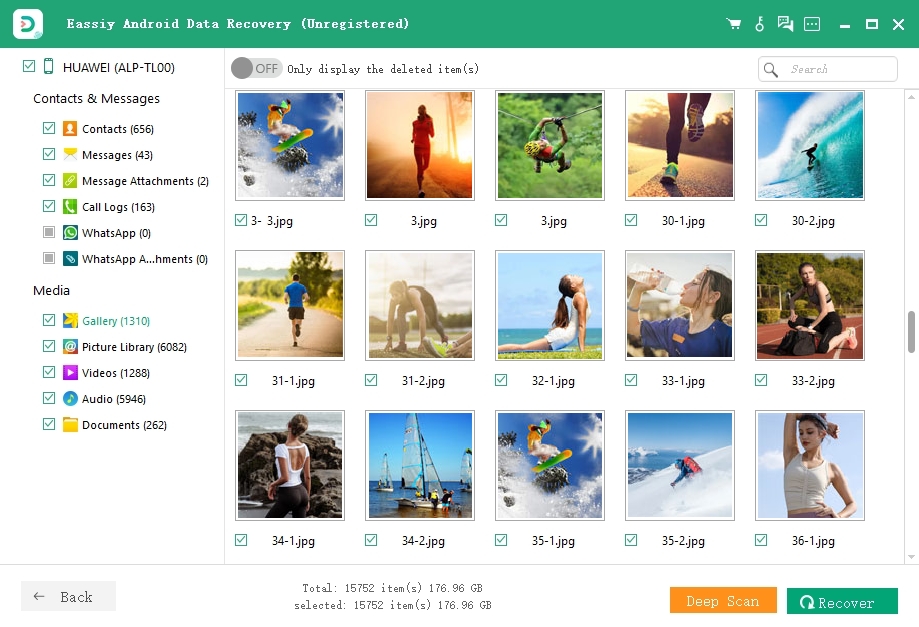
Choose the category of files to retrieve on the left sidebar, and check the boxes next to the corresponding data displayed on the right hand panel. Hit the green Recover button and Eassiy Android Data Recovery will retrieve the selected data immediately.
Conclusion
Now you know all about Android other storage. We’ve provided the right guide to help you delete other storage on your Android phone without losing data. Follow and apply the guide appropriately to get the best result.
Mind you, Eassiy Phone Transfer offers the best data backup services, and the Eassiy Android Data Recovery software retrieves your Android data without crashing your system. Both software programs come in handy when you need to backup and retrieve data respectively. Try them out today!