
Updated on 2023-05-17
views
5min read
On a Mac, experiencing photo loss is inevitable due to various reasons such as accidental deletion, crashed photo editing, physical damage, and malware infection. Nevertheless, unintentional deletion is the most common cause of photo loss. If the deleted photos are in the Mac Trash, restoring them is a simple process. However, situations can be drastically different if the photos have been permanently deleted in the following scenarios: deleting photos in Photos' Recently Deleted folder after 30 days, permanently deleting photos from the Mac Trash bin, or finding deleted Mac photos missing. In this guide, we are describing how to recover deleted photos on Mac. By following this guide, you can perform photo recovery Mac and get your deleted photos back on your Mac.
Part 1: Can You Recover Deleted Photos on Mac?
Recovering deleted photos on a Mac is indeed possible which means you can recover deleted photos on Mac. If the photos were deleted from the Trash, you can retrieve them easily by opening the Trash, finding the photos, right-clicking on them, and selecting "Put Back".
However, if the photos were permanently deleted or removed from the Trash, you can still recover them using third-party data recovery software options like Eassiy Data Recovery or Backup files.
Part 2: How to Recover Deleted Photos Mac?
Here, we will showcase 7 distinct methods to recover deleted photos on a Mac. With these options, you should be able to retrieve your valuable pictures successfully.
Way 1: Recover Deleted Photos on Mac with Best Photo Recovery Mac Software
We comprehend that your photos or files have been deleted permanently from your Mac, and it may appear that checking your Trash bin is unnecessary. However, it is advised that you do so since you may discover your deleted photos there under a different file name. If that's not the case, the most straightforward method to recover permanently deleted photos on Mac is to employ a professional data recovery program, and we suggest using Eassiy Data Recovery. It stands out from its competitors by offering a multitude of robust features that can efficiently and rapidly restore your data. The speed and reliability of this tool are unparalleled, enabling it to deliver precise and accurate data recovery services. Eassiy Data Recovery is versatile, as it can be used on any drive or location, whether it's a local drive, external hard drives, Recycle Bin, portable devices such as USBs or SD cards, or crashed computers. This user-friendly yet professional program can recover an array of file types, including photos, Word documents, videos, Excel spreadsheets, and more. It can restore lost files caused by various factors, such as virus attacks, accidental deletion, emptying the trash bin, or operating system updates.
Key Features:
- The software can support more than 1000 file types, encompassing photos, videos, music, and a variety of documents, including but not limited to Excel, Word, PPT, PDF, and numerous others.
- Recover lost or deleted data from various sources such as Windows/Mac systems, USB flash drives, SD cards, digital cameras, and more using this software.
- Eassiy Data Recovery boasts a higher success rate in recovering data.
- If your system crashes and you forgot to back up your files, this program can help you retrieve your lost data.
- Supports effortlessly recovering deleted data from RAW hard disk or RAW flash drive without any issues.
Here are the steps to recover deleted photos on Mac with best photo recovery Mac software.
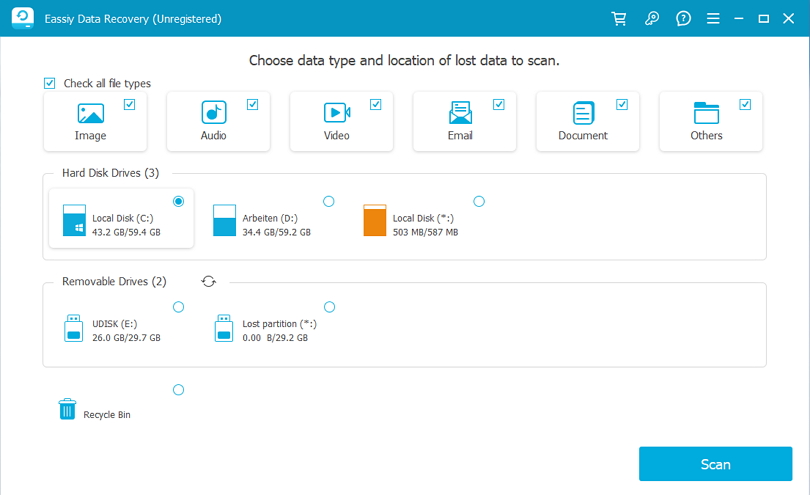
Step 1: To start the recovery process with Eassiy Data Recovery, all you need to do is launch the software and select the type of data you want to retrieve, along with the hard drive you want to scan. Simply choose the corresponding checkboxes if you only want to recover particular file types.
Step 2: With Eassiy Data Recovery, you can choose between two scanning modes: Quick Scan and Deep Scan. Quick Scan starts automatically when you begin scanning and is best suited for recent data loss. Once the scan is complete, you can review the results by examining the files sorted by type and path.
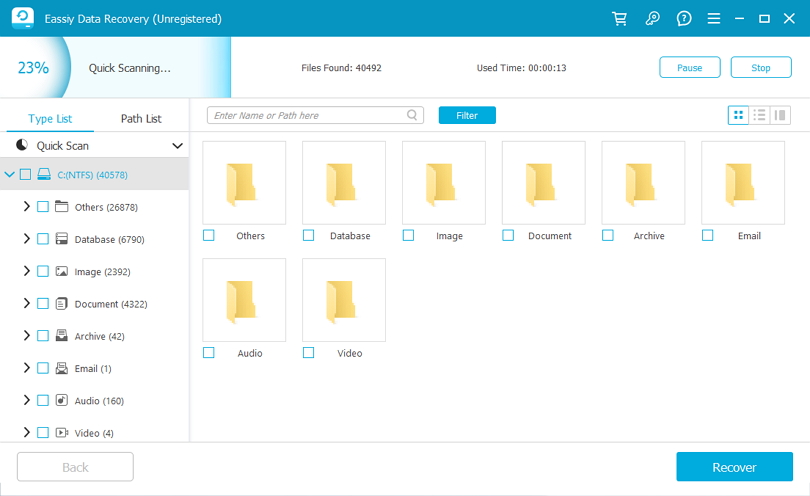
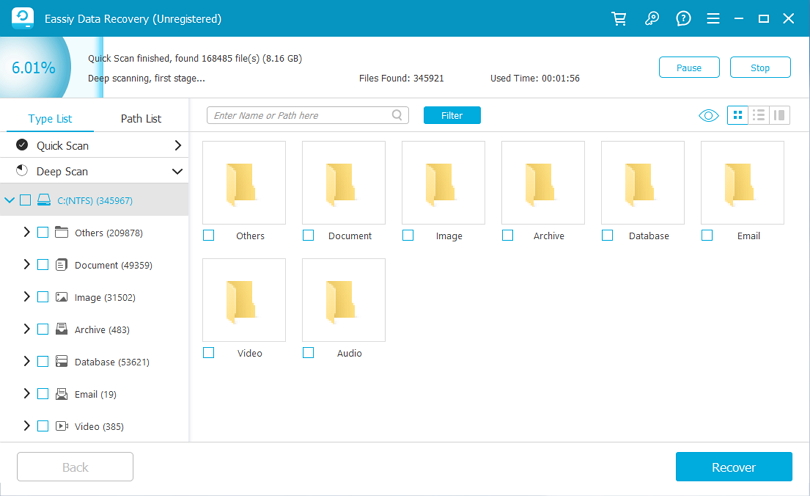
Note: In case you are not satisfied with the results, you can opt for a Deep Scan to discover additional content. However, bear in mind that this option may take longer than a Quick Scan.
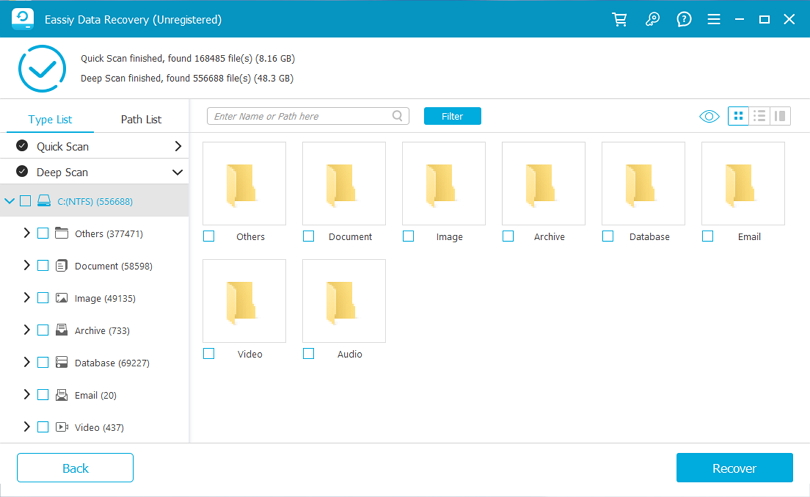
Step 3: Once all the data types are displayed, simply select the particular files you want to recover. You will be able to use the search bar to find files by name or path, and the icons next to the Filter button to adjust the preview mode.
Way 2: How to Recover Permanently Deleted Photos on Mac by Time Machine
If you have Time Machine backup available, you can effortlessly recover permanently deleted photos on Mac for free. As you might be aware, Time Machine is a backup application that enables you to save your files to external storage devices. In case of data loss, you can retrieve the files from your Time Machine backup. Follow the below steps to recover permanently deleted photos on Mac by Time Machine.
Step 1: Plug in the external hard drive that you utilize for Time Machine into your Mac.
Step 2: Click on the Time Machine icon located in the top menu bar and then choose the option "Enter Time Machine".

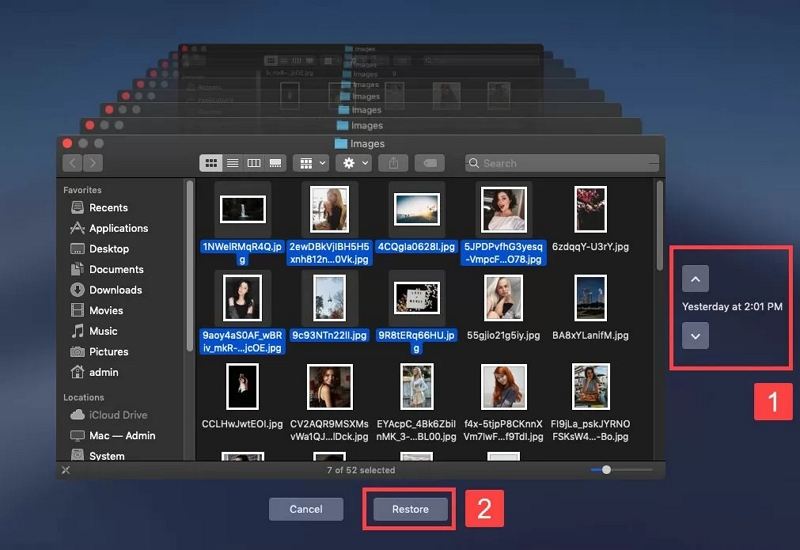
Step 3: You can navigate through the timeline in the lower right corner of the screen to find the date and time of your last backup. Then, in Finder, locate the folder containing the mistakenly deleted files, such as precious family photos.
Step 4: After you have found the photos, choose them and then click on the Restore button. This will initiate the restoration process of the photos back onto your Mac's hard drive.
Way 3: Mac Photo Recovery Using iCloud
If you've stored your photos permanently on iCloud but haven't activated the sync function, you can retrieve them on your Mac by re-downloading them. This is particularly handy if you're trying to recover photos that were recently deleted and are now missing from your Mac. Here are the steps that you have to follow to perform Mac photo recovery using iCloud.
Step 1: Access icloud.com from your Mac and sign in.
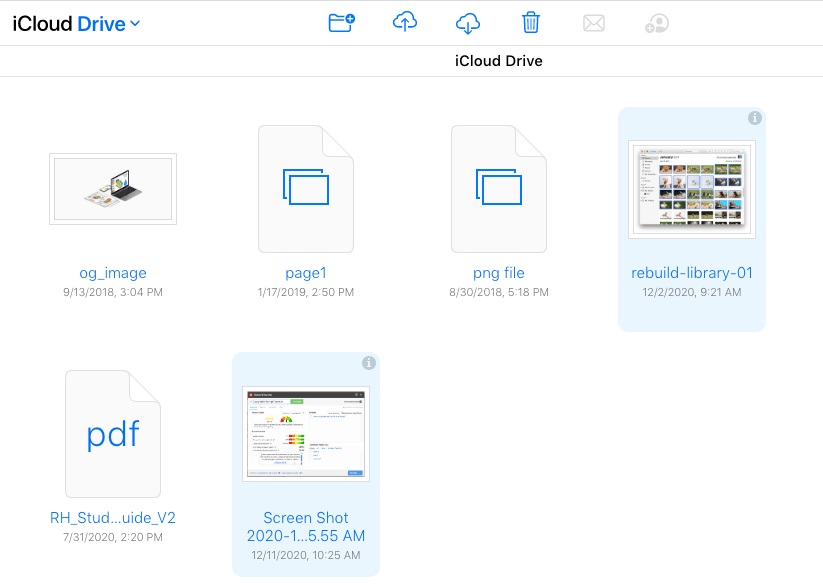
Step 2: Select iCloud Drive from the menu in iCloud Settings.

Step 3: Locate the photos that were permanently deleted, choose them, and then tap on the Download button to recover them to your Mac.
Way 4: Data Recovery from Mac Photos App using Recently Deleted Folder
In case you removed the photos from iPhoto or Apple Photos app, they might be available in the Recently Deleted Folder. The photos and videos that are deleted will stay in this folder for a maximum of 30 days and can be easily recovered. Follow the below steps to perform data recovery from Mac Photos app using a recently deleted folder.
Step 1: Launch the Photos app.
Step 2: Select Recently Deleted from the window on the left-hand side.
Step 3: Select the photos you want to recover.
Step 4: Tap on the Recover button to retrieve the deleted photos.

Way 5: Data Photo Recovery Mac on Mac Trash
Another option is to check the Mac Trash Bin, which is a dedicated folder that retains recently deleted files and folders for up to 30 days, or until it's manually emptied. Here are the steps to perform data photo recovery Mac on Mac trash.
Step 1: Access the Trash folder by clicking on its icon.
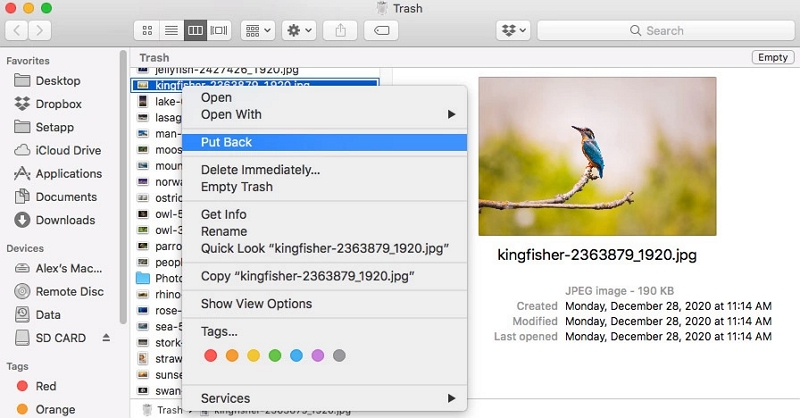
Step 2: Find the item that you wish to retrieve.
Step 3: To recover the file to its original location, right-click on it and choose the "Put Back" option.
Way 6: How to Recover Permanently Deleted Photos from Mac via Terminal
If you wish to recover deleted photos on Mac without utilizing software, then using Terminal is a good option. However, it's important to keep in mind that the Terminal command can solely recover deleted files from the Trash on Mac. If the Trash is emptied, then you will need to resort to a Mac file recovery tool for assistance. Follow the below steps to recover permanently deleted photos from Mac via Terminal.
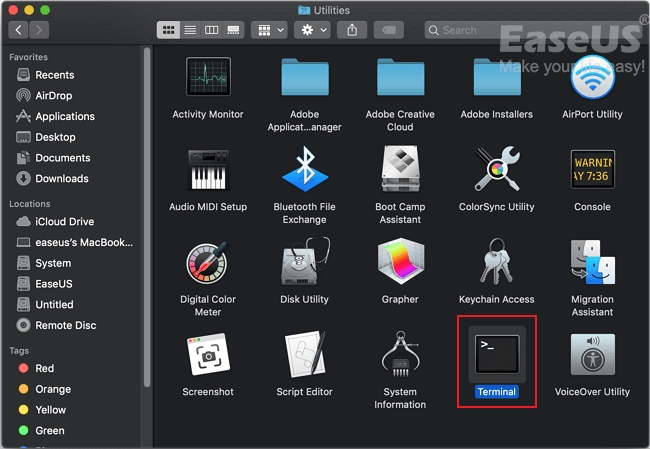
Step 1: Navigate to "Finder" > "Applications" > "Utilities" and double-click on "Terminal" to open it.
Step 2: Enter the command "cd .Trash" and hit the "Return" key on your Mac.
Step 3: Type in "ls -al ~/.Trash" to view the contents of your Trash folder.
Step 4: Enter the command "mv filename ../" and press "Return" (Note: the filename should be the complete file name for this command to function properly).
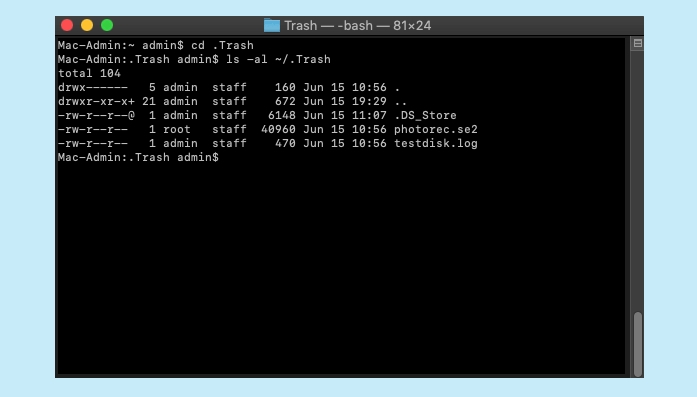
Step 5: Type "Quit" in the Terminal to close the Terminal window. The files that were recovered using Terminal are situated in your home directory folder. You can then proceed to navigate to the folder and check the retrieved items.
Way 7: Data Photo Recovery Mac with Undo Options
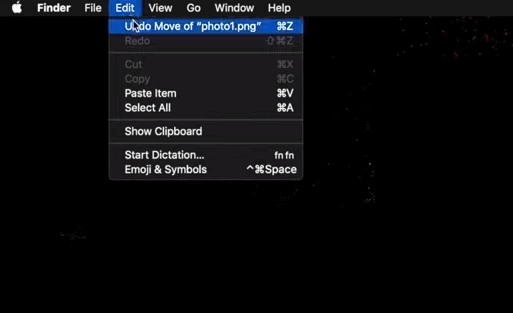
Restoring accidentally deleted important files on a Mac can be done easily by utilizing the "Undo" option, but it's important to do it promptly after removing the files. Once the files have been emptied from the Trash or permanently deleted, this option is no longer valid. Here are the steps for you to perform data photo recovery Mac with undo options.
Step 1: Select the "Undo Move" option by navigating to "Edit" after deleting files.
Step 2: Another way to undo the delete operation is by using the shortcut key combination of Command + Z.
Part 3: FAQ for Photo Recovery on Mac
1. Is it possible for Apple to recover photos that have been permanently deleted?
It is possible to recover photos that have been permanently deleted from an Apple computer through the use of data recovery software or by utilizing local backups.
2. Where do the recently deleted photos on my Mac get stored upon deletion?
If you delete photos using the Photo app, they will be transferred to the Recently Deleted folder. However, if you use any other method to delete them, you can find them in your Mac's Trash Bin.
3. Is it true that deleted photos are permanently erased?
Even after deletion, the photos continue to exist on the hard drive until overwritten by new data. Therefore, if you wish to restore the deleted photos on your Mac, it's advisable to act swiftly and do so before they get permanently removed.
4. What happens to deleted photos on a Mac after 30 days?
Deleted photos are initially transferred to the Recently Deleted folder, where they stay for a short duration before being permanently removed and erased from your device.
Conclusion
Losing photos on Mac due to accidental deletion, virus attacks, or unforeseen circumstances can be a distressing experience. Nevertheless, it is comforting to know that lost photos can be easily retrieved with or without the use of third-party software. In this guide, we have described how to recover deleted photos on Mac. Among the methods given above, we would suggest you use third-party software, such as the Eassiy Data Recovery Software which is often considered the most effective method as it streamlines the process and saves time.