
Updated on 2023-05-11
views
5min read
For Mac users, the macOS Trash Bin is an essential folder for holding deleted files. If you accidentally deleted important documents, the Trash Bin is where you can hope to recover them. However, if you have already emptied the Trash Bin, what options do you have? In this article, we are describing how to recover emptied/deleted trash Mac. After reading this article, you will be able to recover trash Mac and get your deleted files back on Mac.
Part 1: Can You Recover Deleted Items from Trash on Mac?
Yes, you can recover deleted items from trash on Mac. If you select a file and click "Move to Trash" by right-clicking, the file will be sent to the Trash folder, which simply relocates it on your Mac. If you change your mind, you can undo this action and retrieve the file. However, if you choose to permanently delete it by emptying the Trash, the sectors that stored the data will be marked as accessible, allowing new data to overwrite it.
To summarize, permanently deleting a file does not erase the data from your hard drive immediately. Instead, the data remains on the disk until new data overwrites it. Thus, there is a possibility of recovering deleted files before they get overwritten by new data.
Part 2: Ultimate Way to Recover Trash on Mac - Eassiy Data Recovery
Eassiy Data Recovery is a straightforward yet proficient tool for restoring various file types such as photos, videos, Word documents, Excel sheets, and more. This software can assist you in recovering files that were permanently deleted from the trash bin on your Mac. This Mac recovery software is designed to recover data from all types of Mac storage devices, including hard drives, USB drives, SD cards, digital cameras, and more. Whether the data loss occurred due to emptying the trash bin, a virus attack, an accidental deletion, or an operating system update, this software can help retrieve your lost files.
Key Features:
- The Eassiy Data Recovery program is engineered to function seamlessly on both Windows and Mac operating systems.
- Enables you to filter your search results by file type, size, and date, streamlining the process of locating the exact files you require.
- Offers both fast and deep scan modes, guaranteeing a swift and comprehensive identification of all recoverable files.
- You can recover an assortment of files, including photos, videos, documents, emails, archives, and many others, with this software.
- This application is more effective and prosperous compared to other currently available software in the market.
Steps to recover trash on Mac using Eassiy Data Recovery
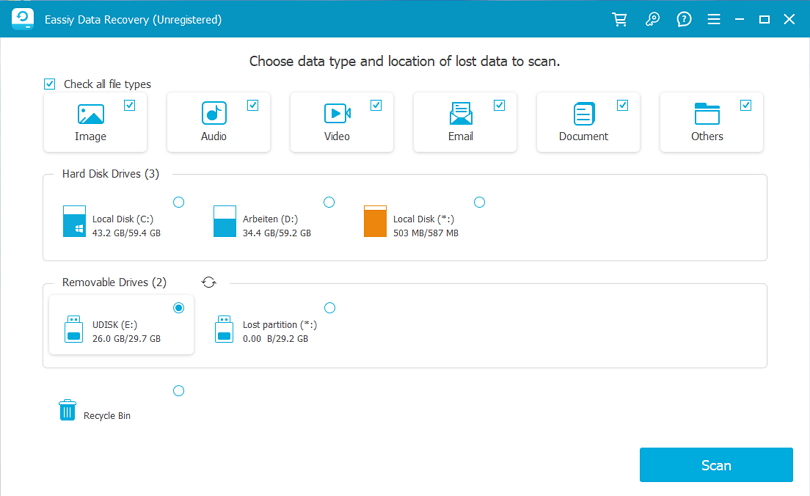
Step 1: To commence the process of data recovery, start Eassiy Data Recovery and select the desired data format and the hard drive you wish to scan. If you prefer to recover specific categories of files, just mark the relevant check boxes.
Step 2: Two scanning options are available in Eassiy Data Recovery: Quick Scan and Deep Scan. Quick Scan starts automatically during the scanning process and is ideal for recent data loss situations. The scan results can be reviewed by inspecting the files categorized by path and type.
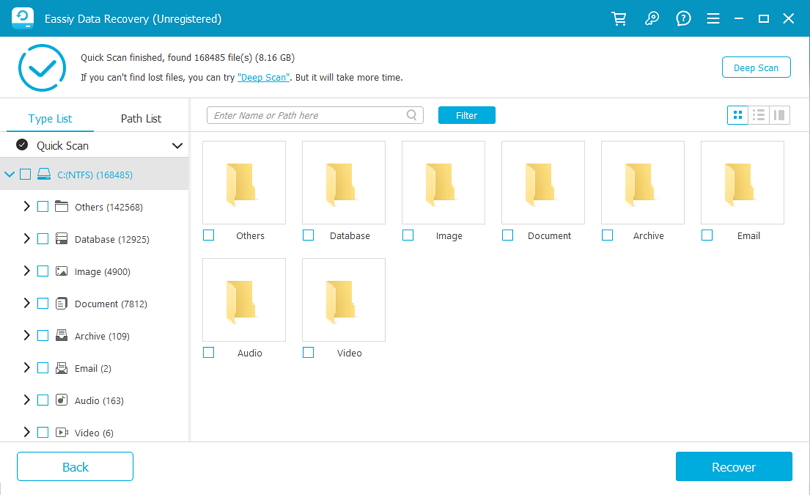
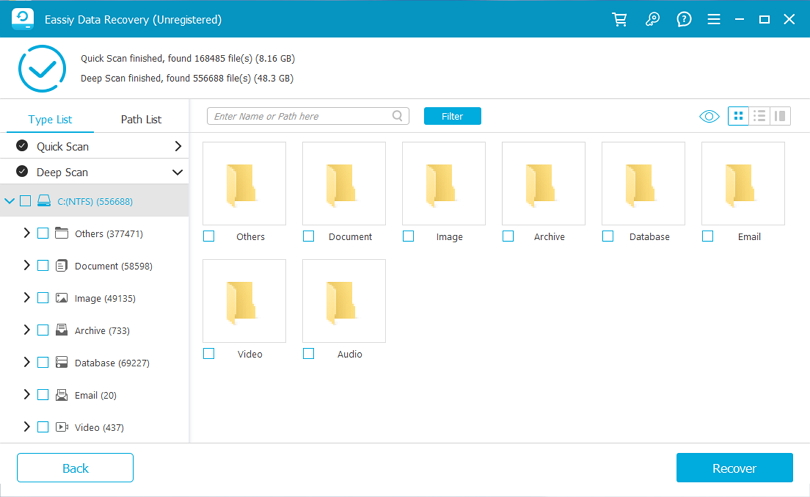
Note: In case you are not content with the results, you can conduct a Deep Scan to unearth additional content, although it may take longer to finish.
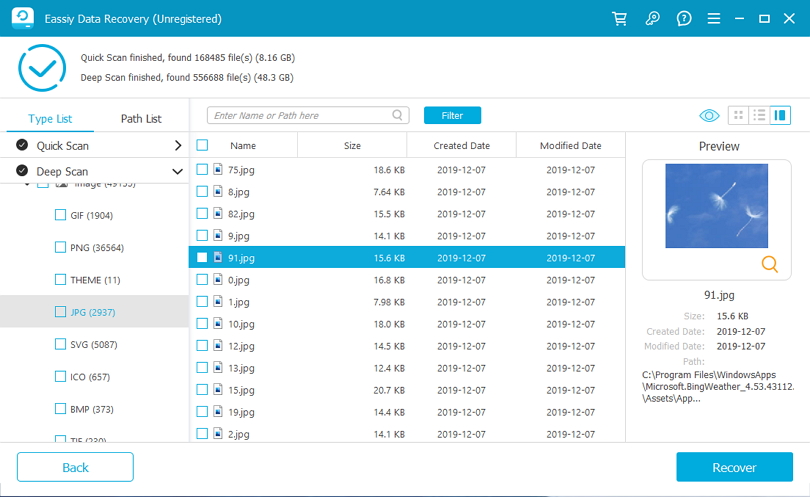
Step 3: Once all the data categories are shown, select the files that need to be restored. You can use the search bar to find files by name or path and modify the preview mode by choosing the icons next to the Filter button. Finally, retrieve the selected files by clicking the Recover button.
Part 3: Recover Emptied Trash on Mac with Time Machine Backup
Apple's Time Machine is a dependable and user-friendly backup tool for Mac users. It creates snapshots or images of everything on your Mac, enabling you to restore a particular file or the entire system whenever necessary. Here are the steps to recover emptied trash on Mac with Time Machine Backup
Step 1: Accessing Time Machine is as easy as clicking on the clock icon in Mac's menu bar. However, if you want to have more control over Time Machine, you can use the Terminal application. By using the Terminal, you can manage multiple computers and obtain various information regarding the backups performed by Time Machine in the past.
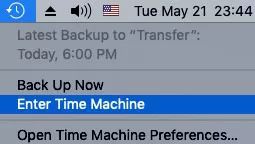
Step 2: To recover a document using Time Machine, you must have the media that you use to back up your Mac connected and turned on. Once you open Time Machine, you can navigate through the backups of your files.
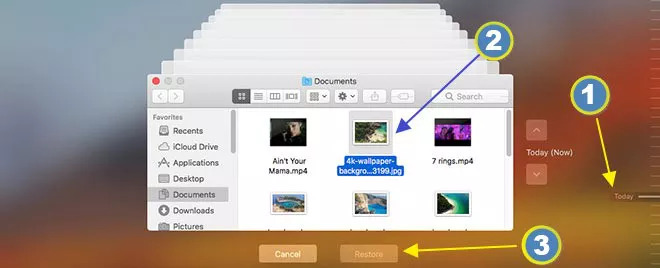
Step 3: Identify all the files that were deleted before the backup was made on the erasure date.
Step 4: Once you have located the specified files, click on "Recover" to retrieve them and restore them to your hard drive. This is how you can recover files from the trash on a Mac.
Part 4: Recover Deleted Trash on Mac Using iCloud Backup
In case you are using backup solutions apart from Time Machine to safeguard your crucial data on the Mac, you can still use those tools to retrieve files that were deleted permanently after emptying the Trash. iCloud is Apple's cloud storage and cloud computing service available to all Mac users, enabling them to back up essential data such as photos, videos, documents, notes, contacts, and more. If you have been using iCloud to prevent the loss of vital data, you can also use it to recover all files that are no longer in the Trash. Follow the below steps to recover deleted trash on Mac using iCloud backup.
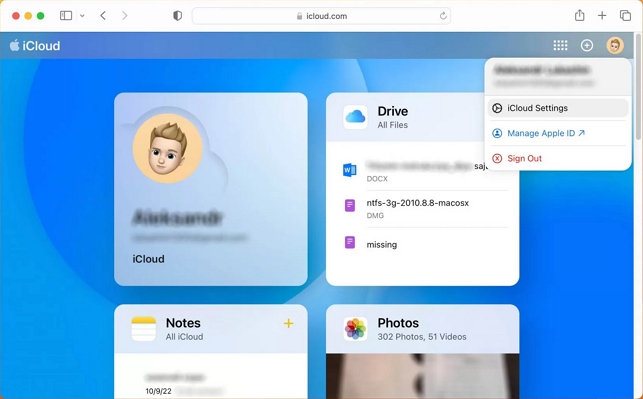
Step 1: Visit iCloud.com and log in to the site using your account credentials.
Step 2: Click on the Account icon and then select "iCloud Settings".
Step 3: Navigate to the "Data Recovery" section and select the "Restore Files" option.

Step 4: Locate the files that you wish to retrieve and select them by checking the boxes on the left-hand side of their names. Alternatively, you can choose to restore all files at once by selecting the "Select All" option.
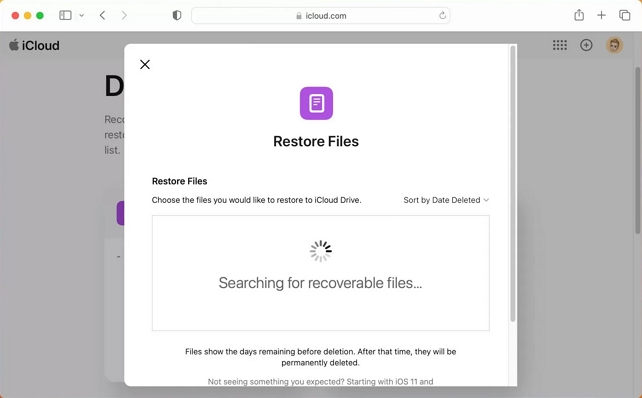
Step 5: Click on the "Restore Files" button to initiate the process and retrieve your lost data.
Part 5: Recover Emptied Trash on Mac Free By Dropbox
Dropbox is a cloud-based storage service that enables users to save and distribute files and folders to others through the Internet. It provides access to stored files from any internet-connected device, facilitating teamwork and collaboration by allowing sharing of specific files and folders with designated individuals or groups. You can recover emptied trash Mac free by using Dropbox if you have previously backed up your files. Here are the steps to recover emptied trash on Mac free by Dropbox.
Step 1: On your Mac, open Dropbox's website and sign in with the account details that you have used to back up your deleted files.
Step 2: Find the specific files that you desire to recover on your Mac.
Step 3: Choose the files that need to be recovered and indicate a storage location on your Mac to save them.
Step 4: Once you are done choosing the files, tap on the “Download” button and your deleted files will be recovered.

Part 6: Recover Trash on Mac with Professional Data Recovery Service
If all other methods have failed, it may be necessary to seek the assistance of a data recovery service to retrieve the files lost when you emptied the Trash. Although it is the most expensive option, it may be the only viable solution in certain situations.
Data recovery services utilize advanced software and hardware techniques to clone and restore a damaged or corrupted storage device. The following are the fundamental steps to recover trash on Mac with a professional data recovery service.
Step 1: Conduct an online search to find a trustworthy data recovery service.
Step 2: Get in touch with the service to request a recovery quote and to receive shipping guidelines.
Step 3: Send your device to the data recovery center using the provided shipping instructions.
Step 4: Once the device arrives at the center, the technicians will investigate it thoroughly and provide a more accurate estimate regarding the recovery process.
Step 5: Once the customer agrees to the recovery cost, the center will proceed to recover the lost data and save it on a new storage device.
Step 6: Once the recovery process is finished and the customer pays the bill, the recovery center will send the recovered data on a new storage device to the customer, while making sure to securely dispose of the old media.
Part 7: FAQ for Mac Recover Deleted Trash
1. Where the trash can be found on a Mac?
On a Mac, the "Trash" acts like the "Recycle Bin" in Windows and allows you to recover accidentally deleted files by dragging them back out into their original location or onto the desktop. To access the "Trash" icon, you can find it on the right-hand side of the Dock or use the "Go to Folder" option and enter "Trash" in the search bar.
2. What are some typical causes of data loss experienced by Mac users?
Data loss is a universal risk that can affect anyone, regardless of their level of expertise or operating system. Various factors can cause data loss. This article highlights three primary causes of data loss frequently experienced by Mac users.
- Malfunctions in software.
- Failures in the hard disk drive.
- Unintentionally removing files.
3. How to prevent data loss on Mac?
To avoid data loss, backups are undoubtedly the most dependable solution. Fortunately, as a Mac user, you have a remarkable backup tool at your disposal already: Time Machine. To utilize Time Machine for backups, all that's required is an external storage device. Once you have it, plug it into your Mac and access Time Machine through System Preferences. Then, choose your external storage device and let Time Machine automatically back up your Mac. For a more comprehensive backup approach, it's worth considering storing vital files in the cloud. Although Apple's iCloud is a dependable option, other reputable cloud storage services like Dropbox, Google Drive, or OneDrive can also be used.
4. What are the steps to retrieve deleted files from the trash bin on a Mac using Terminal?
Since Trash functions as a concealed folder, Terminal can be used to extract data from it. Nonetheless, if the Trash has been emptied, file restoration through this method is impossible. In such cases, a data recovery application is necessary.
Conclusion
In case you mistakenly delete files on your Mac, it's crucial to immediately check the Trash folder and restore the files from there. However, if the Trash has been emptied and no backups exist, there's no reason to panic. In this article, we have described how to recover emptied/deleted trash Mac. You can choose any of the methods and recover trash Mac. However, we would suggest you download Eassiy Data Recovery to recover emptied trash Mac free. It allows you to restore everything you lost and recover data from 2000+ storage devices.