
Updated on 2022-10-03
views
5min read
It would be great if I could move all of my favorite songs from the PC to my Android phone. However, it never fails to remind me to test the functionality of my USB cord. I can't figure out where to activate USB debugging is quite frustrating. How exactly do I start the USB debugging mode on my Android device? On my Android device, I have a free recovery app that enables me to retrieve any texts that get erased. But whenever I connect my phone to the computer, this program cannot recognize it, and it informs me that I need to activate the USB debugging option on my phone. I have no idea what you were talking about at all. Can anybody provide a hand?
A lot of people who use Android can get into a scenario in which they wish to control their Android devices on their personal computers. Enabling the USB debugging Mode on your Android device is the first step toward accomplishing either of the following goals: transferring your Android data to another device or letting third-party tools on your computer detect your phone. If you want to achieve either of these goals, the USB debugging Mode on your device must be active. Android has a tool called USB Debugging Mode specifically for software developers. Android users can get more access to their devices by enabling the USB Debugging Mode. When you hear the term "developer," some of you may have some reservations about using this option. But just like every other item in the world, so long as we know how to make appropriate use of it, it has the potential to be of enormous benefit to us. And by the time you conclude this essay, you will be aware of the drawbacks of using this, Mode. First, let's go through the actions that are a must.
Part 1: Enable the USB Debugging Mode on a Variety of Android Devices
Because the Android market is home to a wide variety of phone brands and models, we will only include the most well-known Android phone brands in this section to demonstrate how to debug the USB mode.

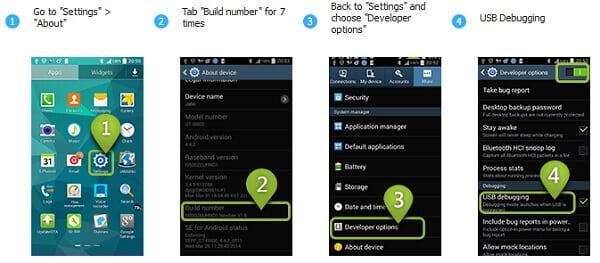
The Step-by-Step Guide to Enabling the USB Debugging Mode on a Samsung Galaxy
Samsung Galaxy S8/S8+
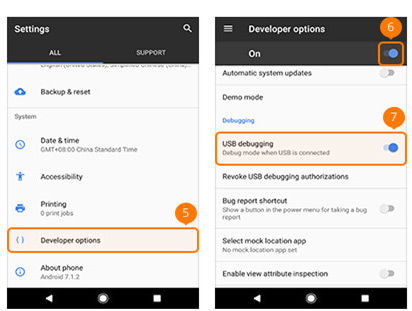
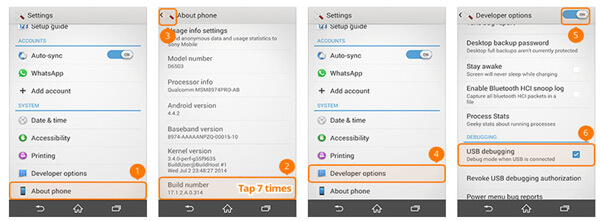
Step 1: Navigate to the "Settings" menu on your Samsung Galaxy S8 or S8+. Choose the "About phone" option > Select "Software information" from the menu. Seven times on the "Build number" button > To return, use the top button labeled "Back."
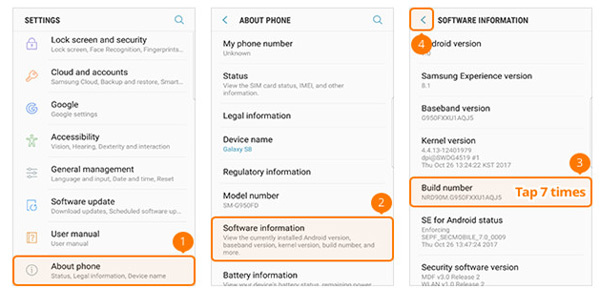
Step 2: Navigate to the "Developer settings" menu, and then slide the "ON" switch at the top and the "USB debugging" switch in the center to the "ON" position.
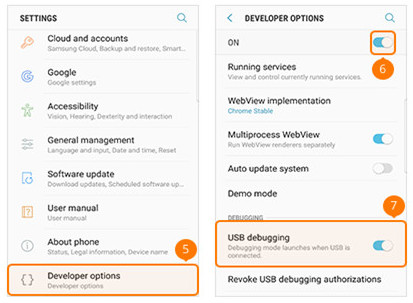
Samsung Galaxy S5/S6/S7
Step 1: Navigate to the "Settings" menu on your Samsung Galaxy S5, S6, or S7. Choose the "About device" option > Select "Software information" from the menu. Seven times on the "Build number" button > Use the "Back" button located at the top of the screen.
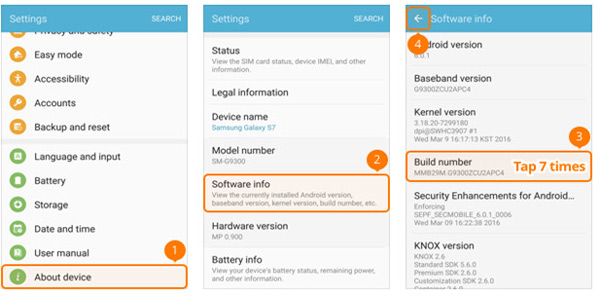
Step 2: To choose "Developer options," slide the "ON" button at the top of the screen, and then slide the "USB debugging" button in the center of the screen to the ON position.

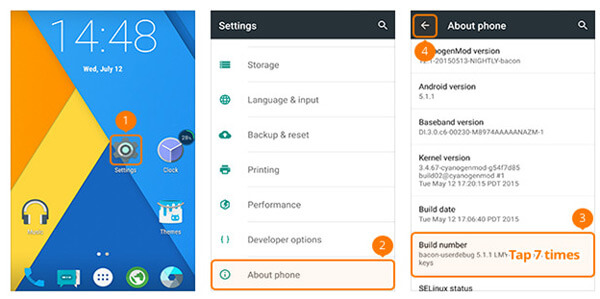
The Step-by-Step Guide to Enabling the USB Debugging Mode on Your Google Phone
Step 1: On your Windows Phone, choose the "Settings" menu > Choose the "About Phone" option > Seven times on the "Build number" button > Use the "Back" button located at the bottom of the screen.
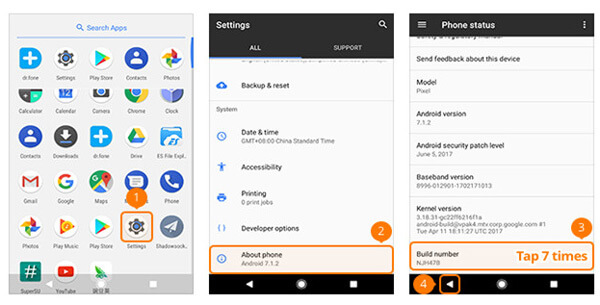
Step 2: To enable USB debugging, go to "Develop settings" and turn the switch on.
The Step-by-Step Guide to Enabling the USB Debugging Mode on HTC Phone
Step 1: How to Enable the USB Debugging Mode on an HTC Device Navigate to "Settings" on the HTC phone you're using > Choose "About," then "Software information," and then "About" again. Hit "More" > Seven times on the "Build number" button > Use the "Back" button located at the top of the screen.
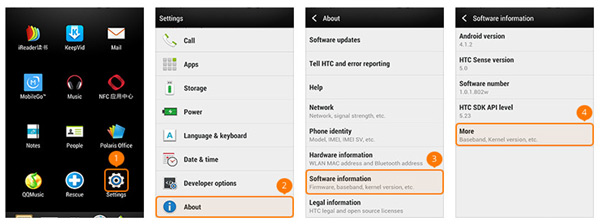
Step 2: To choose "Developer options," slide the "ON" switch located in the upper-right corner of the screen, then check the box located directly before the "USB debugging" heading in the center of the screen.

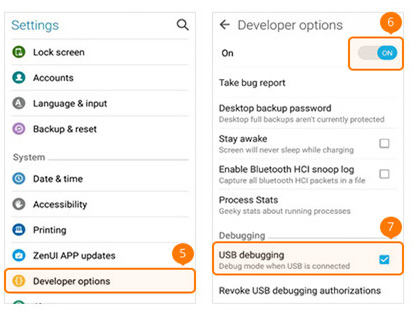
How to Activate USB Debugging Mode on a Huawei Honor/Mate/P Series Device
Step 1: Navigate to the "Settings" menu on your HUAWEI device, and then choose the "About phone" option.
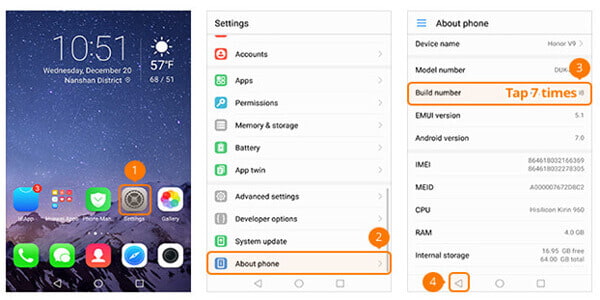
Step 2: Tap "Build number" seven times, then tap the Back button in the screen's bottom-left corner. Choose "Developer options" from the drop-down menu, then toggle "USB debugging" to the "on" position in the center of the screen.
How to Turn on the USB Debugging Mode on Your LG Device
Step 1: Go to the "Settings" menu on your LG phone > Choose the "About phone" option > Select "Software details" from the menu. Click "Build number" seven times in rapid succession > Click the Back button in the upper left corner of the screen.
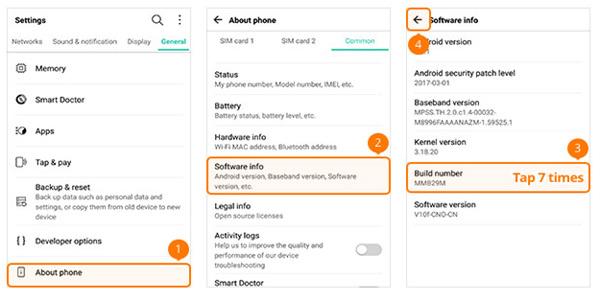
Step 2: To choose "Developer options," follow these steps: > Toggle the "Developer options" button (located on the top-right side of the screen); > Toggle the "USB debugging" button (located in the center of the screen).

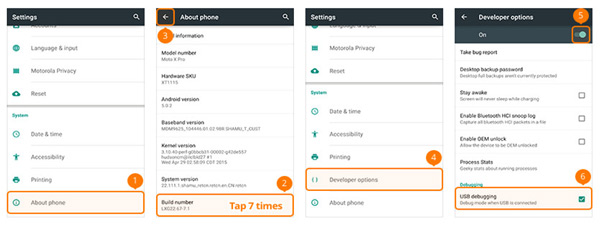
The USB Debugging Mode on Motorola: How to Enable It
Step 1: On your Motorola phone, go to the "Settings" menu > Choose the "About phone" option > Click "Build number" seven times, then click the Back button in the upper left corner of the screen.
Step 2: To choose "Developer options," check the box located just below "USB debugging" at the bottom of the screen.
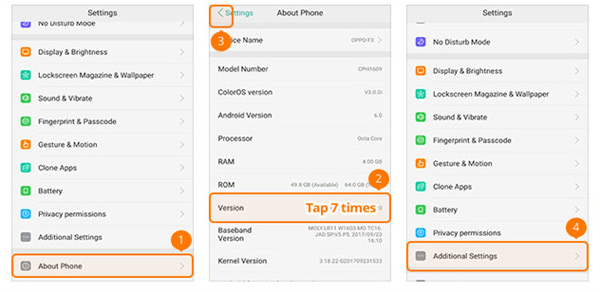
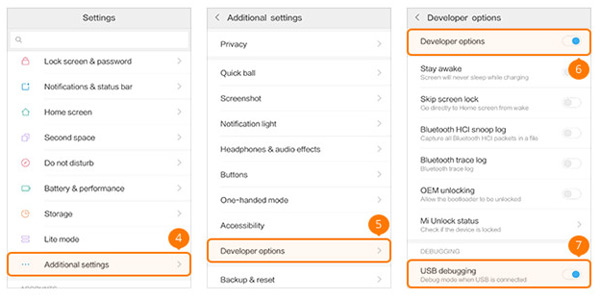
How to Turn on the USB Debugging Mode on Your OPPO Device
Step 1: On your OPPO phone, go to the "Settings" menu > Choose the "About phone" option > Seven times on "Version," please > Click the Back button located in the upper left corner > Choose "Additional Settings" from the menu.
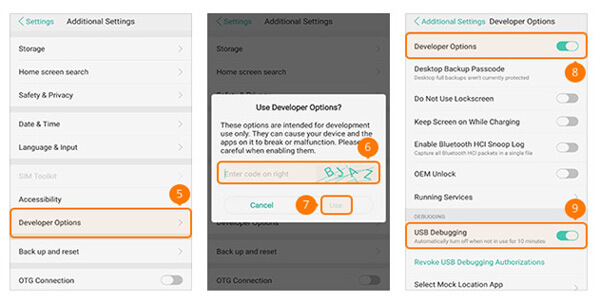
Step 2: To enable "Developer Options" and "USB Debugging," go to "Developer Options," enter the verification code, and then tap "Use" on the menu that appears.
How to Turn on the USB Debugging Mode on Your SONY Device
Step 1: Navigate to the "Settings" menu on your SONY Phone > Choose the "About phone" option > Seven times on the "Build number" button > Use the "Back" button located at the top of the screen.
Step 2: To activate the "Developer options," go to the settings menu and slide the "Developer options" and "USB debugging" switches to the "ON" position.
How to Turn on the USB Debugging Mode on Your VIVO Device
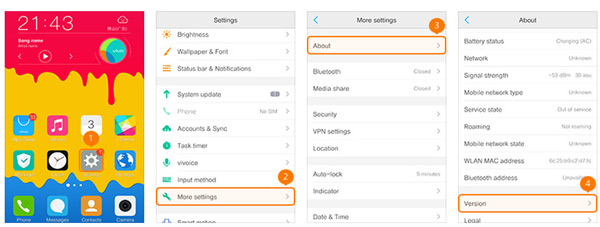
Step 1: Navigate to the "Settings" menu on your VIVO Phone, then choose "More Settings" and then "About" before tapping the "Version" button.
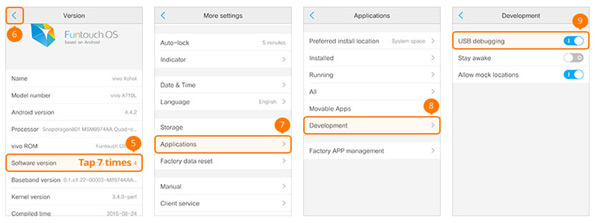
Step 2: You must click "Software version" seven times >. To go back, click the Back button in the top menu > Choose "Applications," "Developer options," and "Development" from the menu. Move the "USB debugging" and "Allow mock locations" switches so that they are both ON.
How to Activate the USB Debugging Mode on a Xiaomi (Redmi/Xiaomi) Device
Step 1: On the Xiaomi (Redmi), go to the "Settings" menu > Choose "About phone >" from the menu. Seven times on the "MIUI version" button > Use the "Back" button located at the top of the screen.
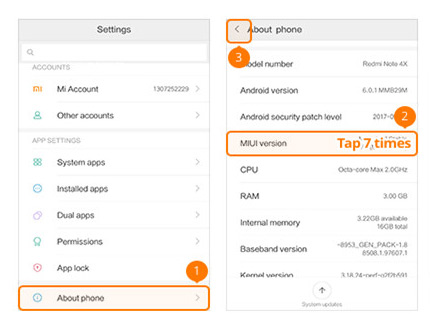
Step 2: Navigate to "Additional settings," then "Developer options," and finally turn "USB debugging" and "Developer options" to the "ON" position.
From this point forward, you will be able to finish the process of enabling USB debugging. One further step is required before you may install Xiaomi models, which is to turn on "Install through USB."
The Step-by-Step Guide to Enabling the USB Debug Mode on ONEPLUS
Step 1: Navigate to "Settings" on your ONEPLUS device, then choose "About phone." Next, tap the "Build number" option seven times, and then press the Back button at the top of the screen.
Step 2: To choose "Developer options," you must first turn "Android debugging" and "Developer options" to the ON position.
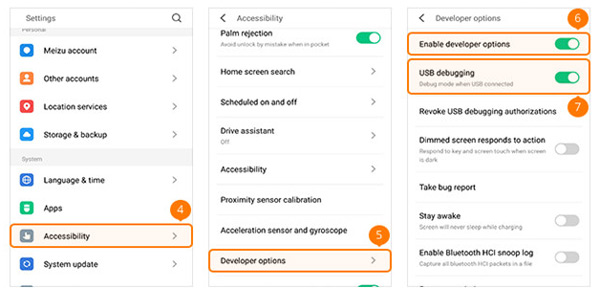
How to Turn on the USB Debugging Mode on the MEIZU
Step 1: Select "Settings" from the MEIZU menu > Choose "About phone," then tap "Build number" seven times in a row, and then hit the Back button at the very top of the screen.
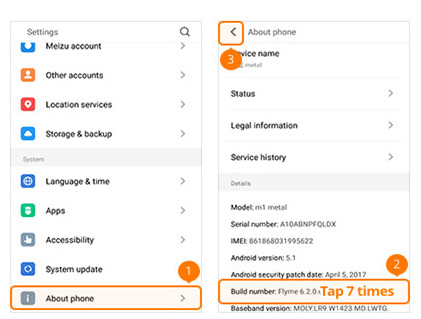
Step 2: Choose the "Accessibility" option > To enable USB debugging and other developer options, tap "Developer options" and then slide the "Enable developer options" switch to the ON position.
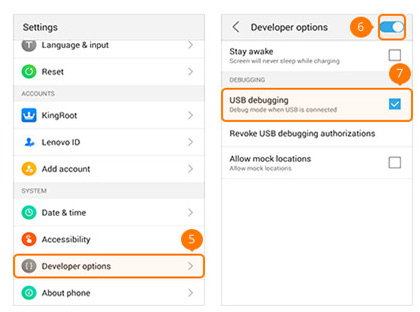
The Step-by-Step Guide to Enabling the USB Debug Mode on Your Lenovo
Step 1: Navigate to the "Settings" menu on your Lenovo > Tap "Device information" after selecting the "About phone" option. Click "Build number" seven times in quick succession > To go back, click the top button labeled "Back."
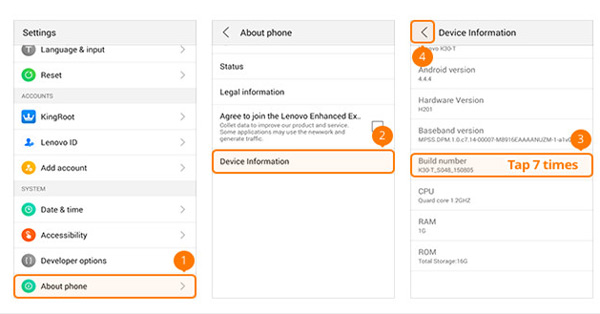
Step 2: Choose "Developer options" from the drop-down menu, then turn on "USB debugging" and "Developer options."
How to Activate the USB Debugging Mode on an ASUS Device
Step 1: Navigate to the "Settings" menu on the ASUS > Choose the "About" option > Select "Software information" from the menu. After pressing "Build number" seven times, press the Back button at the top of the screen.
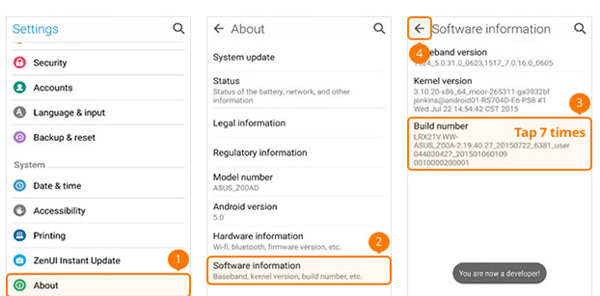
Step 2: Choose "Developer options.". Switch "On" to the "On" position. Then move "USB debugging" to the "On" position.
How to Put Your Nokia into the USB Debugging Mode
Step 1: Navigate your Nokia to the "Settings" menu. To access the "About phone" menu, go to the "System" menu first. Tap "Build number" seven times, then press the Back button located at the top of the screen.
Step 2: Find the option labeled "Advanced," then "Developer settings," and then turn on "USB debugging."
The USB Debugging Mode on ZTE: How to Enable It
Step 1: Go to "Settings" on your ZTE device, then choose "Developer options." After pressing "Build number" seven times, press the Back button at the top of the screen.
Step 2: Activate "Developer options" by toggling the switch > Toggle "USB debugging" to ON > On the page labeled "Allow USB debugging," choose "OK" to continue.
Part 2: Guide to Enable the USB Debugging Mode on All Android Versions
Tips
1. Android 4.2 or later is a requirement for the following devices: Samsung Galaxy S10/A9 Star/S9+/S9/S8+/S8/S6 Edge/S6/S5, Samsung Galaxy Note 8/Note 5/Note Edge/Note 4/Note 3/Note 2, Samsung Galaxy Note 8, Samsung Galaxy Tab S/Pro, LG G8/G7/G6/G5/G4/3/2, HTC M10/9/8, Google Nexus 10/9/7/6/5.
2. Android 3.0 - 4.1: HTC ONE M7, HTC EVO 4G LTE, etc.
3. An Android device with version 2.3 or an older version, such as the Samsung Galaxy S2 or the Google Nexus One.
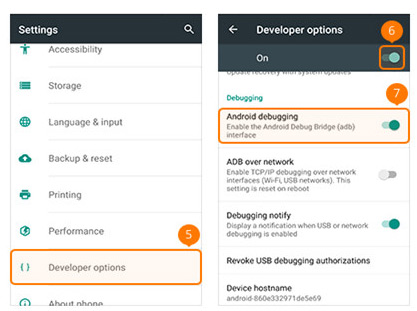
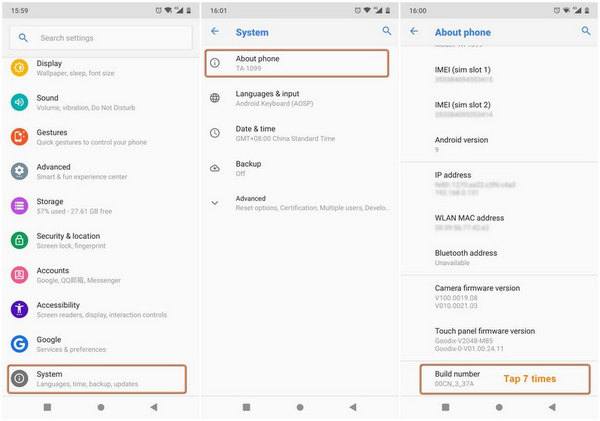
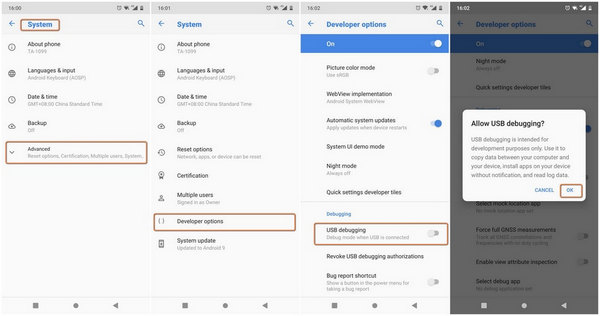
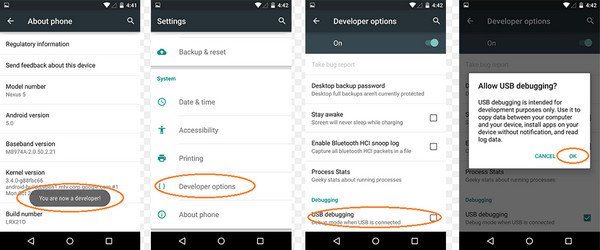
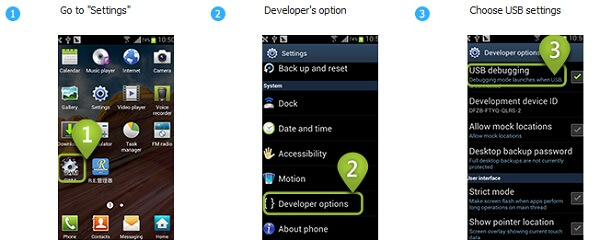
1. Enable USB Debugging on any version of Android later than 4.2.
Step 1: First, go to "Settings" > "About phone" on your device's menu.
Step 2: Tap the "Build number" icon (seven times in succession) until the message "You are now a developer" appears.
Step 3: Navigate back to the "Settings" page.
Step 4: Select "Developer settings" and then "USB debugging" from the menu that appears.
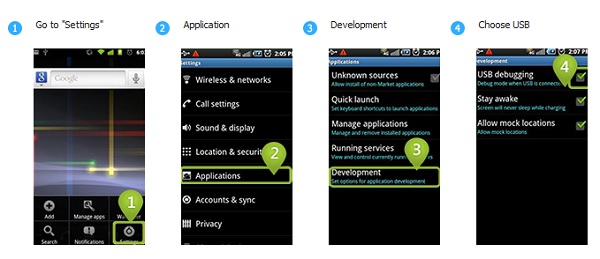
2. Enable USB debugging on Android devices running versions 3.0 to 4.1 of the operating system.
Step 1: Select "Settings" from the menu.
Step 2: Select "Developer options" from the menu.
Step 3: Check "USB debugging"
3. Activate USB Debugging on Android versions older than 2.3.
Step 1: Select "Settings" from the menu.
Step 2: Select "Applications" from the menu.
Step 3: Choose "Development."
Step 4: Check "USB debugging."
Now that we've covered every scenario, we can discuss how to enable USB debugging on Android phones. Once you have enabled the USB debugging Mode on your device, you can use the transfer program to transfer Android contacts quickly and the recovery application to effortlessly recover lost SMS messages on Android.
Continue reading if you are curious about the benefits and the drawbacks of using this method.
Part 3: The Advantages and Disadvantages of USB Debugging
The USB Debugging Mode Offers Convenience
1. As long as your phone is connected to your computer while using the USB Debugging Mode, you will get the most excellent level of authority. And as a result, reading data such as contacts, messages, and call logs will be simple.
2. Once USB Debugging Mode is activate, the Android-locked screen won't be an issue anymore. You only need to download and run the appropriate software to unlock your Android device.
3. You will be able to solve specific issues that are impossible to address in the ordinary course of events after you have enabled USB Debugging Mode and obtained the highest authority.
4. If you wish to get administrative privileges on your Android device, you must first turn on the USB Debugging Mode setting. After that, you will experience an increase in the pleasure that is brought about by rooting.
2. Security Concerns Following the Enablement of USB Debugging
1. There is a possibility that your phone will get infected with adware or other unwanted applications.
2. Information on the phone linked to the computer while operating in this Mode will be visible to other people. Therefore, remember to turn it off after you have finished what you need to accomplish.
3. There have been rumors circulating that your personal information might get stolen if the USB debugging Mode is enabled on your device while you are charging it with a portable power source.
All of the issues brought up here constitute a remote probability. You arrived at the proper location if, sadly, you could not access your data after activating the USB Debugging Mode. You are highly encouraged to make use of our Android Data Recovery program, which makes it simple and risk-free for you to regain erased information.