

Updated on 2025-06-16
views
5min read
Blurry Zoom meetings and low-quality recordings can ruin your message. Whether you're hosting a webinar or capturing a virtual interview, enhancing your Zoom video quality—both live and recorded—is crucial in 2025.
This guide walks you through practical steps to improve lighting, optimize Zoom settings, and even enhance Zoom recordings using AI video enhancer tools like Eassiy Video Converter Ultimate.
Part 1. Understand the Limits of Zoom Recording Quality
Zoom doesn’t record in full HD by default.
- Live resolution: Up to 1080p, but usually capped at 720p unless you have a Business/Enterprise plan.
- Cloud recordings: Typically compressed, capped at 720p.
- Local recordings: More control, higher potential quality.
Tip: For the best results, always record locally and request Full HD access from Zoom support.
Part 2. Pre-Meeting Setup: Boost Video Quality Before You Hit “Record”
1. Improve Lighting
Use a ring light or natural lighting facing your face. Avoid backlighting or overhead shadows.
2. Optimize Your Internet
- Use a wired Ethernet connection for stable bandwidth
- Ensure upload speed >3 Mbps for HD
3. Use High-Quality Equipment
- External HD webcam (e.g., Logitech C920)
- Condenser mic or USB headset (e.g., Blue Yeti)
Part 3. In-Zoom Settings: Maximize Your Recording Quality
To get the best out of Zoom recordings, it’s essential to tweak key settings before your meeting begins. Below are the crucial Zoom configurations for achieving clearer video and richer audio.
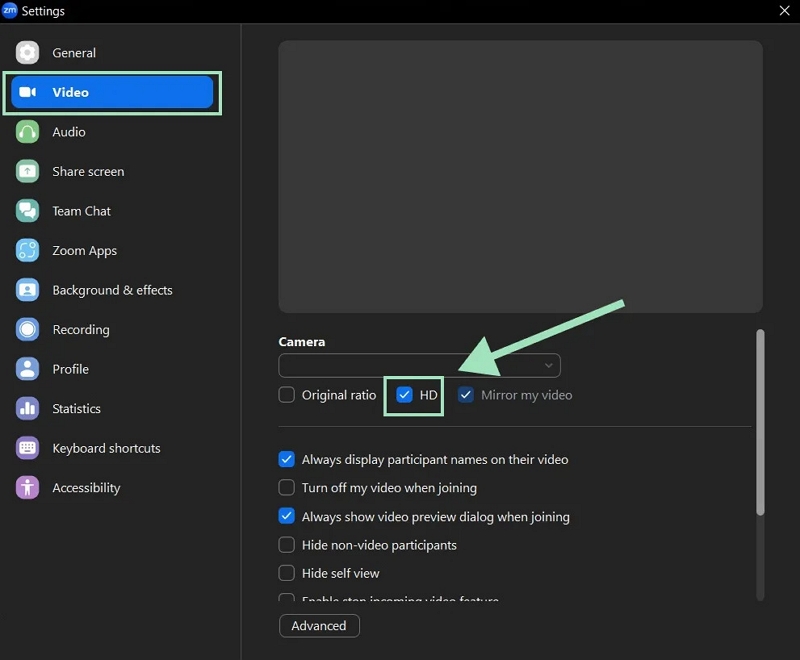
1. Enable HD or Full HD in Settings
Basic HD (720p):
- Go to Settings > Video
- Check Enable HD
Unlock Full HD (1080p): (Business/Enterprise only)
Step 1. Visit the Zoom web portal and log in
Step 2. Navigate to: Settings > Meeting > In Meeting (Advanced)
Step 3. Enable Group HD video and select 1080p if available
Step 4. Save changes and contact Zoom support to activate 1080p
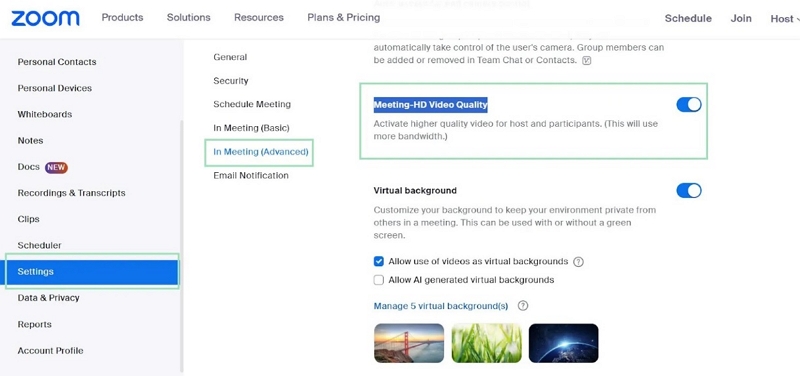
Important: Full HD is only supported in Speaker View mode, not Gallery View.
- Speaker View: Focuses on the active speaker in HD/Full HD
- Gallery View: Shows all participants in equal tiles but records in standard resolution
For HD recording: Use Speaker View and maximize the Zoom window during the session.
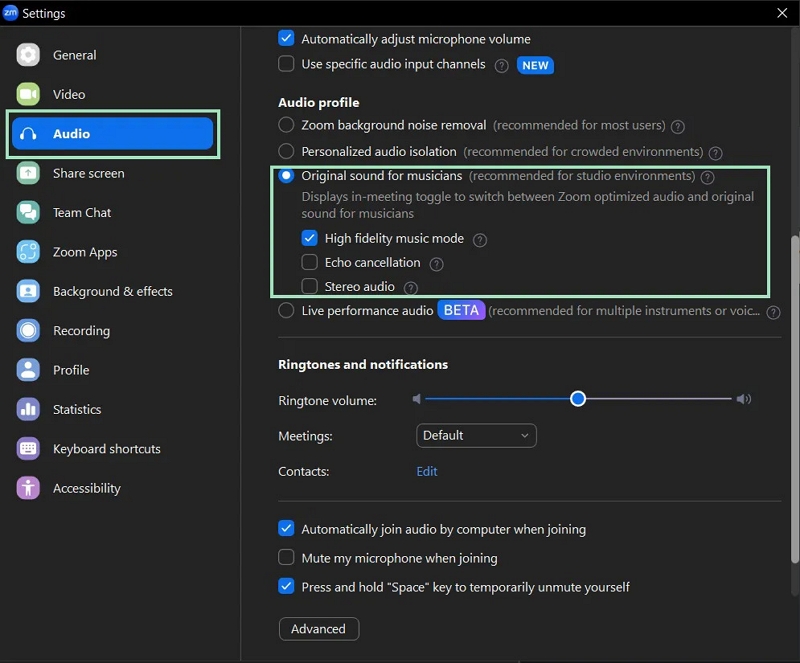
2. Enable "Original Sound" for Clean Audio
Zoom applies echo cancellation and noise suppression by default, which can muffle high-quality microphones. For professional sound, use “Original Sound for Musicians.”
Step 1: Open Zoom Desktop > Click Profile > Settings
Step 2: Go to Audio
Step 3: Check:
- Enable Original Sound for musicians
- High-fidelity music mode
- ❌ Disable Echo cancellation and Stereo audio if not needed
During meetings: Toggle "Original Sound" on/off from the top-left of your Zoom window.
3. Choose the Right Recording Mode
Local Recording (Recommended)
- Saves uncompressed video/audio to your computer
- Ideal for post-production and high-quality output
- Not available on mobile; desktop only
- Reflects your screen layout (Speaker or Gallery View)
Cloud Recording
- Saves to Zoom’s servers for easy access & sharing
- May compress video/audio
- Storage limits apply, and retention depends on your plan
Best Practice: Use local recording for quality and editing control. Choose cloud recording for convenience and automatic upload.
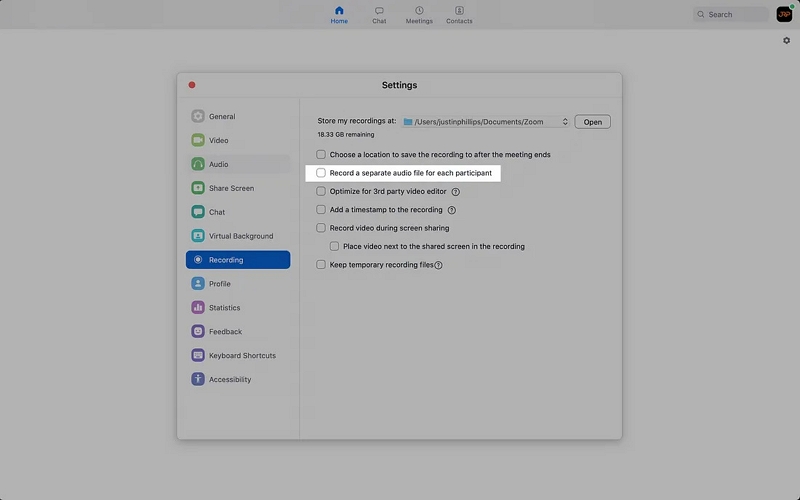
4. Enable separate audio files per participant
Perfect for podcasting or post-editing, this feature creates an individual audio file for each speaker.
Step 1: Open Zoom > Profile > Settings
Step 2: Go to Recording
Step 3: Check:
- Record a separate audio file for each participant
- Optimize for 3rd-party video editor
Summary – Key Zoom Settings for HD Recordings
| Setting | Recommendation |
|---|---|
| Video Quality | Enable HD (720p) or request 1080p |
| Recording Mode | Local recording (desktop only) |
| Viewing Mode | Speaker View (for HD support) |
| Audio | Enable "Original Sound" |
| Separate Audio Tracks | ON (for post-editing) |
Part 4. Post-Recording Tips: Improve Output Quality
Recording is just the first step. To ensure your Zoom videos are polished and professional, follow these post-recording best practices.
1. Use the Right File Format – Avoid Quality Loss
- For video: Export as MP4 – widely supported, efficient compression, great for uploading.
- For audio: Use M4A (AAC codec) – better quality than MP3 at smaller file sizes.
Avoid repeated compression. Always edit from high-quality source files and export once in your final format to prevent degradation.
2. Basic Editing to Improve Clarity
Use any basic video editor (e.g. iMovie, Audacity, Premiere Pro) to apply:
- Noise Reduction: Eliminate background hum, hiss, or static.
- Volume Normalization: Ensure consistent loudness across clips.
- EQ Adjustment: Sharpen voices, remove muddiness, enhance clarity.
- Compression: Balance dynamic range so quiet voices are heard and loud peaks aren't distorted.
Tip: Don’t over-process – subtle changes lead to more natural results.
3. Enhance Recordings with Eassiy Video Converter Ultimate
Eassiy Video Converter Ultimate is a robust comprehensive software for video enhancement and editing. This tool is aimed at elevating the quality of your Zoom recordings easily. Works on both Windows (7 through 11) and macOS (10.12 and up), providing an intuitive interface and a comprehensive trial. Eassiy delivers professional-quality outcomes for issues like grainy videos, shaky recordings, or bad lighting, all for an affordable price of $39.99 annually.
Key features:
- Improve video quality by stabilizing unsteady footage and eliminating visual distractions.
- Revive lifelike hues and modify brightness for a more refined appearance.
- Enhance video quality to 8K while maintaining sharpness.
- Compatible with over 1,000 video formats such as HD, DVD, 3D, and others.
- The integrated toolbox features trimming, compression, audio synchronization, and subtitle modification.
- Perfect for enhancing recordings of online meetings, vlogs, tutorials, and additional content.
Here are the steps to enhance Zoom recordings with Eassiy Video Converter Ultimate –
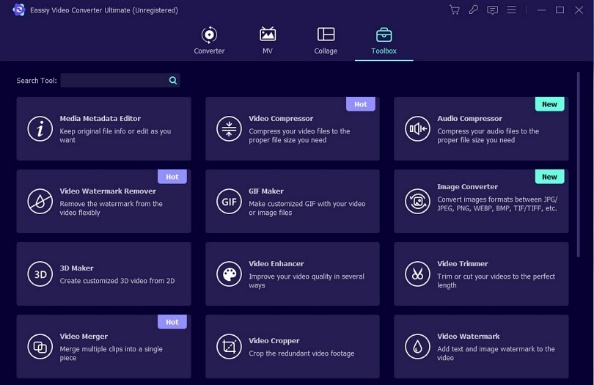
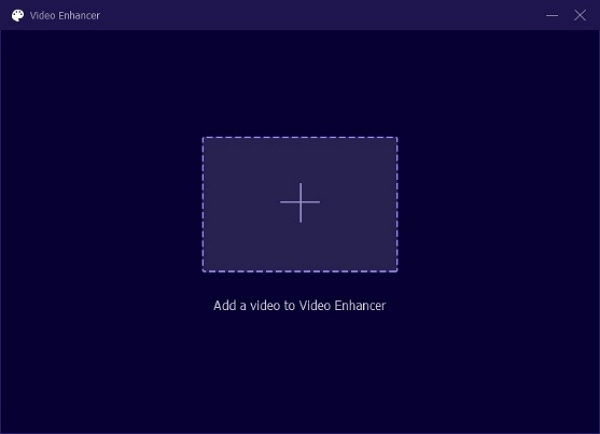
Step 1: Open Eassiy > go to Toolbox > click Video Enhancer
Step 2: Upload your Zoom video via the “+” button or drag it in
Step 3: Choose enhancement options (resolution boost, brightness, stabilization, noise reduction)
Step 4: Select output resolution and video format
Step 5: Click Preview to check results
Step 6: Hit Enhance to export the upgraded video

For achieving Zoom recordings that look polished and of high quality, Eassiy Video Converter Ultimate is the ideal tool to enhance your setup.
4. Free Online Video Zoom Enhancer Tools for Quick Fixes
If you're short on time or storage, consider free online tools like:
| Tool | Features | Limitations |
|---|---|---|
| Clideo | Trim, compress, resolution boost | File size capped, watermark |
| Kapwing | Auto-enhance, add text/subtitles | Account required, limited output |
| HDConvert | Convert resolution up to 1080p | No 4K/8K, slower upload |
Note: These are good for quick fixes, but Eassiy offers better quality control and batch processing.
Conclusion
Enhancing your Zoom video quality in 2025 is simpler than ever with the proper pre-meeting arrangements, in-Zoom settings, and post-recording improvements. For professional-grade Zoom recordings in 2025, we highly recommend Eassiy Video Converter Ultimate. With powerful enhancement tools and support for up to 8K, it turns average footage into polished, high-quality content — perfect for presentations, tutorials, and business meetings.