Updated on 2023-06-01
views
5min read
Nowadays, MP4 is one of the most popular formats supported on mobile devices, MACs, and PCs. But still, you might encounter one issue – file size. A great deal of disk space can be taken up by high-definition and high-quality videos which is well-known. You can simply move the videos to an external storage device if they are stored on your computer but it won’t work for mobile devices. So what can you do to store a video on your device? Well, the answer is to compress the videos to a smaller size and store them on your device. In this article, we are describing how to compress MP4 videos on Windows/Mac/Online.
Part 1: Can You Compress Video without Losing Quality?
You need to compress a video for various purposes. But compressing a video might cause you video quality loss. If you want to compress video without losing quality, you can try trimming the unnecessary parts of the video. You can also remove the audio or background noise of the video to reduce the file size. Trimming video parts and removing audio won’t cause you quality loss. Or you can use a capable video compressor to maintain the original quality of the video while compressing.
Part 2: How to Make Video Smaller for Email? [Top 7 Methods]
Several ways will help you to compress video files. Here we are introducing the top 7 methods for you to make video smaller for Email.
Method 1: How to Compress MP4 Video Easily - Video Converter Ultimate
If you want to compress MP4 video easily, then the best solution for you is to use Eassiy Video Converter Ultimate. It is one of the most powerful video compressors that allow you to compress MP4 video files, accessible on both Windows and macOS. Without quality loss, this program can compress any type of video file. It provides 60X faster video conversion speed and supports 1000+ video/audio formats. This program is a complete multimedia toolbox for you. Besides compressing and converting videos, you can use this tool to edit videos, trim, merge, add subtitles, watermarks, etc. The paid license of this video converter ultimate will cost you only $39.99.
Features:
- Videos can be compressed without losing the original quality.
- Supports compressing video files up to 90%.
- 60X fast video conversion speed is offered by this program.
- More than 1000+ video/audio formats are supported by this tool.
- 20+ multimedia tools are offered to convert, edit, compress video, make MV, make college, etc.
Steps to compress MP4 video easily – Video Converter Ultimate:
Step 1: Download and Install Eassiy Video Converter Ultimate
First, you need to download and install Eassiy Video Converter Ultimate from their official website on your desktop.
Step 2: Launch the Program
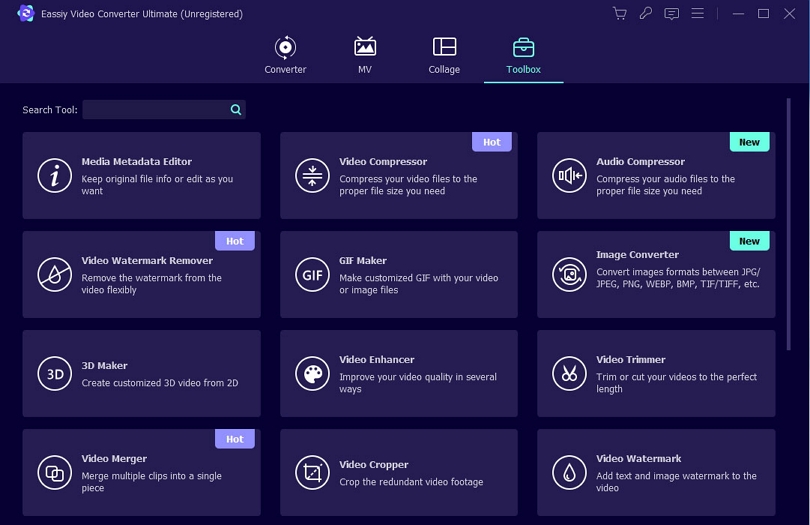
Open the Toolbox option from the top after launching the program and you need to tap the Video Compressor.
Step 3: Upload the Video File
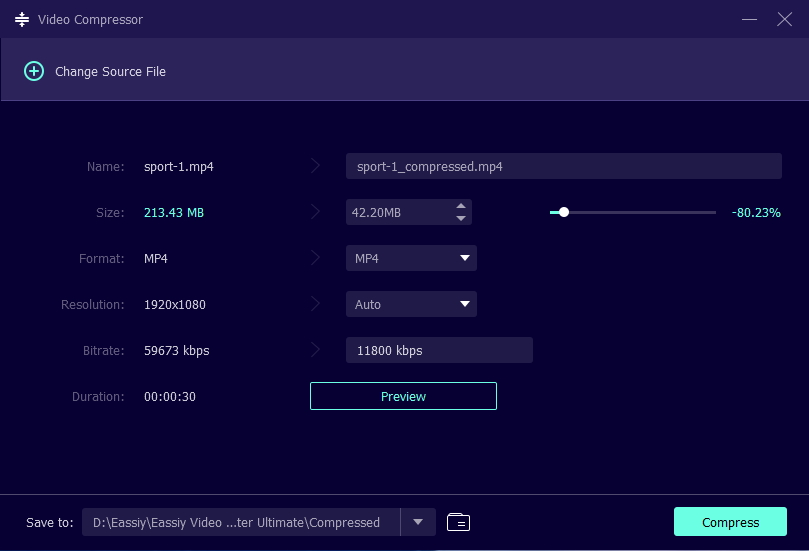
You can see a pop-up window then. To add the video you want to compress to the program, either click the “+” sign or drag and drop videos.
Step 4: Adjust the Video Size
For your final video file, you need to adjust the name of the video, size, resolution, format, bitrate, and export location. You will be able to resize the video by sliding the dot. It will compress the video file up to 90%.
Step 5: Preview and Compress the Video File
This program allows you to preview the video quality after adjusting the video size. Click the “Compress” button and your video file will be compressed to your desired size.
Method 2: How to Compress MP4 Video File Using Windows Movie Maker
For many experienced Windows users, Windows Movie Maker is an iconic video editor. You may even still have it installed if you have been using your Windows PC since before 2017. For other users, the program is impossible to obtain through any official Microsoft platform. You won't be able to download this program from the website or get it from Microsoft Store. To get the software, we don't recommend looking through other sources because what other websites provide might be malware masked as Windows Movie Maker. Please skip this method if you don't have this program installed already. Here are the steps to compress an MP4 video file using Windows Movie Maker.
Step 1: Open Windows Movie Maker on your Windows PC.
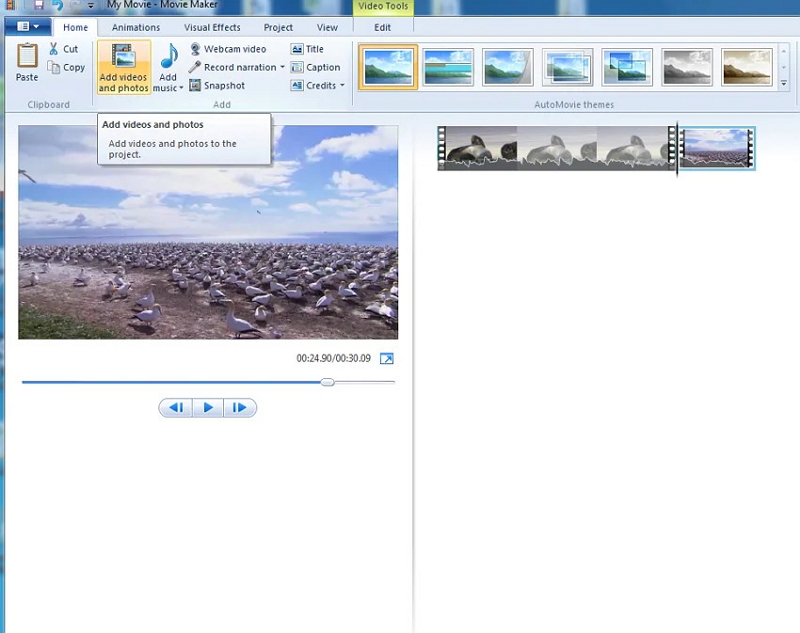
Step 2: Into the program’s window, import the MP4 file. Then drag and drop your file on the editing timeline.
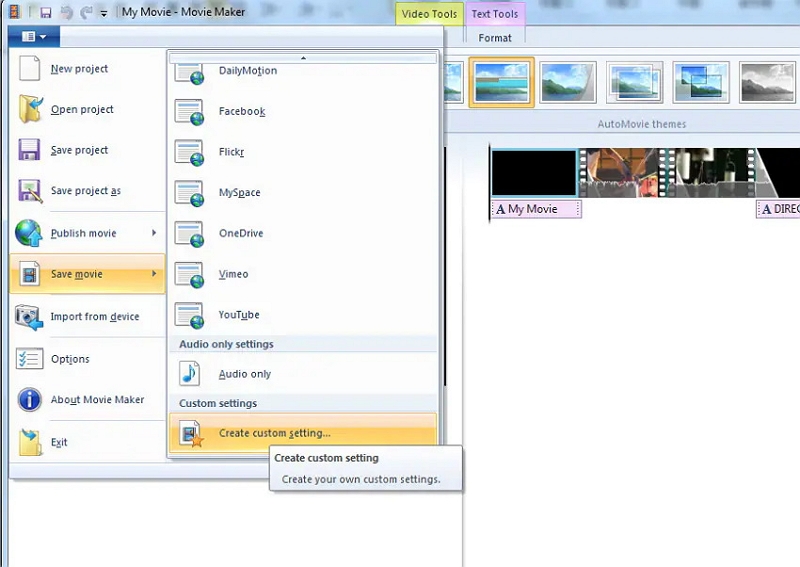
Step 3: Select “Save movie” after opening the “File” menu and tap “Create custom settings”.
Step 4: Enter the name for the future preset in the pop-up window. Now, you have to change the properties of the output file. Either, you can change the video's bitrate or the height and length. You need to set the desired values and preview the size of the future video file. Click "Save" once you are done with setting and previewing. Tap "Save" again to select the folder to save the new preset.
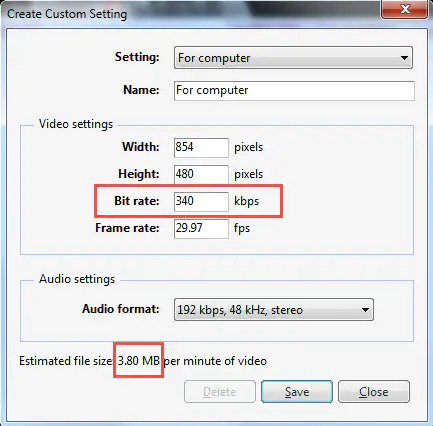
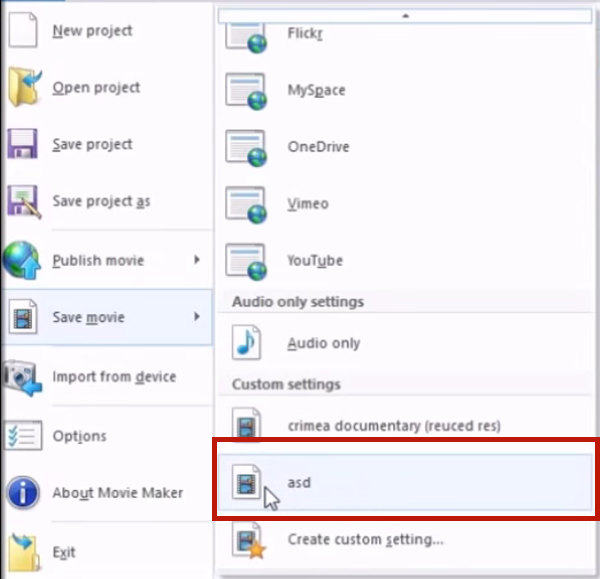
Step 5: Click “File” and hover over “Save movie” after closing the “Create Custom Settings” dialog window. After that, tap the custom setting that you have just created. Select the folder, name, and format for the output video in the new window. Tap “Save”.
Method 3: How to Compress a MP4 Video File with VLC Media Player
VLC Media Player is a well-known open-source and free media player. You will be happy to know that there is more to it than meets the eye if you are used to watching videos using it. This program can also function as an MP4 compressor and a video converter. However, the compression interface of VLC Media Player is not intuitive. It doesn't provide you the preview feature to check what the resulting file will look like or whether it will be smaller than the original. Using this program might require a long-trial and error process. The Mac and the Windows interfaces are also different, and the instructions for the one do not work for the other. If you still decide to use this software despite all the inconveniences because it can compress for free, follow the below-given steps.
Step 1: Download and install VLC Media Player on your computer by going to their official website.
Step 2: Open the “Media” menu and tap “Convert/Save” after launching the software. A new window will come in front of you.
Step 3: Click “Add” in the “File” tab and locate the video file that you desire to compress. After that, you have to tap the “Convert/Save” button.
Step 4: You have to select a profile for your video now. Let's choose "Video – H.264 + MP3 (MP4)" since we want the video to stay as an MP4.
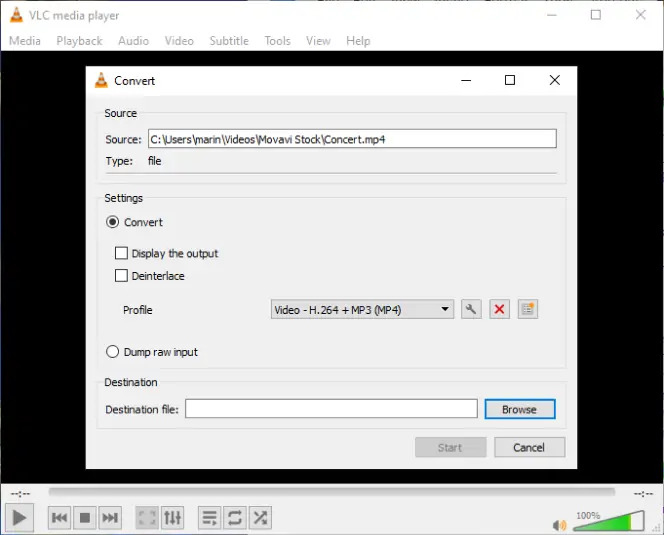
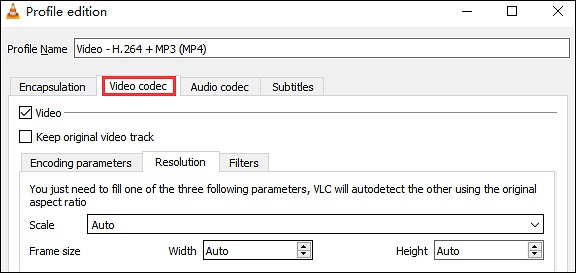
Step 5: Click the “Wrench” icon to set the compression parameters. Open the “Video codec” tab in the window that opens. You have to set the bitrate at a lesser value than the video file currently has. Unfortunately, you will have to guess it yourself because the software doesn't let you see your video's current bitrate. Click "Save" when the bitrate is set.
Step 6: To save the file, you have to locate the folder now. Find the desired target folder by clicking “Browse” and enter the name for the future file including the “.mp4” extension in the “File name” field. The resulting file might end up botched and you won’t be able to open it if you don’t enter the file name with the extension. Again, tap the “Save” button.
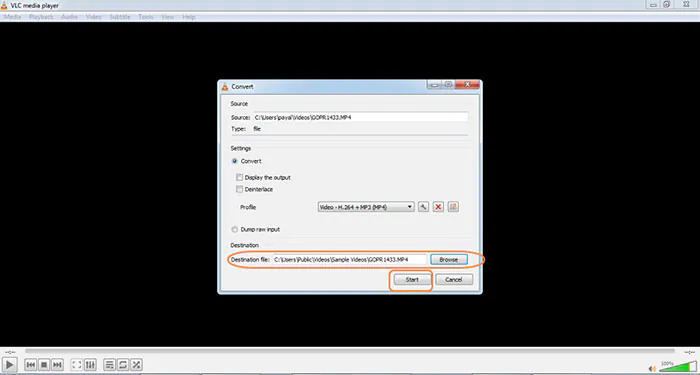
Step 7: Click "Start" when everything is set. The program will show no progress bar but processing the entire file will take some time. To check out the output file, take a few-minute break and then come back.
Method 4: How to Compress an MP4 Video File via Handbrake
To compress MP4 videos to a smaller size for free, Handbrake is open-source software. This software is accessible to almost anyone with versions available for Mac, Windows, and Linux. As there is not much customer support available, users who aren't accustomed to working with open-source and freeware software might have a bit of a learning curve. However, this might be a good option for you if you are good at troubleshooting and you want a free MP4 video compressor. Here are the steps to compress an MP4 video file via Handbrake.
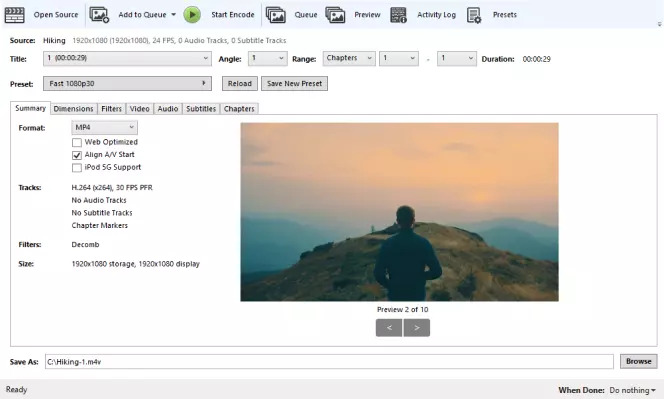
Step 1: On your computer, download and install Handbrake. Click “Open Source” in the top left corner of the window after opening the program.
Step 2: Click “Open” after choosing your video file.
Step 3: To select where you want to save your converted file, click “Browse”.
Step 4: Type the name you want for your compressed MP4 after selecting “Save As” and click “Save”.
Step 5: From the “Format” dropdown, select “MP4 File”.
Step 6: As your video codec, choose “H.264”. You have to enter the bitrate between 5000 and 10000. After that, you need to change the video frame size and resolution as you wish.
Step 7: Click “Start Encode” to compress your file once you are happy with all of your settings.
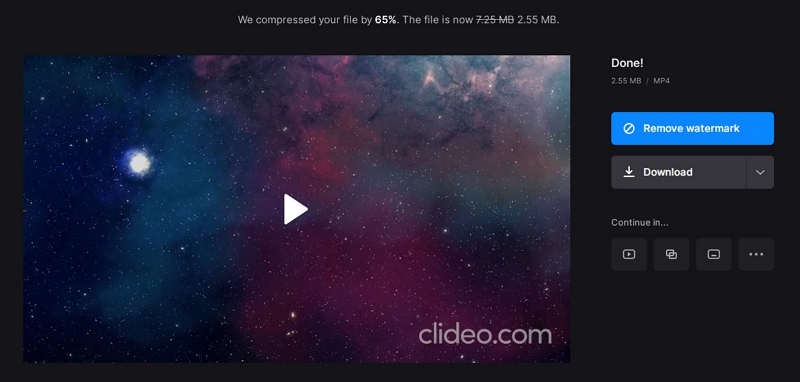
Method 5: How to Compress MP4 Video on Clideo
Clideo is an online app that helps you to compress MP4 videos to a smaller size online for free with a watermark. It offers easy conversions and a straightforward interface but a watermark will be included to output videos. To remove the watermark, you have to purchase the premium service. Follow the given steps to compress MP4 video on Clideo.
Step 1: You have to go to the Clideo website.
Step 2: To choose a file from your computer, click the "Choose file" button, or by clicking the down arrow next to the button, you can choose a file from Google Drive, Dropbox, or a URL.
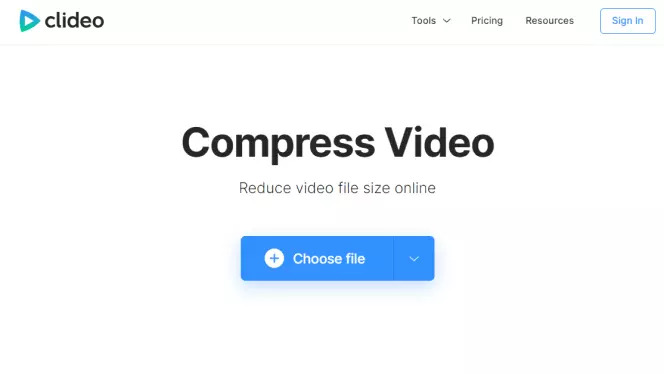
Step 3: Compression will begin automatically once you have selected your file.
Step 4: You have to wait for your file to compress and after that, choose whether you want to download the compressed video with a watermark or pay to remove the watermark.
Method 6: How to Compress MP4 Video File from XConvert
You can reduce your output MP4 file size by using XConvert. It is an online tool that doesn't add a watermark to the compressed videos. This online platform is also safe. Even beginners can use it without any problem because the user-friendly interface makes it very simple to operate with just one mouse click. Here are the steps to compress an MP4 video file from XConvert.
Step 1: Visit XConvert's official website first.
Step 2: To upload videos from your PC, click on “Add File” from XConvert’s web interface. By using online cloud services like Google Drive and Dropbox, you can also add content.
Step 3: Now, you need to customize the Video Codec and adjust the video file size.
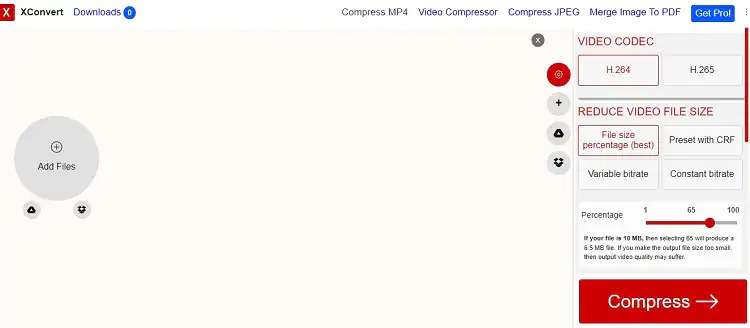
Step 4: To start the process, click the “Compress” tab. Finally, you can download the reduced file.
Method 7: How to Compress an MP4 Video File by Online Convert
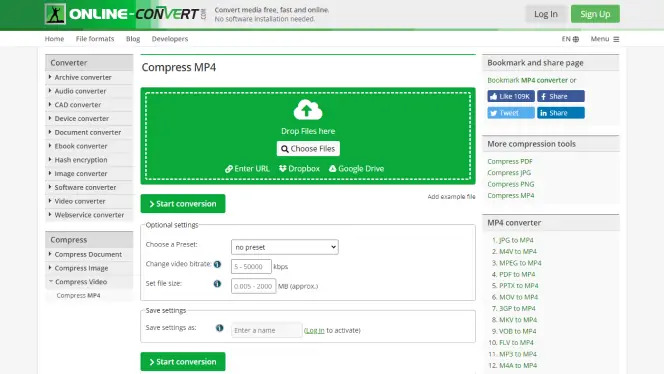
One more option to compress MP4 videos online is using Online Convert. This website only lets you upload videos under 100MB in size, unlike the two previous options. But the advantage of this website is that you will be able to see the size of the file you are uploading and set the resulting file size. Follow the below-given steps to compress an MP4 video file by Online Convert.
Step 1: Navigate to the Online Convert website first.
Step 2: Upload your video to the platform after clicking “Choose Files”.
Step 3: For the future file, enter the approximate size in megabytes in the "Set file size" field. This website will try to compress the file size as close to the requirements as possible. However, try entering a smaller number than the requirement say if you want to match some requirements.
Step 4: Tap “Start conversion”.
Part 3: FAQ for How to Compress MP4 Videos
1. How can I compress an MP4 file for Email?
To resize an MP4 file for email, you can use Eassiy Video Converter Ultimate and easily compress your video file for email.
2. Which is the best software to reduce MP4 video size without losing quality?
The Eassiy Video Converter Ultimate offers the best compressor feature that can decrease the file size without any quality loss and compress the video as you want.
3. How can I reduce the file size of an MP4 in VLC?
Though in VLC Media Player, there is no dedicated feature to decrease MP4 video file size. But to change the format and adjust the video frame size, you can use the file converter function which will make it smaller.
Conclusion:
There are plenty of ways to compress an MP4 video file. But to make your work easy, we are describing how to compress MP4 videos on Windows/Mac/Online with the top 7 ways in this article. Feel free to use any of the methods mentioned in this article. But we would recommend you to use Eassiy Video Converter Ultimate because this program will compress your video up to 90% without causing quality loss. Again this program doesn't have any disadvantages like other above-given methods. So try Eassiy Video Converter Ultimate now!


