
Updated on 2026-05-20
views
5min read
Hi everyone, I figured my iPhone is in recovery mode, so I decided to restore it with iTunes as usual. However, it's not going through. My iPhone is useless at the moment. Is there a way to fix this issue so I can start connecting with my friends via the device again? Kindly help a friend out!
Restoring your iPhone data in recovery mode with iTunes can be quite tedious for people who don’t know how to. Do you belong to this category of people? If so, and you are ready to learn how to, this is definitely the right place to be. Here, we will explain in full detail how to restore iPhone data in recovery mode with iTunes. And if you don’t have access to iTunes, we also got your back. So keep reading!
Part 1. Restore iPhone Data without iTunes in Recovery Mode
With Eassiy iOS data recovery, you can restore your iPhone data without iTunes in recovery mode. This software helps you restore your data without stress. When restoring data with this iOS data recovery software, you don’t have to worry about data loss. Eassiy protects your data during data recovery.
The software restores over 36 data types with high accuracy at a remarkably high speed. Eassiy restores data like WhatsApp attachments, Facebook Messenger messages, contacts, voice memos, etc. It works with your favorite operating systems, Mac and Windows computers. Eassiy iOS data recovery software provides users with 3 modes of recovery; from your iOS device, iTunes, or iCloud backup.
Key Features
- 1-click to restore iPhone data without iTunes in recovery modes
- Restores over 36 data file types simultaneously without distorting the quality
- Restores iOS data from iTunes and iCloud backup in 3 steps
- Scans 1000+ deleted image files at a go
Stepwise Guide to Restore iPhone Data without iTunes in Recovery Mode
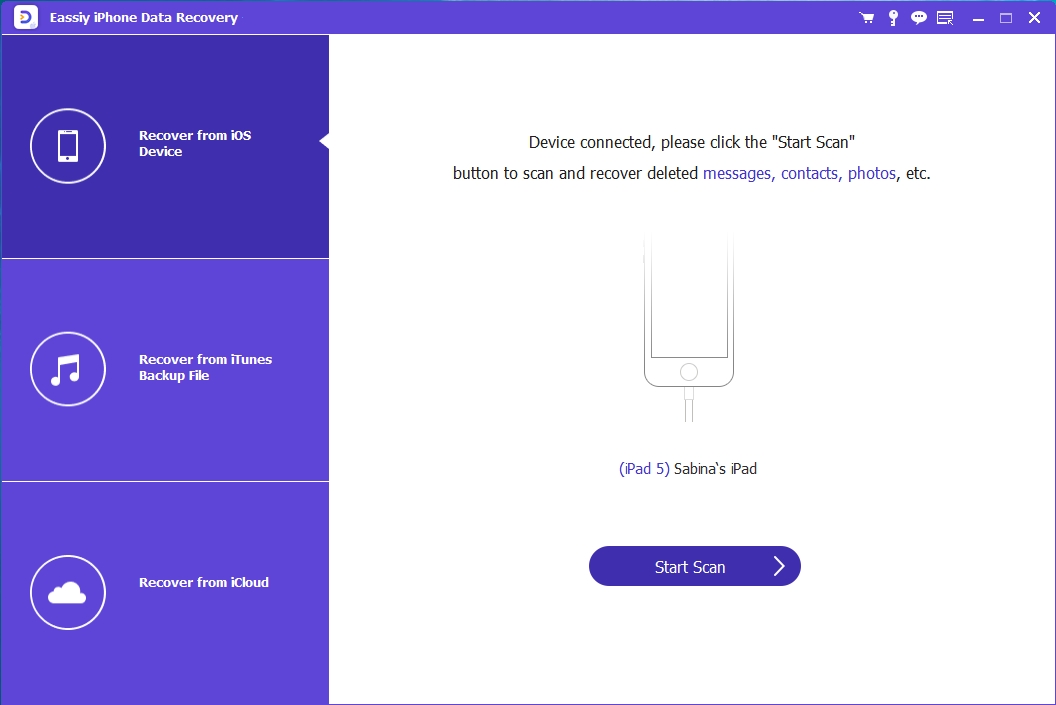
Step 1: Install Eassiy iOS data recovery software from the official webpage on your computer, launch it and then connect your iPhone with the aid of a USB cable. Click on Start Scan once you’ve successfully established a connection.
Step 2: Wait for Eassiy iOS data recovery software to scan your device for data files to recover. You will get an interface with the list of recoverable data on the left sidebar. Here is an image to help you understand the statement better:
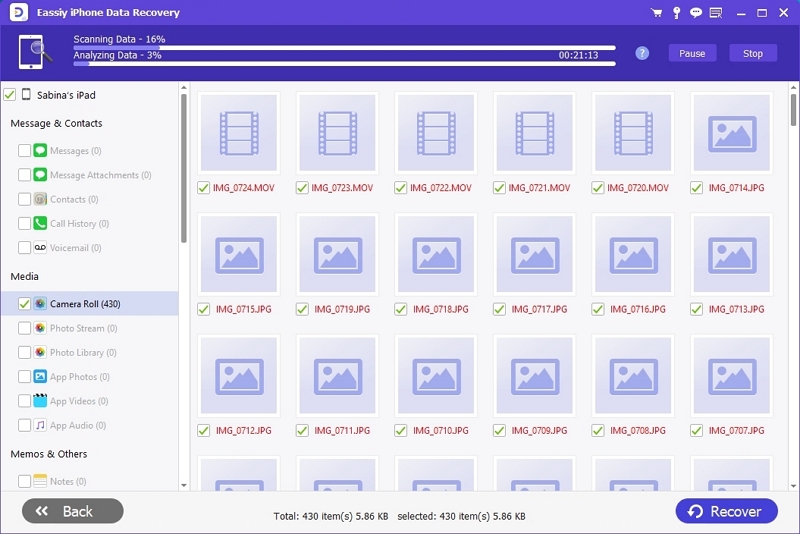
Preview the data then proceed to the next step.
Step 3: Choose the iOS data to recover, and tap on Recover at the bottom right corner of your screen. Wait for recovery to complete, then you disconnect your iPhone from your computer system.

Part 2. How to Restore iPhone Backup from iTunes Backup
Do you have your iOS data backed up on iTunes? If so, you can restore your data easily from the backup service. iTunes allows you to restore your iOS data without stress. Recovering your data via iTunes is completely easy but there is an issue with it.
Before restoring data from iTunes, you have to wipe your device to avoid overwriting data. This method is quite rigid, as users don’t have the chance to select their preferred data to recover. Instead, they are allowed to restore their whole data.
Mind you, you must meet the condition that you have your data backed up over iTunes for this solution to work. Should you meet the condition, kindly follow the instructions below to restore your data from iTunes backup:
Step 1: Open the latest version of iTunes on your computer system. Establish a connection between your iPhone and computer system using a USB cable. iTunes should detect your iPhone. If not, try fixing the USB cable properly.
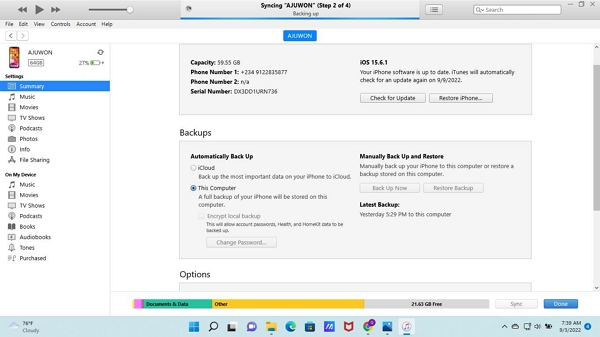
Step 2: Your iPhone will pop up on the left sidebar. Click on the Drop-down menu beside your iPhone’s name. Select Summary from the options that come up.
Step 3: Now locate the Restore Backup icon on the right-hand side of your display screen. A dialogue will immediately pop up for you to confirm your action. Kindly click on Restore to validate your action and complete the process.
Part 3. How to Fix iTunes Not Detecting iPhone in Recovery Mode [5 Ways]
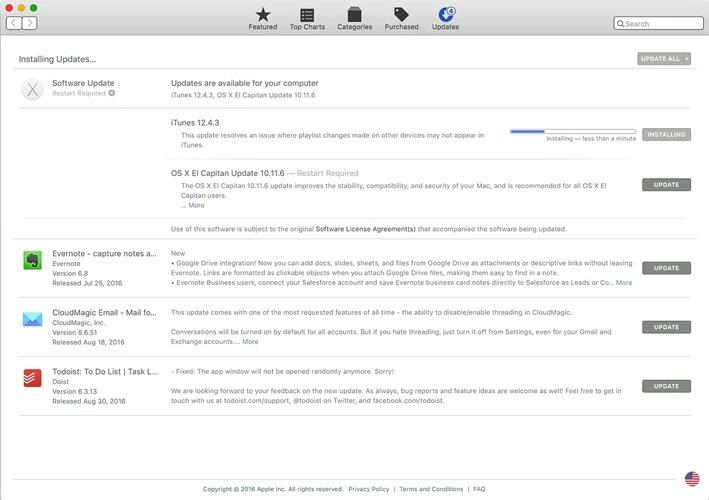
1. Update iTunes
Are you running an obsolete version of iTunes on your computer system? If so, iTunes will definitely not detect your iPhone in recovery mode no matter the approach you take. Always confirm you aren’t lagging in terms of iTunes updates.
To check whether or not you are running an outdated iTunes, follow the appropriate instructions below:
Mac Users
- Navigate your way to the Apple Store on your Mac operating system
- Next, locate and click on the Updates icon at the top of your screen
- Should iTunes show the UPDATE button, kindly click on it to update the software
Windows Users
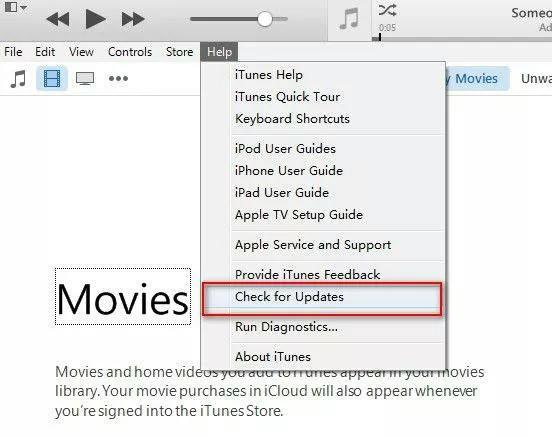
- Launch the iTunes app on your computer
- Navigate to the Help icon and click on it
- A drop-down menu with a couple of options will come up. Select Check for Updates
- If there is a new version of iTunes, kindly click on Install to update your iTunes software
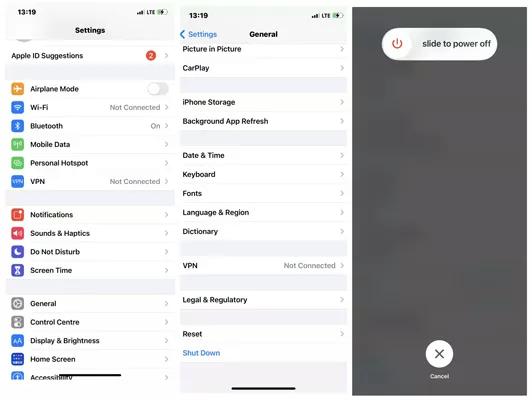
2. Force Restart iPhone
Force restart is a quick fix for any iOS-related issue you encounter on your iPhone. This solution refreshes your iPhone system as it clears those bugs causing it to glitch or malfunction. This solution is simple to employ. However, the procedure differs for the different models of iPhone. Find below the different procedures for the different models:
iPhone 8 and newer versions
- Hold down the Volume Up button and release it
- Hold the Volume Down button also and then release it
- Lastly, hold the Lock button until the Apple logo appears on your display screen
iPhone 7 and 7 Plus
Simultaneously hold shown the Power and Volume Down buttons for a few seconds until you found the Apple logo on your screen, then release.
iPhone 6 and older versions
Hold down the Power and Home buttons at the same time. Release both buttons when you find the Apple logo on your display screen.
3. [Ultimate Solution] Fix iTunes Not Detecting iPhone in Recovery Mode with FonePaw iOS System Recovery
FonePaw iOS system recovery software is a smart helper with rich system recovery features required to fix an iPhone so it stops malfunctioning. It lets you restore your iPhone in recovery mode without iTunes. Yes, you read it right! FonePaw iOS data recovery software restores your iPhone without iTunes.
The software fixes more than 50 iOS system issues you may encounter on your device. It's highly efficient in fixing issues like being stuck in DFU mode, stuck in the Apple logo, frozen status, black screen, etc. FonePaw iOS system recovery software provides end-users with 3 modes of repair; Quick Fix, Standard Mode, and Advanced Mode.
FonePaw iOS system recovery software fixes all iOS devices. So whether you use an iPhone 6, 7, 8, or 13 pro max, the software fixes your device at a remarkably high speed. Operating this software is easy. Most end-users find the user interface friendly- one reason they find it quick to navigate around.
Key Features
- 1-click to restore iOS with or without iTunes in recovery mode
- Fixes more than 50 iOS system issues, including broken screen, white screen, stuck in Apple loop, and many others
- Ensures maximum data protection during system recovery
- Reset locked or disabled iDevice without password easily without iTunes
Stepwise Guide to Restore iPhone in Recovery Mode without iTunes
Hers is an illustrative instruction you need to follow to restore your iPhone data in recovery mode without iTunes using the Eassiy iOS system recovery software:
Step 1: Go to the official webpage for Eassiy iOS system recovery. You should have an interface as below on your screen:
Click on the appropriate download link for your computer system. The download will commence immediately. Wait until the download is over then you install the software. After the successful installation, click on the Eassiy iOS system recovery software icon to launch it.
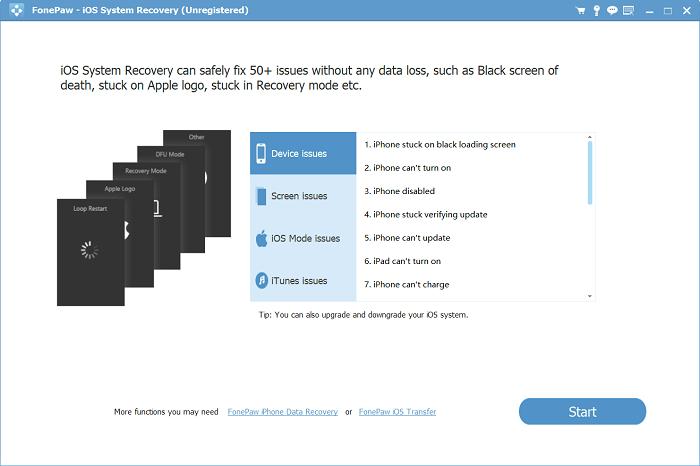
Connect your iPhone to your computer and then click on Start.
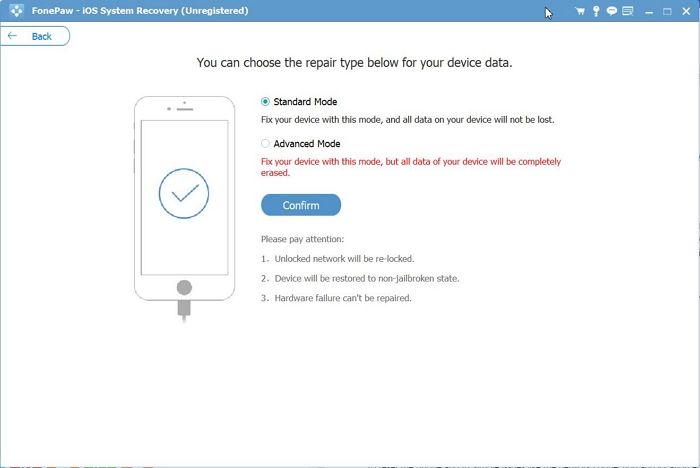
Step 2: Assuming your iPhone is in recovery mode already, the next screen that pops up will ask you to choose your preferred repair mode. Kindly pick Standard Mode, and then hit the Confirm button to proceed with system recovery.
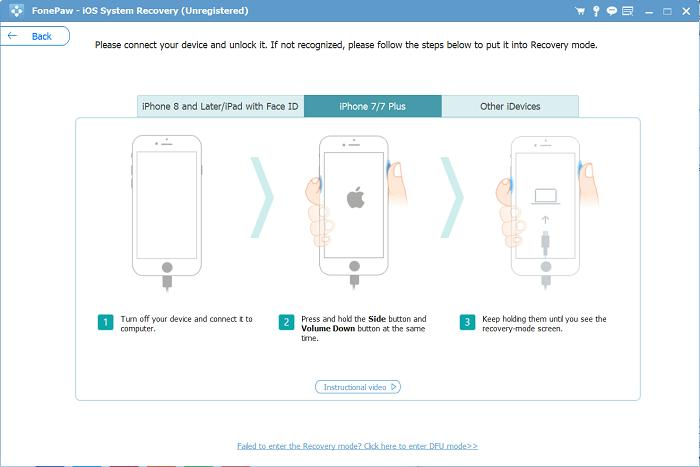
If your iPhone isn’t in recovery mode, Eassiy iOS system recovery software will suggest that you put your device in recovery mode. Follow the on-screen instructions and put your iPhone in recovery mode.
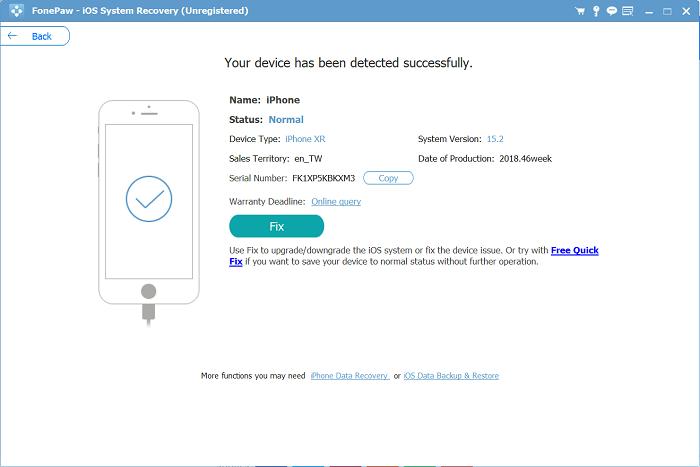
Once that's set, you will be directed to a new interface showing your iOS details. Kindly look through to confirm all specifications tally with that of your iPhone. In the absence of an error, click on Fix to proceed further.
Step 3: Next, Eassiy iOS system recovery software will run a quick check on your device for possible reasons why it is malfunctioning. In a few seconds, scanning should be over and Eassiy will recommend a compatible firmware package to fix your iPhone.
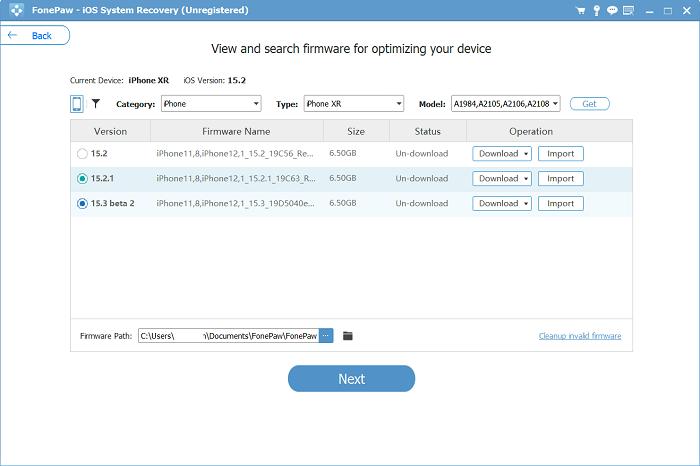
Select a firmware package to repair your iPhone, and then click on Next.
Step 4: Finally, click on Next, and then hit the Repair button. Eassiy iOS system recovery software will automatically repair your iPhone with the newly downloaded firmware package.

Wait patiently until the repair is over. Your iPhone will reboot automatically, so it should start functioning properly now.
4. Restore iPhone with DFU Mode
Here is another quick fix to repair your iPhone when you observe that iTunes isn’t detecting it in recovery mode. You should only employ this solution when every other solution isn’t yielding positive results. This is because restoring your iPhone in DFU mode repairs your iPhone by erasing it. We strongly advise that you back up your device first before using this solution.
Follow the procedure below to restore your iPhone in DFU mode:
Step 1: Run the iTunes software on your PC, and connect your iPhone with a USB cable. For your information, you need to have the latest version of iTunes before proceeding with this solution.
Step 2: Put your iPhone in DFU mode. Check out the appropriate instruction below to do that:
iPhone 8 and newer versions
- Quickly press the Volume Up button, and release.
- Press the Volume Down button, and release.
- Now hold down the Lock button till your screen goes blank.
iPhone 7 and 7 Plus
For 8 seconds, hold down the Volume Down and Power buttons until your iPhone screen turns blank.
iPhone 6 and older versions
Hold down the Power and Home buttons till your screen goes blank. Make sure you hold those buttons for 8 seconds to get it right.
Step 3: On completing the above, you will get a prompt that iTunes has detected your iPhone in Recovery Mode.
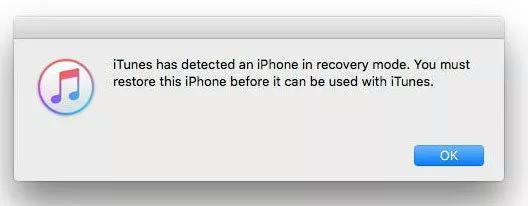
Now click on OK > Restore iPhone.
Part 4. How to Restore iPhone Data from iTunes with No Data Loss
In addition to the features of Eassiy iOS data recovery software, the tool also supports the restoration of iPhone data from iTunes. It allows users to restore their backup files from iTunes with zero data loss. There is maximum flexibility when using the Eassiy iOS data recovery software to restore backup data from iTunes. Wondering what this flexibility may be? Well, you have the freedom to select your desired data to recover. Also, you don’t have to erase your device to restore data when using this software.
Here is the detailed procedure you need to follow to restore iPhone data from iTunes with Eassiy iOS data recovery software:
Step 1: Launch Eassiy iOS data recovery software on your PC, and then establish a connection with your iPhone via a USB cable. Select Recover from iTunes Backup File as your preferred mode of data recovery, select a backup file and click on Start Scan.
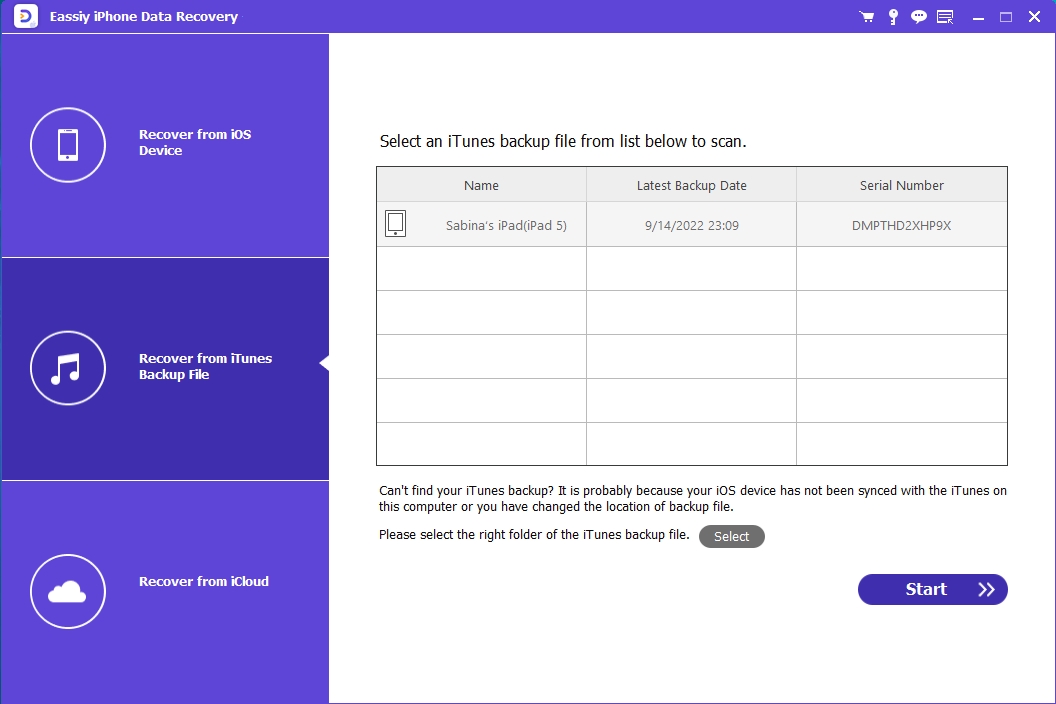
Step 2: Eassiy iOS data recovery software will scrutinize your iTunes backup for recoverable backup data. Wait for scrutinization to complete and the interface below will pop up on your computer screen:
Step 3: Now select the backup data you want to recover, and then click on Recover. Eassiy iOS data recovery software will automatically export your iTunes backup data to your computer. Mind you, you have to choose where to restore the data. Kindly select between Restore to Device or Restore to PC.

Conclusion
Now you have the 6 effective solutions to restore your iPhone data in recovery mode with/without iTunes. Select your desired solution and apply it to fix your iPhone now. Restoring your iPhone data in recovery mode has never been so easy. But that you have our guide at hand, restoring your iPhone should be an easy peasy.