
Updated on 2023-02-07
views
5min read
Screen recording iPhone screen can come in handy in various situations. Suppose you’re unable to join a zoom meeting but want to record the meeting to watch later. You want to record a funny video and share it with your friend. Or more. Screen recording your iPhone screen can help you achieve your objective within a few clicks. If you don’t know how to screen record iPhone, don’t panic. There are various ways to approach the task. You can either use the built-in screen recorder or a third-party tool. Here, we’ll show you the best way to add screen record to iPhone quickly and easily without requiring technical knowledge. Keep reading to find out more.
Part 1: Add Screen Record to iPhone Via Settings - Official Method
Apple integrated the Screen Recording feature into all iOS devices. So, the most straightforward way to add screen records to your iPhone is via the Settings app. The built-in screen recorder allows recording video with internal audio or with a microphone, and the great thing is that the recorded video can be edited using the iPhone Photos app.
The following steps explain the process to use the iPhone built-in in screen recorder to record iPhone screen;
Steps to add screen record to iPhone via Settings
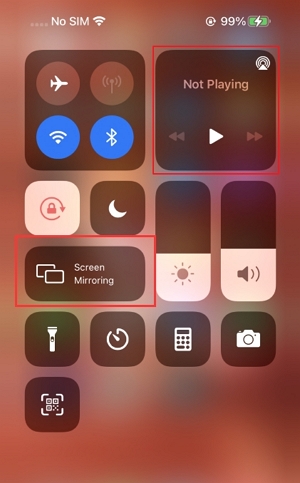
Step 1: Go to Settings, scroll to the Control Center, and press the Add button next to the Screen Recording function.
Step 2: Find the video you want to record. Then, do the following; If you’re using iPhone 8 and earlier, swipe up from the bottom of your iPhone or open up the Control Center while on iPhone x and latest, swipe down from the top of your phone to access the control center.
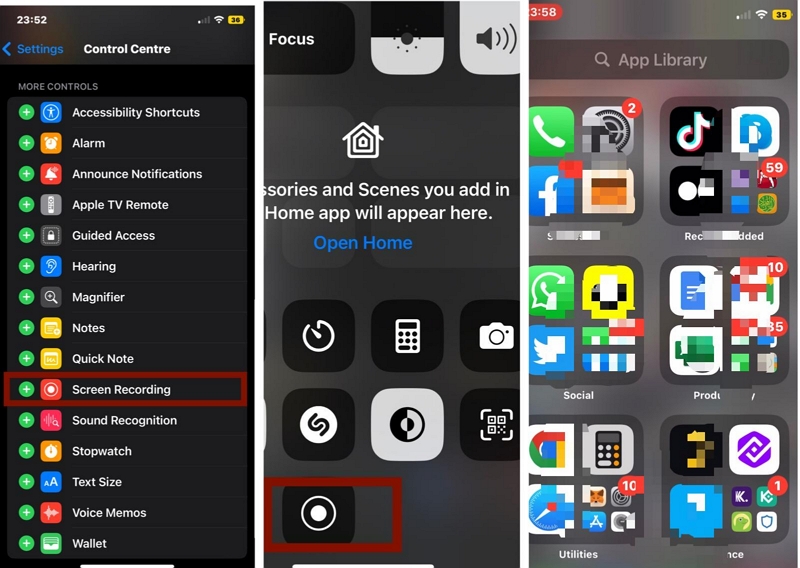
Step 3: Select the grey circle with a film reel symbol—the icon is labeled Record—waits for a three-second countdown before you exit the Control Center.
Step 4: The screen recorder will begin the screen recording operation.
Step 5: Once you're done with the screen recording operation, click the Red icon at the top left corner of your screen and select Stop from the pop-up that appears. The recorded video should be automatically saved to your iPhone photos app afterward. From there, you can choose to do anything you want, from sharing it, playing it, editing it, and more.
Pros:
- Easy to use
- Saves time
- Helps conserve phone's battery life
Cons:
- Settings lack much control
Part 2: How to Add Screen Record to iPhone With Third-party Tool
Screen recording on iPhone has been made better and easier with the help of third-party apps. There are many apps in the App Store that can be downloaded to allow you to record your phone’s screens, including some free ones. The apps work differently, but they all offer a fairly simple process. However, choosing the right third-party tool may be daunting for new users. Thanks to Techsmith Capture, which is one of the top screen recorders for iOS devices.
1. Techsmith Capture
Techsmith Capture (earlier known as Jing) is a fairly old recording tool for iPhone and Mac screens. But thanks to the continuous development of the tool, Techsmith Capture is one of the best iPhone screen recorders in the market. It allows you to record the iPhone screen and the facecam. However, it is important to note that the tool is compatible only with iOS 13.6 and above. So, if that criterion is met, you will have one of the best tools in your hands to screen record iPhone.
Techsmith Capture does not provide sophisticated video editing tools on the iPhone itself. However, you can transfer the recorded video to the Mac application of Techsmith and use advanced video editing tools to curate your video professionally. Above all, Techsmith Capture does not store any video on the iPhone, as everything is stored on the cloud. And regardless of whether you are a beginner or an advanced user, you can use Techsmith Capture conveniently.
Key Features of Techsmith Capture:
- You can use Annotations to draw, doodle, and highlight something in the iPhone screen recording.
- High-quality iPhone screen recording. You can set the recording resolution up to 4K.
- File Sharing to transfer the recorded video to the computer seamlessly.
- Video management to store and organize your iPhone screen recordings like a professional.
- Audio capture via both channels (internal and external).
- Record facecam with iPhone screen.
- Share the iPhone screen recording to social channels with a click of a button.
How to use TechSmith Capture?
Step 1: Install the Techsmith Capture app.
- You can download the Techsmith Capture from the App Store.
- Open the application after downloading it.
- Once the installation is complete, click on Done.
- You will see the Techsmith Capture icon on the bottom-right corner of the iPhone, click on the icon to access the main menu.
- Unfortunately, Techsmith Capture does not allow you to record the iPhone screen without creating an account, so you will have to fill in the information demanded by the Techsmith Capture team. You will find options to tell a bit about yourself and why you are using the Techsmith Capture app.
Step 2. Record the iPhone Screen.
- You will have to add screen recording from the Settings to use Techsmith. So, go to Settings and add Screen Recording to the Control Center.
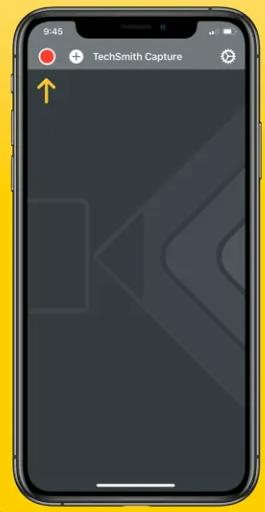
- After adding, swipe down from the top-right corner to access Screen Recording.
- You will see two options in the Screen Recording menu, one is iOS Screen Recorder, and the other is Techsmith Capture. Choose Techsmith Capture to proceed.

Step 3. Click Start Broadcast to start the iPhone screen recording. Then, afterward, tap the Red recording button at the top left side to end the iPhone Screen Recording.
- Once you end the screen recording, you can Preview the screen recording.
- And send it to the Techsmith Capture app on the Mac to further edit the screen recording.
That’s how simple it is to record a screen on iPhone using Techsmith Capture.
Pros of TechSmith Capture:
- Techsmith Capture is easy to install as you can get the application from the App Store.
- Easy to use on the iPhone.
- You can record the iPhone screen in high resolution.
- You can include both internal and external (microphone) sound.
- Include Facecam recording and iPhone screen simultaneously.
- Professional editing tools on the computer.
- All the recorded videos are saved to the cloud, saving you a ton of space on the iPhone.
Cons of Techsmith Capture:
- A long and daunting signing profess.
- You will have to pay to use the professional editing tools on the computer.
- The free tool leaves a watermark on the iPhone screen recording.
- iOS 13.6 and above only.
Part 3: How to Add Screen Records to iPhone Without Occupying Local Phone Storage?
There is also an option to screen record on iPhone without occupying local storage. And that is by mirroring the iPhone screen to the computer and recording the screen via the computer. This way, the screen recordings are saved to the computer. Thankfully, there is a tool that allows you to do just that: Eassiy Screen Recorder Ultimate. Eassiy Screen Recorder is a professional screen recorder for Windows computers. However, it also includes tools to record iPhone and Android screens with sound. The tool offers a wide range of features that allows you to execute various iPhone screen recording operations, it does not matter if you want to record iPhone with audio or not.
Besides, unlike regular screen recording tools, Easily allows you to record iPhone in up to 4K quality, and you can employ advanced editing tools like trim, auto-split, and lots more to enhance the recorded video. You can even save the iPhone screen recording in any format and share it to various social media platforms like YouTube, Facebook, Twitter, and many more within a few clicks.
Key Features of Eassiy Screen Recorder:
- You can mirror the iPhone or Android screen and record it in high resolution with Eassiy Screen Recorder.
- Include both internal and external sound in the iPhone screen recording. Eassiy allows you to include microphone sound from the computer as well.
- All the iPhone Screen Recordings are saved on the computer.
- You can annotate the iPhone screen recording using arrows, pencil, highlighter, text, and other drawing tools.
- You can share the iPhone screen recording to social channels with a click of a button.
- You can save the iPhone screen recording in any format on the computer.
- You will also have access to a recording tool on the computer that comes with advanced recording tools like Follow Mouse Recorder or Around Mouse Recorder.
How to use Eassiy Screen Recorder to Record iPhone Without Occupying Local Storage?
Step 1. Download Eassiy Ultimate Screen Recorder on the Computer.
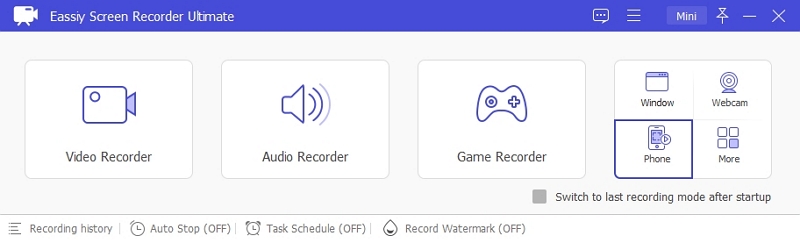
Install the Eassiy Screen Recorder on the computer. And from the main interface, choose Phone.
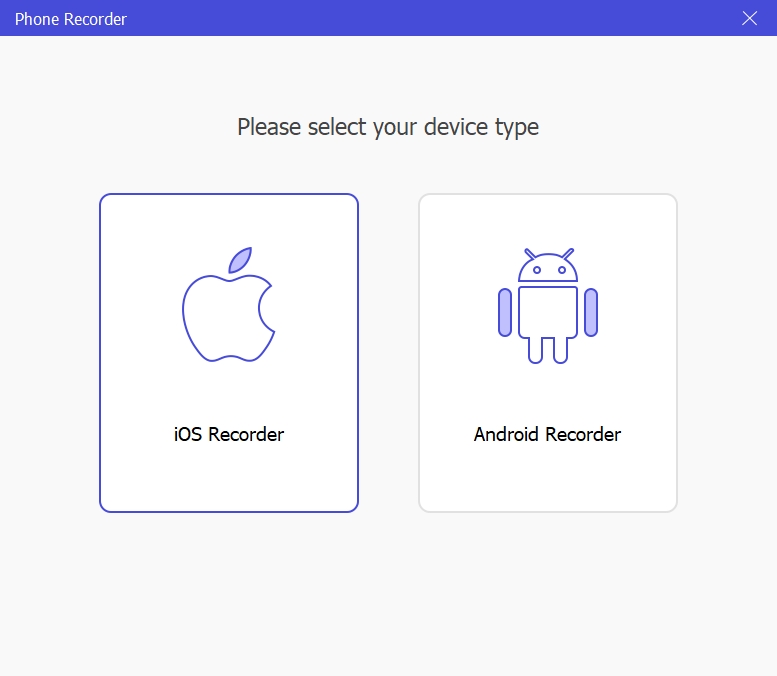
On the next screen, choose iOS Screen Recorder.
Step 2. Connect the iPhone and the Computer
To mirror the iPhone screen to the Eassiy program on the computer, you have to connect the iPhone to the Windows computer using its USB cable. Then, follow the on-screen instructions to establish a connection between the iPhone and the computer.
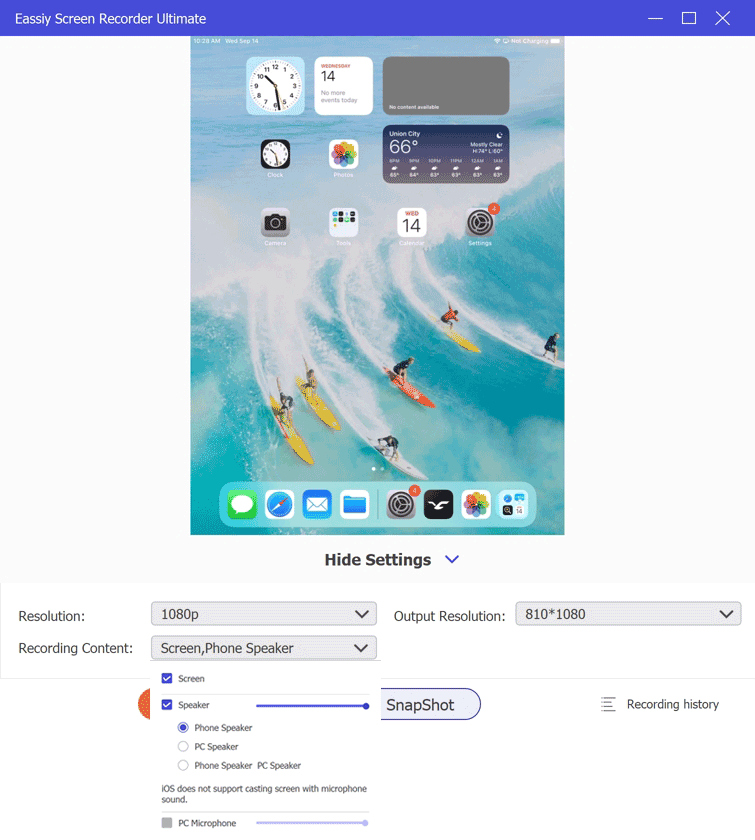
Step 3. Optimize the iPhone Screen Recording Settings.
Choose the Recording Quality and Recording Content (the audio channels). Eassiy allows you to include the internal sound from the computer, iPhone, or a combination of both.
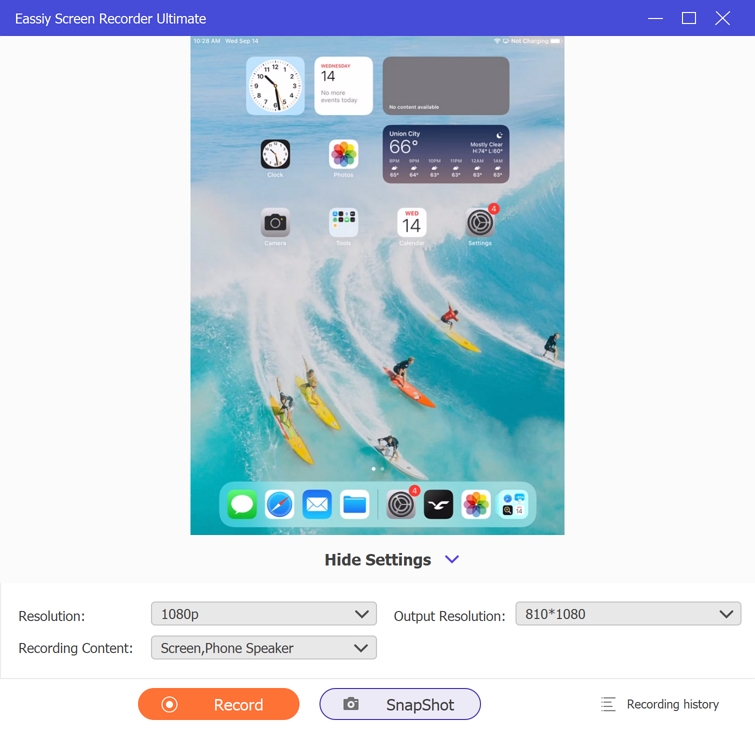
Step 4. Start the iPhone Screen Recording.
- Click on the Record button to start the iPhone screen recording.
- Click on the Camera button to take a screenshot during the live iPhone screen recording.
- Click on the Stop button to end the iPhone screen recording.
After you end the iPhone screen recording, you can Preview it and edit it then and there only. Or, you can access the iPhone screen recording from the Recording History panel and edit, annotate, share, or save it to local storage on the computer later. All the recordings and screenshots will be safe in the Recording History panel until you choose to delete them.
Pros of Eassiy screen recorder:
- Downloading and using Eassiy Screen Recording is pretty straightforward; even a beginner can do it conveniently.
- Recording iPhone, Android, or computer screens is simplistic. You can even set up hotkeys to start and end the screen recording or take a screenshot during live recording.
- There are annotation tools to draw, doodle, and highlight something in the screen recording. This will be useful if you are recording gameplays, online lessons, or video lectures.
- Affordable tool compared to other screen recorders in the market.
Cons of Eassiy screen recorder:
- The free version of Eassiy Screen Recorder only allows you to record for up to 3 minutes.
Frequently Asked Questions
1. Why is screen recording not working on iPhone?
Your iPhone or iPad screen recording may fail to work if you've disabled screen recording on your device. To fix this, enable screen recordings in the Settings app. Just add it by visiting settings > Control center > customize control > and then turn on the screen recording.
2. Why can't I Screen Record iPhone iOS 15?
You may have parental control restrictions from your device preventing you from using this feature. If so, go to Settings>screen time>Content & Privacy Restrictions>Content Restrictions and remove the restriction for Screen Recording.
3. How can I record my screen if an app is not allowing it?
There are different ways you can do this, depending on what OS version you're running. You can use the Screen-Sharing feature in the zoom platform to record. It is an online video creator that lets people share their videos with their social networks, such as YouTube, Facebook, and more. You can also record using screen recorder apps like Eassiy and Techsmith Capture.
4. Why is screen sharing not working?
You can restart your device to troubleshoot this issue. After your device restarts, try again to see if screen sharing works.<
Conclusion
There you have it. Users with any skill level can screen record iPhone without requiring advanced knowledge. In the guide above, we’ve discussed the most reliable methods to screen record iPhone using the built-in screen recorder or third-party apps like TechSmith or Eassiy Screen Recorder.
While the iPhone built-in screen recorder and TechSmith screen recording app allow you to perform basic screen recording operation on iPhone, Easily Screen Recorder gives you access to a plethora of features that allows you to not just screen record, but also perform advanced operations like editing the screen recording and sharing it to various social media platforms.