
Updated on 2024-01-05
views
5min read
Screencast, otherwise known as screen recording, allows teachers, professionals, and marketers to communicate clearly via online tutorials, crafty presentations, and product demonstrations. Since the pandemic, the need for screencast tools has grown across all industries. But that also increased the confusion among the users. Given the internet has tons of screencast tools, it is difficult for users to discover the best tool for them. Understand that a screencast tool that is exceptional for tutors may not be suitable for gamers and marketers. The reason: the expectations of an online tutor differ from the needs of a gamer in a screencast tool.
And that is why we compiled a list of the best screencast tools for different purposes. This list includes the five best screencast tools. Some screen recording tools are suitable for all purposes. Whereas some of the screen recording tools mentioned in the list will be useful specifically for teachers, gamers, marketers, and so on.
Part 1: What is Screencast?
A screencast is a digital video recording of the computer or phone screen, usually don e with real-time audio narration. You might confuse it with a screenshot, which is just a single snap of the screen. The digital video recording of the screen helps teachers, gamers, and professionals deliver their messages clearly and negates the need to answer the same question repeatedly. Today, even the major operating systems like Windows, Mac, iPhone, and iOS devices come with their own screencast tool. Needless to say, the built-in screencast tool fails to meet the needs of advanced users. Given native screen recorders only allow you to capture the screen and internal audio on the device, you may not be able to add your own thoughts via commentary, webcam presence, annotations, and other crucial features.
However, third-party programs like the ones mentioned in the list are more video-making tools with screen recording features. Be that as it may, most users do not even understand their needs. And that is why it is critical to understand the must-have features in a screencast tool. This will allow you to choose a screencast tool easily. So, before moving onto the list of the best screencast tools, here’s what to expect from a screencast tool.
Part 2: Which are the best Screencast Apps in 2024 You must Know.
The above-mentioned features would have given you a clear idea of what to look for in a screencast tool. Still, given there over thousands of screen recording tools on the internet, it will become difficult for you to rule the best one for yourself. But fret not! This list of the five best screencasts will help you find one easily.
1. Eassiy Screen Recorder Ultimate — Best Choice
Available for: Windows, Mac. iPhone and Android (via Screen Mirroring).
Suitable for: Beginners and Advanced users looking to create Online Tutorials, Record Presentations, Video Lessons, Game Recordings, and more.
Price: 19.99/month; 69.99/lifetime.
Eassiy Screen Recorder Ultimate is an all-inclusive screencast tool that presents a simple user interface allowing both hobbyists and experts to work alike. In fact, the reason for Eassiy’s popularity is its customization and personalization options. For instance, you can create your own hotkeys to carry out functions like starting and ending a screen recording or capturing screenshots and manage everything using custom-created keyboard shortcuts.
Coming to the recording options, Eassiy allows you to record the entire screen, part of the screen, or a single window or application. This means you can customize the recording area and record business videos, explainers, advertising, presentations, or product and software demonstrations as desired. You also have the option to include a webcam overlay (in different shapes) and both internal and system sound in the screen recording.
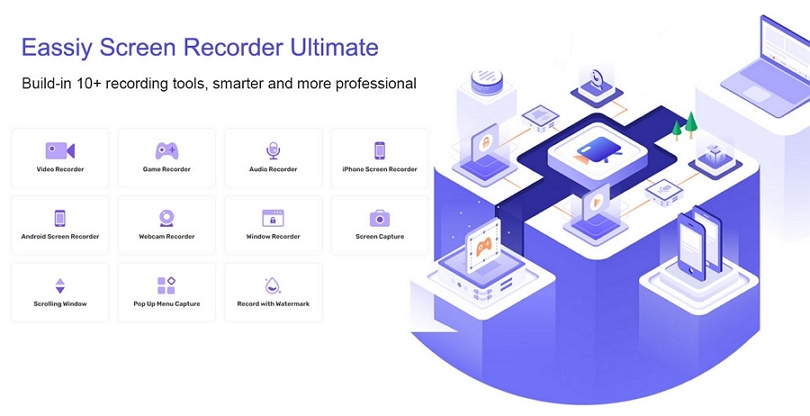
Eassiy also includes real-time annotation tools to draw shapes, insert text, and highlight something important during the live screen recorder. There are also options to show keyboard strokes and mouse cursor effects for capturing immersive gameplays and online tutorials. Not to mention, Eassiy also includes an audio and video editor to trim, clean audio, and give a professional touch-up to your screen recordings.
Key Features of Eassiy Screen Recorder:
- Record the screen flexibly. Record the entire windows or mac screen, and customize the recording area or a specific window.
- Record iPhone or Android. Mirror your phone and screencast via computer or iPhone.
- Audio management system. Manage internal and computer audio levels. Limit background noises and enhance microphone sound. Use a dedicated audio recorder to capture only audio.
- Record webcam. Webcam overlays in different shapes like circular, rectangular, and more. Capture webcam with screen or individually.
- Task Scheduler. Start and end a recording automatically.
- Auto-Stop Recordings. End a recording by setting up the duration for screen recording.
- Real-time annotation. Draw, scribble, and doodle on the screen recordings using different shapes and highlighters.
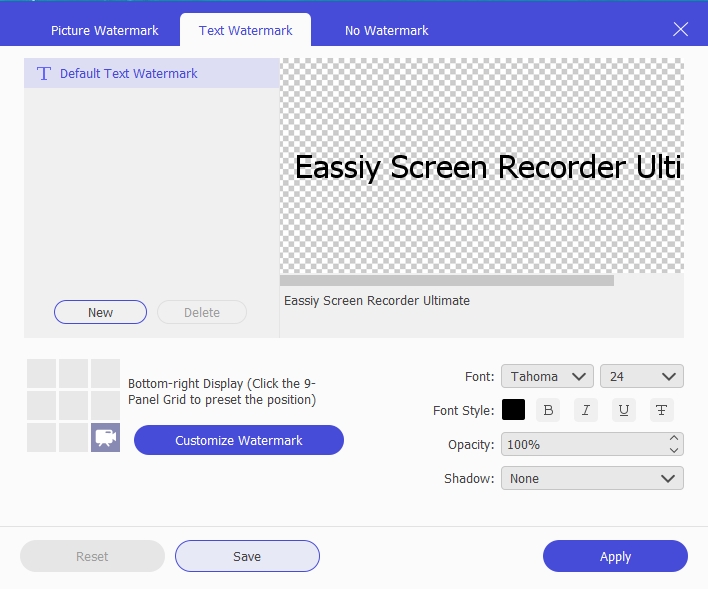
- Custom watermarks. Create logos and custom watermarks to personalize the video.
- Share the recorded video. On YouTube, Facebook, Vimeo, and more social channels.
- Save the recorded footage in any format, including MP4, WMV, AVI, MOV, FLV, ASF, etc.
- Eassiy includes advanced recording options like Follow Mouse Recorder (to record a selected area with mouse movements), Around Mouse, and so on.
- Advanced Screenshot on Windows/Mac. window-specific screenshots, scrolling screenshots to capture chat messages, a webpage, and so on.
- Dedicated Game Recorder. Capture 2D/3D games with audio, voiceover, and webcam in high-definition using the dedicated game recorder.
Why should I use the Eassiy Screen Recorder:
- A clean and intuitive user interface makes it simple for anyone to capture anything in the desired manner.
- Numerous video editing features, including trim, cut, audio cleaning, auto-split, and more.
- Locked window/application recording to record uninterruptedly.
- You can get the lifetime license for a modest cost of US$ 69.97.
Things to consider:
- The free version only allows you to record for 3 minutes.
2. Screencast-O-Matic
Available for: Windows, Mac, iPhone, Android, and Chrome extension.
Suitable for: Educators and Business Professionals.
Price: Solo Deluxe: US$ 3/mo. Solo Premier: US$ 6/mo. Solo Max: US$ 10/mo.
Screencast-O-Matic is another prominent screen recording tool that comes with flexible recording options and also includes a video editor to level up your screen recordings for professional environments. Like Eassiy Screen Recorder, Screencast-O-Matic includes annotation tools to draw on the recordings in real time.
Asides from simple screen recording options, Screencast-O-Matic also includes collaboration features to invite your team and work with students and colleagues. Screencast-O-Matic also presents a simple user interface that allows users of all skill levels to record their screens conveniently. You can also share the video recordings directly to social platforms like YouTube, Facebook, Google+, and more.
Key Features of Screencast-O-Matic:
- Record the screen with a webcam and internal/system sound.
- Annotation tools to scribble, doodle, and draw shapes in the screen recording.
- Use virtual backgrounds in the webcam overlay.
- Video editor to trim, cut, apply effects, transitions, and animate your screen recordings.
Why Should I use Screencast-O-Matic?
- You can publish the video directly to social channels like YouTube and Facebook.
- Different plans for different needs. This means you only pay for what you need.
- A tool designed for focus towards educators and business teams.
- Add music and image from local storage with the recorded video.
Things to consider:
- Learn curve.
- It cannot fulfill all recording needs.
3. Camstudio
Available for: Windows XP, Vista, and 7 users.
Suitable for: Users looking to record for personal use.
Price: Free.
CamStudio is a simple, no-nonsense screen recorder for the old Windows users. Available for Windows, 7, Vista, and XP platforms, CamStudio is a completely free tool to capture your screen and save it any format. It allows you to capture the screen in any shape and comes with advanced audio options, like Microphone, Speakers, Audio, and Video Synchronization.
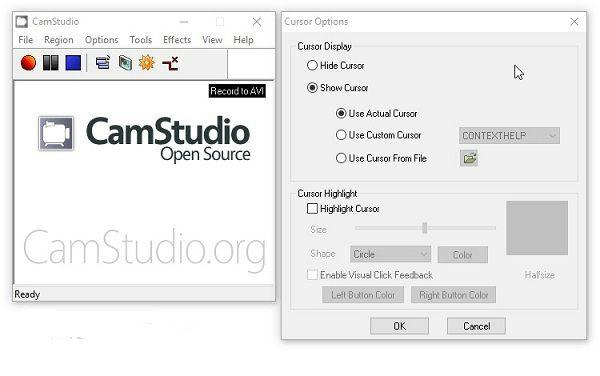
However, unlike other screencast tools like Eassiy and Screencast-O-Matic, CamStudio only allows you to capture the screen in 720p resolution. Nevertheless, there are some cool options like showing keyboard strokes and changing the mouse cursor color. Needless to say, the lack of advanced options like real-time Annotations and Video Editor makes it inefficient to create professional screen recordings. But that also means there aren’t many options on the screen, and users of any skill level can use it efficiently to record their screen.
Key Features of CamStudio:
- Record the entire screen, partial screen, or a specific window or application.
- Use Microphone, Speakers, Audio, and Video Synchronization to manage the audio levels.
- Scheduler to start and end a screen recording automatically.
- Transcoding one video format to another.
Why Should I use Screencast-O-Matic?
- Free, no hidden charges, and no sign-ups needed.
- Change mouse cursor color and show keystrokes.
- Simple user interface.
Things to consider:
- Only for Windows 7, Vista, and XP users.
- CamStudio lacks advanced screen recording and video editing features.
3. Movavi
Available for: Windows, Mac, Online, and Chrome.
Suitable for: Screen recording and video editing.
Price: US$ 34.95/annual license cost.
Movavi Screen Recorder is more or less like the CamStudio with the added benefit of including Webcam. Not to mention, it is available as an online screen recorder and on Chrome, Windows, and Mac. Movavi does not present many options. But it covers just about everything you might need.
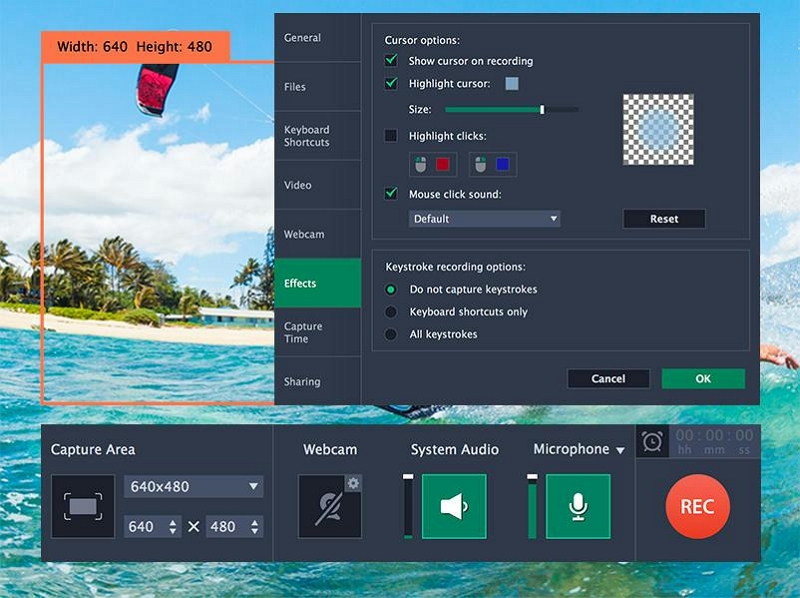
Key Features of Movavi:
- Flexible screen recording.
- Include webcam and microphone sound.
What Should I use Movavi?
- Use custom created shortcuts.
- Choose different resolutions and record up to 4K.
Things to consider:
- No video editor like Eassiy Screen Recorder.
- US$ 34.95/annual charge for freeware functions.
4. Camtasia
Available for: Windows and Mac users.
Suitable for: Users looking to record for personal use.
Price: US$ 270/annual license cost.
Camtasia comes from the TechSmith team, and like other programs from the vendor, Camtasia comes with a plethora of features and a high cost. Aside from all the features discussed in other screencast tools, Camtasia brings in readymade templates to create any type of video. From instructional to explainer, step-by-step online tutorials to video lessons, Camtasia has dedicated templates for all of them.
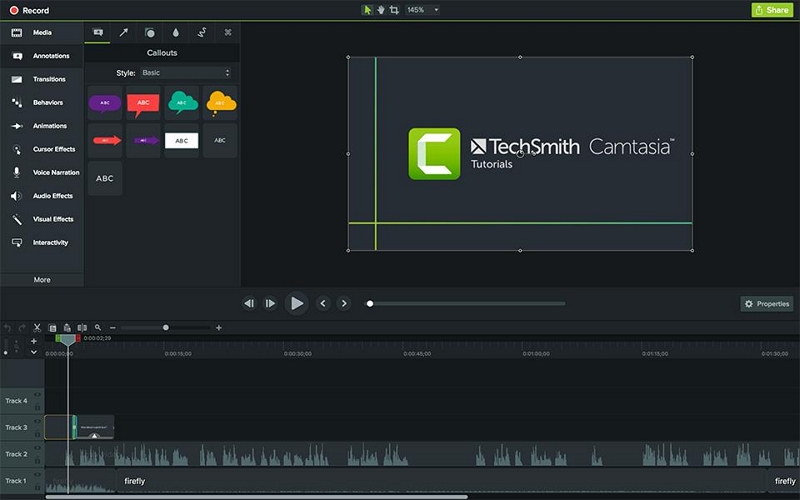
It also includes the much-needed real-time annotation tools. And Camtasia comes with built-in audio, image, and video recorder to edit every aspect of video and image content, be it a recorded video or existing media on the local storage. Be that as it may, Camtasia presents a rather troublesome interface. Users, especially, will have to be patient during the learning process, and it is after a sweet learning curve that you will be able to use Camtasia conveniently.
Key Features of Camtasia Screen Recorder:
- Use readymade templates to create instructional to explainer, step-by-step online tutorials, video lessons.
- Scheduler to start and end a screen recording automatically.
- Numerous fonts, transitions, and effects.
What Should I use Camtasia?
- A lot of sharing and integrations.
- Built-in image, audio, and video editor.
- Real-time annotation tools.
Things to consider:
- US$ 270/annual license cost.
- Learning curve.
Part 3: How Do You Do A Screencast from Any Device with High Quality?
Our best choice, the Eassiy Screen Recorder Ultimate, allows you to capture any device in high-definition. Furthermore, the steps to record on Windows and Mac are the same, given the build of the Eassiy program is the same across all devices. So, you can follow the steps to install and record the screen. First, let’s look at how you can record the Windows and Mac devices in high-definition. Then, we will discuss how to capture iPhone and Android devices using Eassiy Screen Recorder Ultimate.
1. Windows or Mac Screencast
Here’s How to do a screencast on Mac and Windows devices using Eassiy Screen Recorder:
Step 1. Download and Install the Eassiy Screen Recorder program.
Step 2. Customize the Eassiy program. (Optional, Skip to Step 3 to start recording without changing the default options).
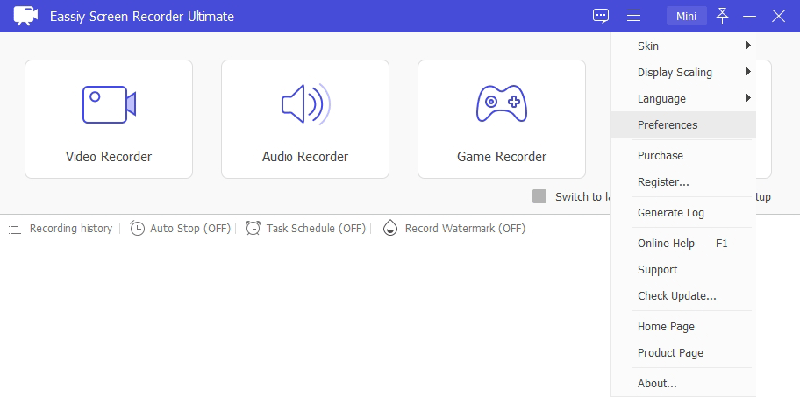
After installing the tool, open the Eassiy Screen Recorder Ultimate. On the main interface of Eassiy, click on the triple bars ( ≡) icon from the top-right corner to access Preferences.
Under the Preferences tab,
- Change the Recording Settings. The Recording panel allows you to customize the basic Settings before and during screen recording. For instance, you can choose whether to include the desktop icons in the desktop recording or not.
- Modify the Export Settings. Customize the video footage format, bitrate, location to save the file, frame rate, and even audio settings of the output. This will be applicable to all future recordings.
- Customize the Audio Settings. The Sound panel gives you access to advanced sound settings like enhancing microphone sound and limiting background interferences and white noises coming from the microphone.
You can return to the main interface of the program after saving the changed Settings by clicking on OK.
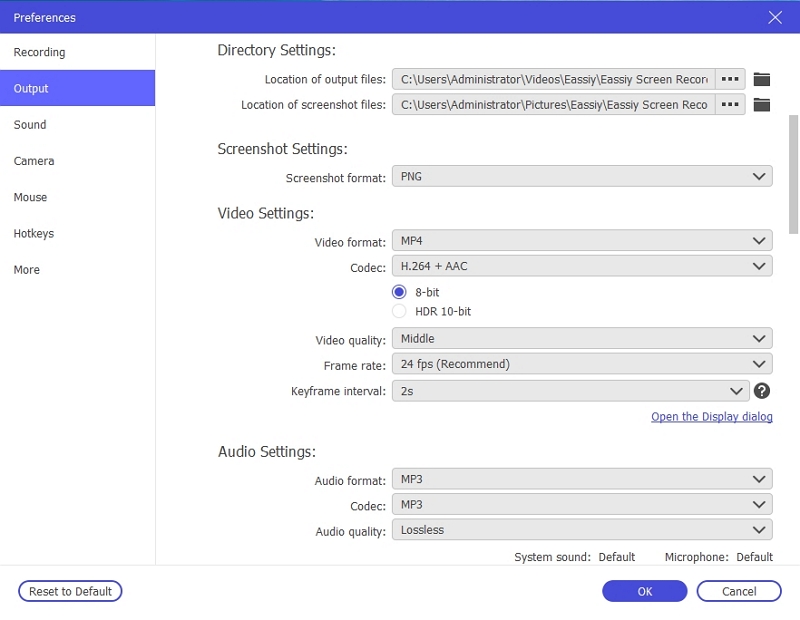
Note: You can also modify the Camera, Mouse, Hotkeys, and other Settings via the Preferences tab. Of course, this is a one-time job. The Camera Settings allow you to customize the camera resolution for the webcam. The Mouse Settings let you choose the cursor color and size of the mouse cursor. Plus, the Hotkey lets you customize the keyboard shortcuts to manage everything with just keyboard buttons.
Step 3. Record the Screen.
On the main interface of Eassiy Screen Recorder Ultimate, choose Video Recorder.
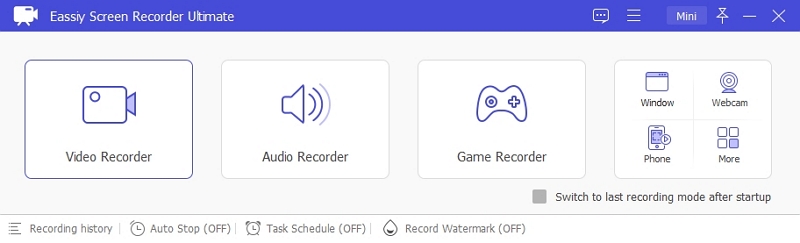
On the next screen, choose whether you want to record the Full Screen or Custom. Custom will allow you to customize the recording area. You can also choose the Aspect Ratio, Resolution, and Dimensions for recording. You can also modify the other Settings like Webcam to include footage from the rearview camera into the video recording. The Microphone option allows you to include your voice in the screen recording.
Click on the REC button to start the recording. (Eassiy will start the countdown to prepare for the screen recording).

Note: The Advanced Recorder allows you to choose the Follow Mouse Recorder and Around Mouse Recorder. Task Scheduler lets you start and end a recording automatically. At the same time, the Auto Stop allows you to set a duration to auto-end a screen recording. Furthermore, Watermark lets you create your own custom watermark and personalize the screen recording.
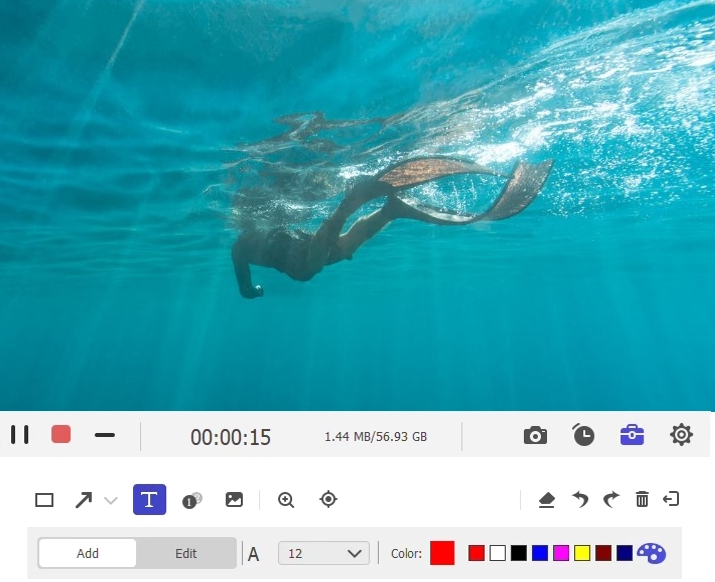
Step 4. Annotate the Recording.
After starting the recording, click on the Briefcase icon to access the drawing tools. You can use the Arrows, Lines, Text, Airbrush, and other drawing tools to highlight something important in the screen recording. Eassiy allows you to change the size and color of each element to compliment the subject. Choose the best color and size to record as desired.
You can also capture Screenshots during live recording via the Camera icon on the recording menu. Or, you can use the keyboard shortcut (Shift+Ctrl+S, by default) to capture screenshots during live recording.
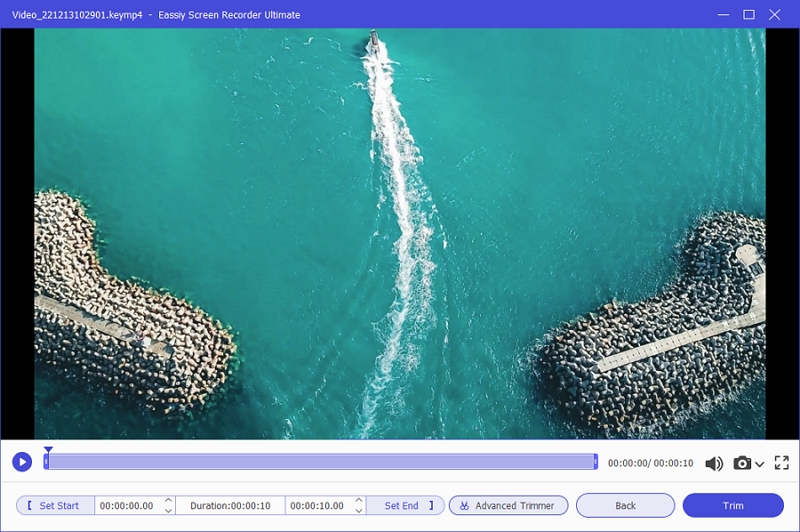
Step 5. Edit the Recording.
Click on the Stop icon to end the recording. Once you end the recording, Eassiy will process the screen recording to the Editing menu. Via the Editing menu, you can trim and remove the unwanted parts from the Screen Recording. You can also edit the recording. Eassiy also allows you to manage the audio levels during post-production.
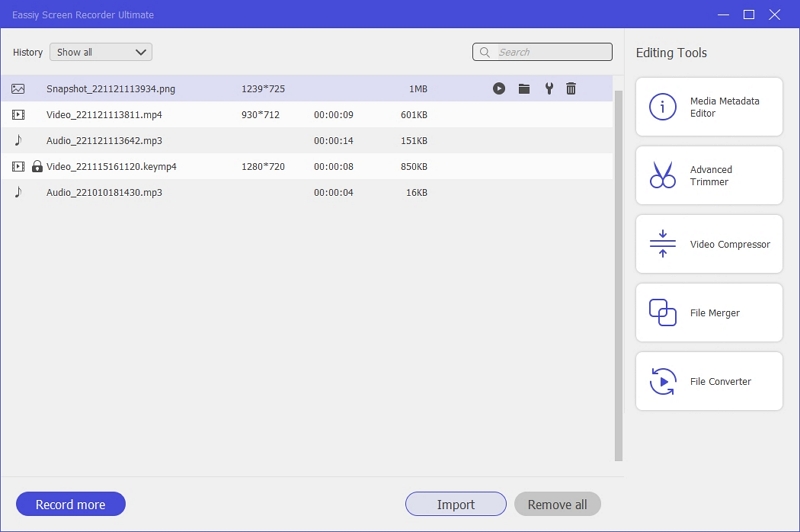
Step 6. Save or Share the Recording.
After editing the screen recording, click on the Save icon. This will prompt you to the Recording History. Via the Recording History, you can either share, edit, or save the screen recording.
2. Phone Screencast
Eassiy also has a phone recorder. Eassiy will essentially be present on the PC itself, but it allows you to mirror your device to Windows or Mac devices and record the screen seamlessly. We record iPhone screen on computer as an example
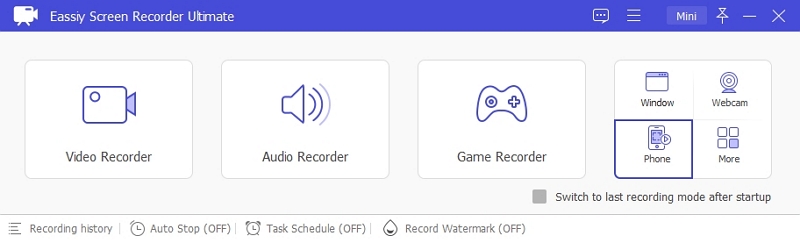
Step 1. Launch Eassiy Screen Recorder and Choose Phone from the left hand side.
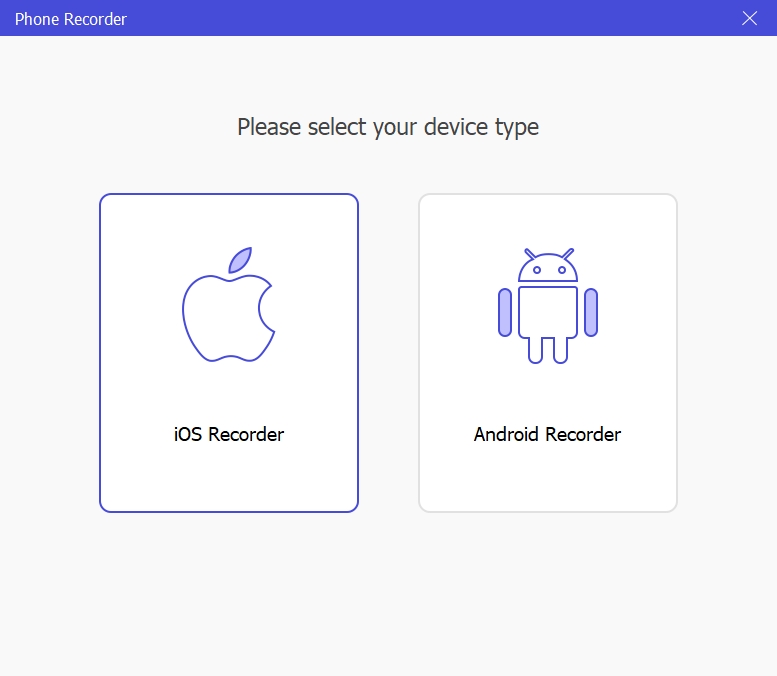
Step 2. On the next interface, choose iOS.
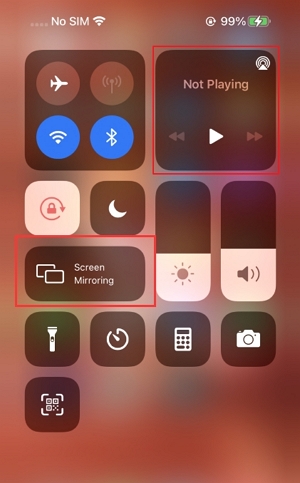
Step 3. Connect your iPhone to the PC and follow the instruction on your PC screen to enable Screen Mirroring on iPhone and establish connection between the iPhone and Eassiy Screen Recorder Ultimate.
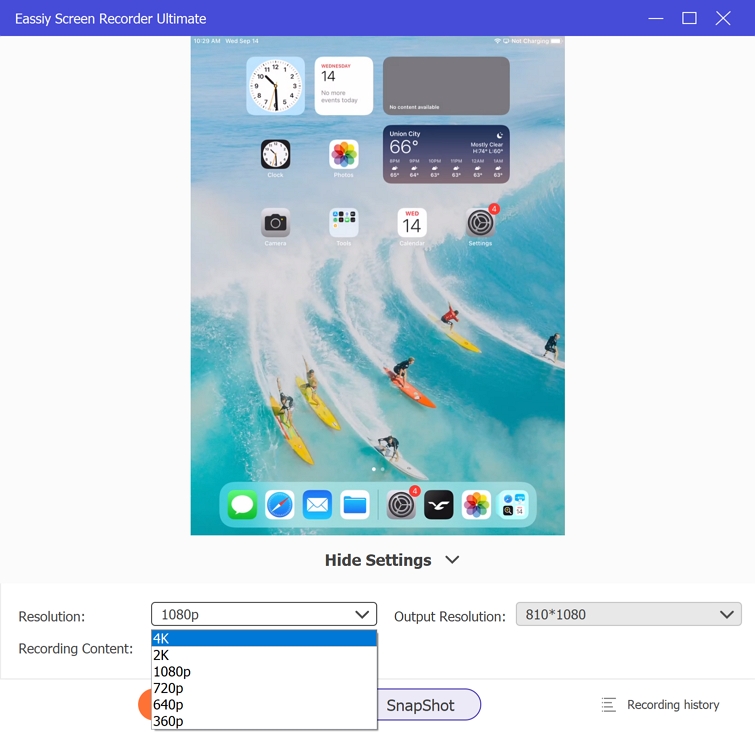
iPhone screen will cast to your computer. Eassiy Ultimate Screen Recorder support iPhone screen recording up to 4k quality. You can record iPhone screen or gameplay on computer easily,
That’s how to use Eassiy Screen Recorder to capture the iPhone screen intuitively. The benefit of mirroring the iPhone or Android screen to the computer is less RAM consumption. This will allow you to capture gameplays and Zoom meetings without lags or connection issues.
FAQs
1. What is the difference between screencast and screen mirrors?
Screencast means video recording the screen. At the same time, the screen mirroring allows you to transmit the screen to other devices. For instance, Eassiy “screencasts” the Windows and Mac devices. But to “screencast” your iPhone or Android via Eassiy will require you to transmit the phone screen via “screen mirroring.”
2. What is the difference between screencast and screenshots?
Screencast, as underlined earlier, is a video recording of the desktop or phone screen. A screenshot, on the other hand, is a single picture of the desktop screen. Think of a Screenshot as a single moment of your experience, and screencast is like sharing the entire experience with others.
3. What is screencast used for?
From online instructions to tutorials, and gameplay recordings to explainer videos, a screencast is used to capture anything on the screen and share the video footage with others. You can record your meetings, explain how the software works, discuss a chapter, or pass on instructions to others using a screencast tool.
Conclusion
Simply sharing a document or user guide is a thing of the past. Today, business professionals, online and school teachers, and marketers use screencast tools to create Training videos, Video lessons, and Recorded presentations. So, if you are a teacher with online classes, a marketer who has to demonstrate a product or software, or an office-going professional who has to create a presentation, unleash the power of video, and create awesome-looking tutorials and presentations using screencast tools.
The screencast tools recommended in the guide are excellent enough to create different types of videos. And if you are looking for an all-purpose screencast tool, choose Eassiy Screen Recorder Ultimate. Eassiy, as indicated, includes all necessary screen recording features, allows you to include a webcam and microphone, and lets you edit the screen recording to make it suitable for a professional environment.