
Updated on 2026-04-15
views
5min read
When you’re planning to switch from Spotify to YouTube Music, one question comes up quickly: how do you keep your Spotify playlists? Searching and rebuilding everything manually on YouTube Music isn’t realistic if you have large or several Spotify playlists. Luckily, there are free tools helping us complete the playlist transfer. These utilities know which ones can accurately match your original Spotify songs and preserve the right versions on YouTube Music.
In this guide, we’ll explore multiple ways to transfer Spotify playlists to YouTube Music, whether you’re on Windows, Mac, iPhone, or Android. Each method is suited for different needs, so you can pick the one that fits your setup, your preferences, and the size of your music library.

How to Transfer Spotify Playlists to YouTube Music via Manual Upload
Free for: Transfer unlimited audio files to your local drive for secure uploads.
Manual uploads are the only way to get the exact versions you love, straight from the source, and carry them over on YT Music without losing audio quality.
Since streaming apps don’t let you export songs outside their ecosystem, you can use a reliable desktop tool like Eassiy Screen Recorder Ultimate to make this transfer possible by recording your audio locally.

Eassiy Screen Recorder Ultimate lets you record your audio into formats that YouTube Music accepts like MP3, FLAC, or M4A and save them directly on your computer. What sets it apart is what it preserves: the original high audio quality captured directly from your system sound. Once the recorded music is saved, you can easily upload your precise tracks without worrying about wrong versions being matched by algorithms.
The audio recording process is simple too. The screen recorder allows you to capture whatever is playing on your computer screen. Whether it’s single tracks or a long continuous playback of your favorite mixes, it lets you record everything without limits.
Eassiy Screen Recorder Ultimate
Record any audio playing on your device and save it as MP3, AAC, FLAC, and more with system sound capture and permanent offline access.
Key Features
- Record any audio stream in high quality — songs, playlists, podcasts, audiobooks, and more.
- Supports multiple output formats including MP3, AAC, FLAC, and more.
- Built-in timer for hands-free, automated recording sessions with no set limit.
- Preview recordings before saving to ensure quality.
Steps to Record Audio to Local Files
Step 1. Download and install Eassiy Screen Recorder Ultimate on your Windows or Mac computer. Once launched, select the Audio Recorder feature from the main interface.
Step 2. Configure your audio recording settings. Enable System Sound to capture the audio playing on your computer. Optionally enable the microphone if you need to add voiceovers.
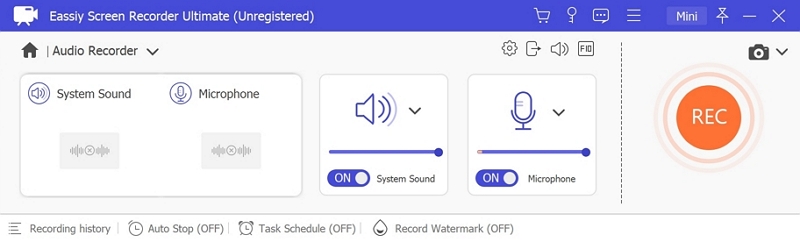
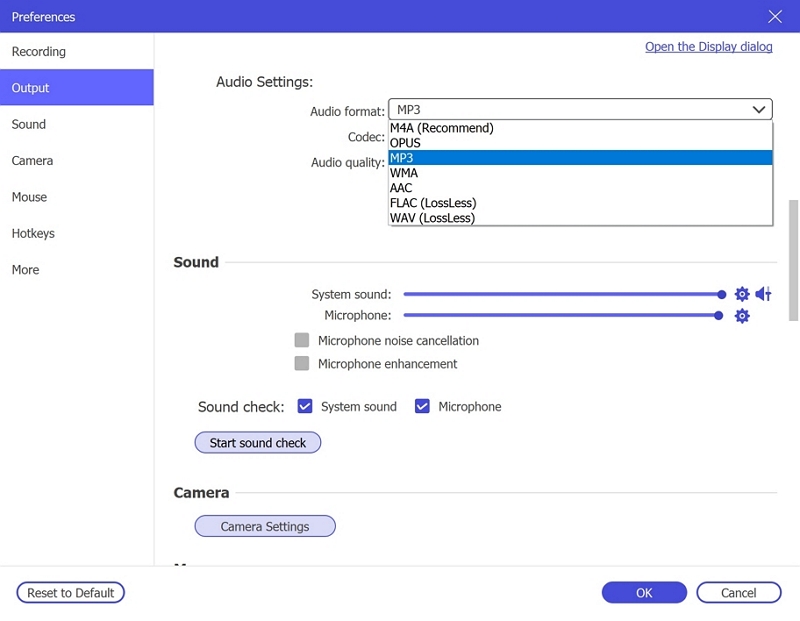
Step 3. Click Settings → Preferences → Output to select your desired audio format (e.g., MP3, AAC, FLAC) and set the quality to High. Click OK to save.
Step 4. Play the audio you wish to record, then click REC to begin recording. Use the toolbar to adjust volume, pause, or stop at any time.

Step 5. To automate the process, you can click the clock icon on the control bar to set a specific recording duration in advance.
Step 6. When finished, click Stop and preview your recording. Save it in your preferred format to your computer for uploading.
Steps to Add Playlists to YouTube Music
Once your audio is saved to your computer, whether Mac or Windows, go to music.youtube.com and follow the steps to upload it.
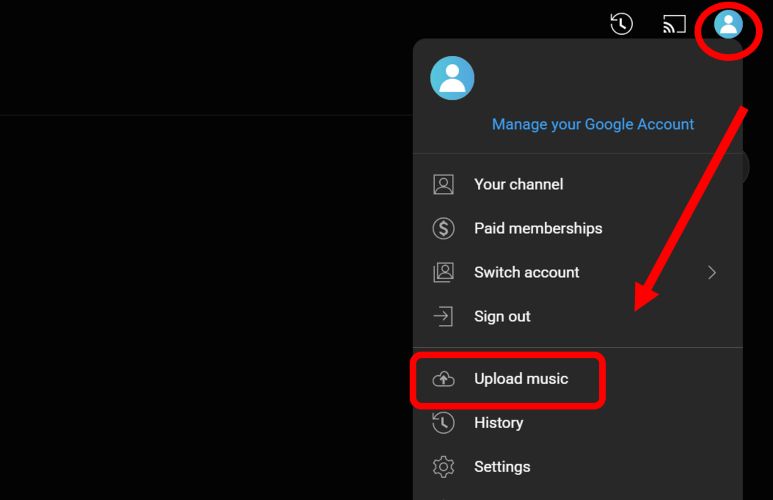
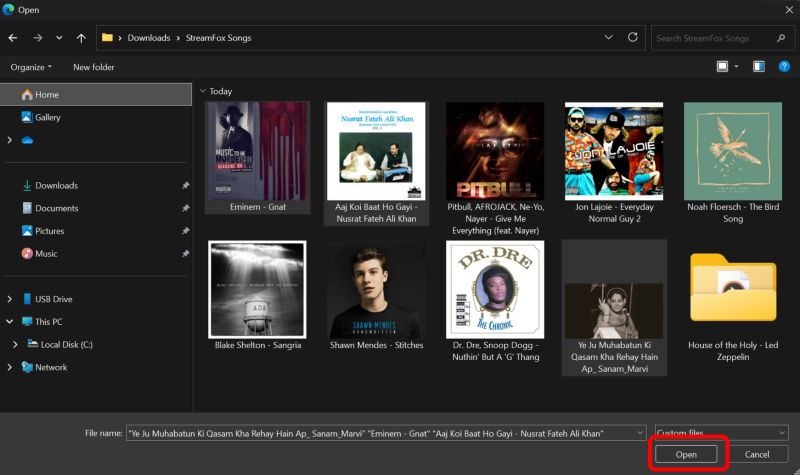
Step 1. Head over to the top-right of YouTube Music and tap your profile icon. From the drop-down, select Upload music.
Step 2. Use the file picker to open the folder where your recorded audio files are saved and select the tracks you want to upload. Once ready, hit Open.
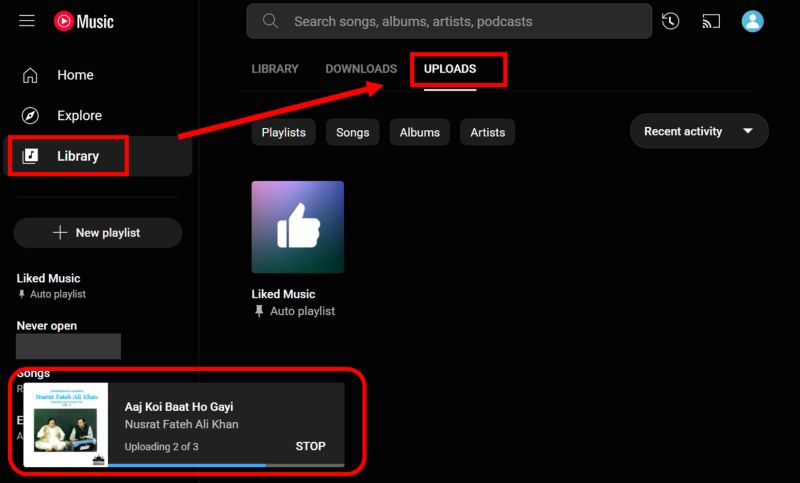
Step 3. You'll see an upload bar at the bottom-left of the screen. Don’t close the window while the songs are uploading.
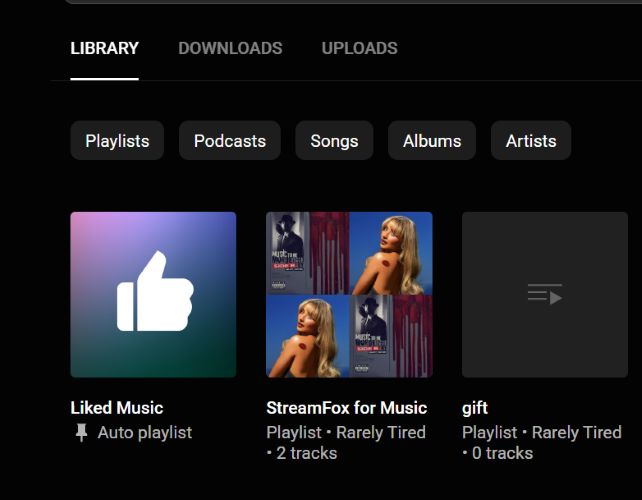
Step 4. After the upload completes, go to the Library tab on the left and select Uploads from the top menu. This section only appears once at least one song is uploaded.
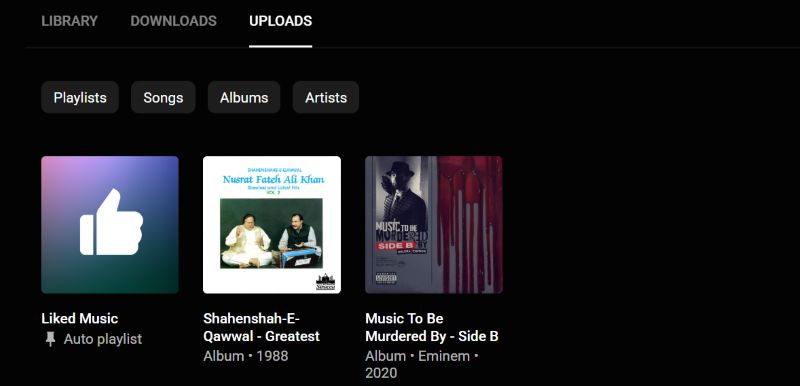
Step 5. You’ll now see your songs organized. The files you carefully saved using the screen recorder will carry over exactly as you recorded them—no mismatched algorithms or wrong versions.
Find Uploads on Your Phone:
As soon as the upload finishes, your songs will be available everywhere you’re signed in, whether it’s your phone, a smart TV, or even speakers like Google Nest. Everything syncs automatically. Here’s how to find them on the mobile app:
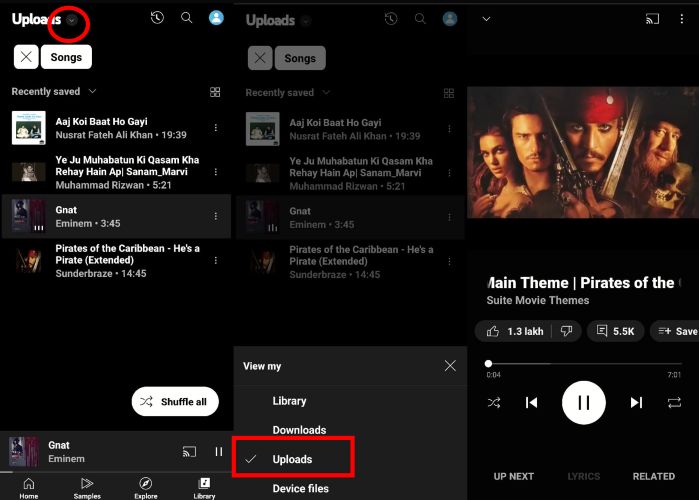
Step 1. Open the YouTube Music app and tap Library from the bottom menu.
Step 2. Then tap the drop-down menu near the top-left of the screen and select Uploads from the list. This shows all the songs you uploaded from your computer.
Tip: Want a mobile app to download YouTube Music without subscriptions? This YouTube Music Premium APK post must be what you want.
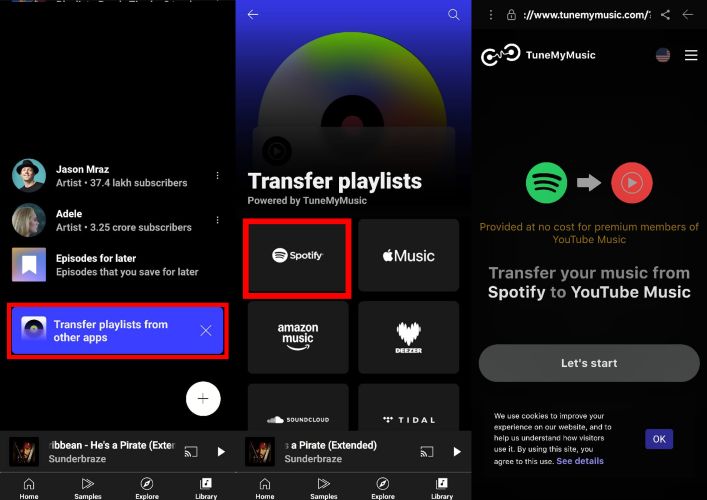
How to Transfer Spotify Playlists to YouTube Music with Online Tools
Online transfer tools come in handy when you want to move your Spotify playlists without downloading anything. They will require you to sign in to your Spotify and YouTube Music accounts. And here’s the important part: they work by matching metadata such as song names, artists and albums from your Spotify playlist to similar tracks on YouTube Music.
The problem? They’re not always perfect. As these tools rely on matching, you will end up with the wrong version of a song, missing album art, or mismatched track lengths. That’s just how metadata-based transfers work. Also, most of these tools come with free limits, either by number of songs, number of transfers, or available features.
Still, they’re simple and fast. So let’s explore the two best ways to use these tools to move your Spotify playlists to YouTube Music.
Way 1. Use TuneMyMusic
Free for: 500 songs per transfer
TuneMyMusic is the first tool worth trying. You don’t even need to create an account. Just connect your Spotify and YouTube Music services directly, and you’re ready to go. It’s simple, fast, and works purely through the browser. That said, there’s no dedicated mobile app.
Now, YouTube Music Premium users will see TuneMyMusic suggested within the mobile app, but it only opens in a browser and only works for Premium accounts.
Steps to Use TuneMyMusic for Spotify Playlist Transfer
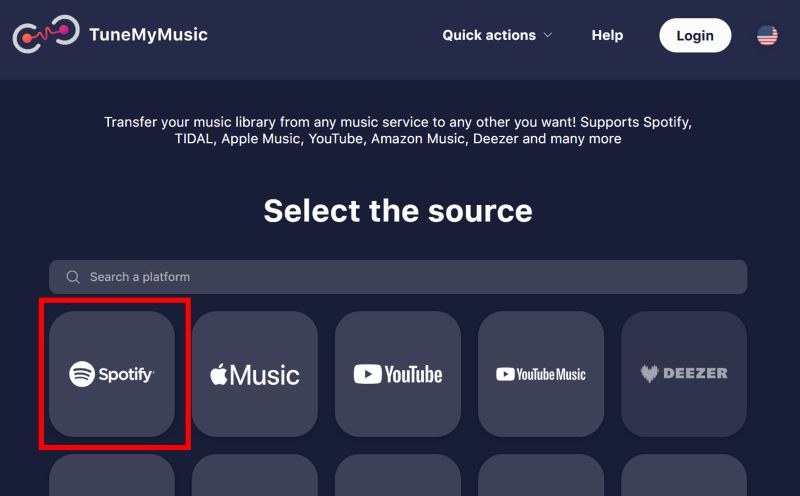
Step 1. Visit the TuneMyMusic site. On the main screen, choose Spotify from the grid of platforms which is listed under Select the source .
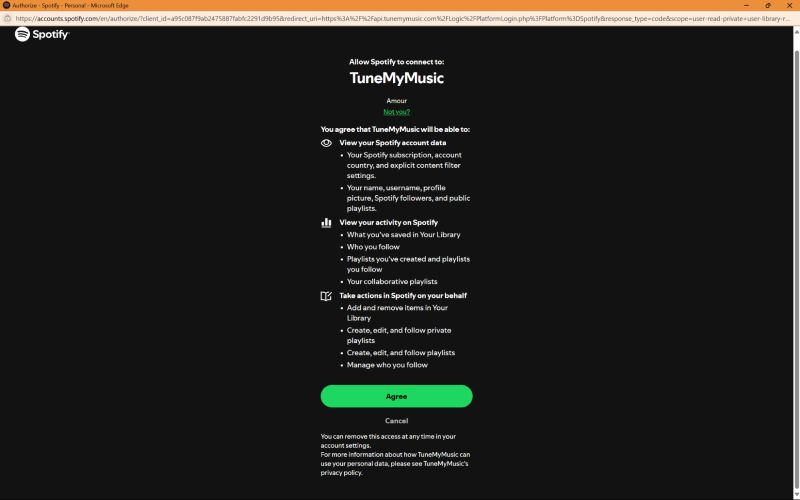
Step 2. You'll be redirected to Spotify's permissions page. Click Agree to allow TuneMyMusic to connect with your account. This is required to access your playlists and transfer them.
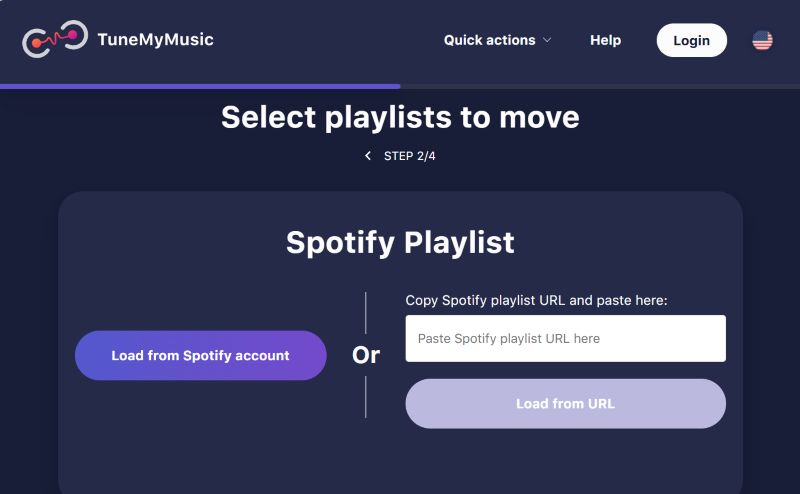
Step 3. Next, you’ll land on the playlist selection page. Here, you can either load playlists directly from your Spotify account by clicking Load from Spotify account or paste a specific playlist URL if you have one.
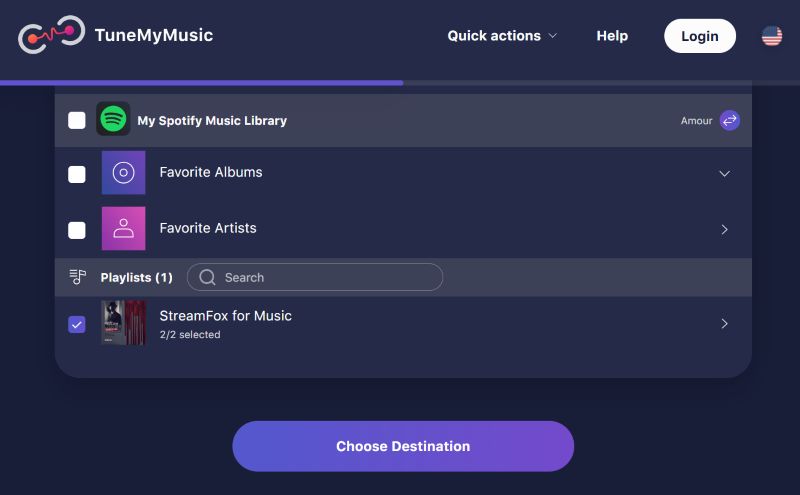
Step 4. After your Spotify data loads, select exactly what you want to move, favorite albums or a specific playlist. Once selected, hit the Choose Destination button.
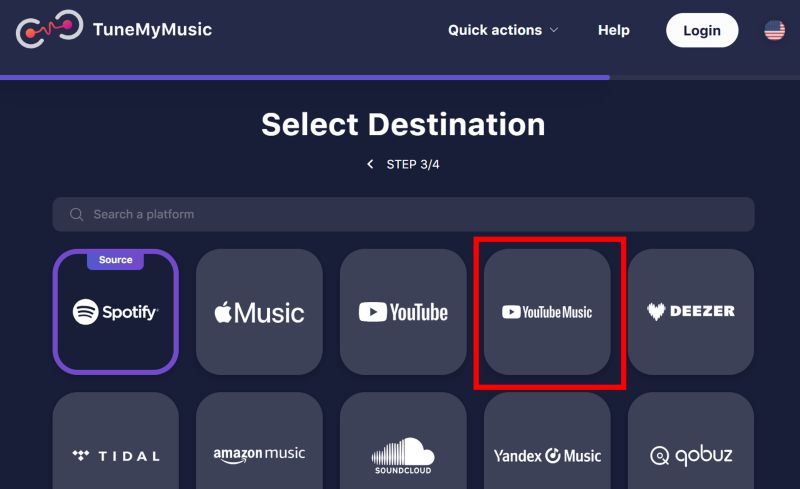
Step 5. Now choose YouTube Music as your target platform.
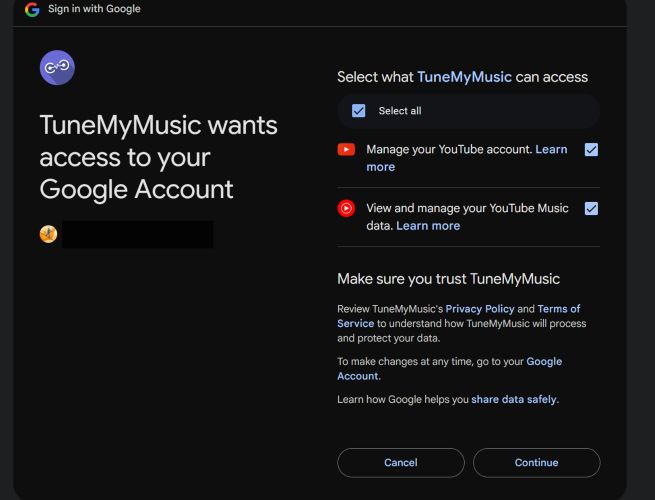
Step 6. Log into your YouTube Music account and check all the boxes for access. Then hit Continue to proceed.
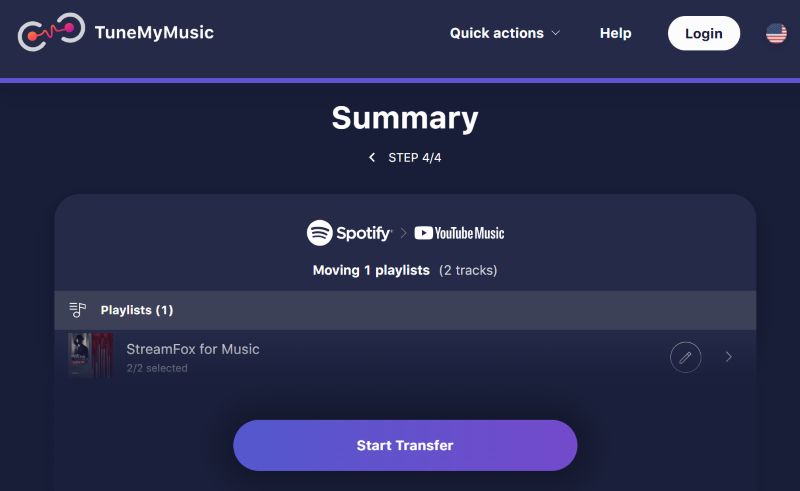
Step 7. You’ll now see a summary of the transfer. Double-check the number of songs and playlists and click Start Transfer to begin the process.
Step 8. Wait for the transfer to complete. Once done, a confirmation message will appear showing that your playlist has moved from Spotify to YouTube Music.
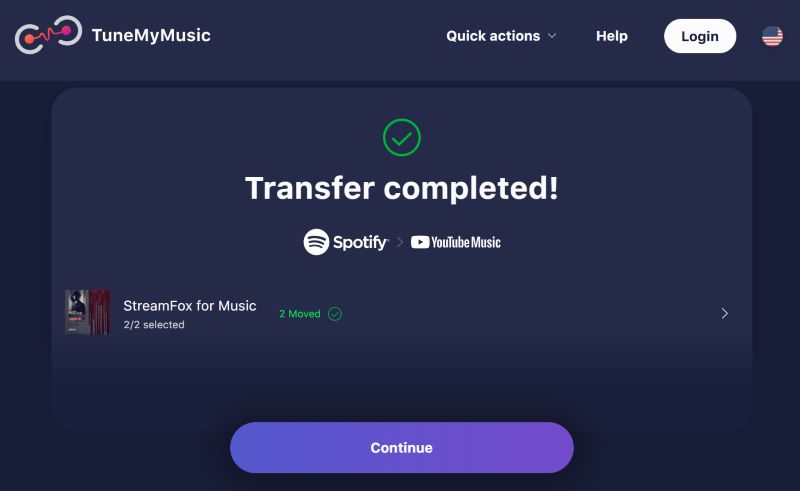
Step 9. Head over to music.youtube.com and look under your Library. You’ll see the transferred playlist now available with the same cover art and track order.
Way 2. Use Soundiiz
Free for: Only 200 tracks per playlist. You can’t move individual songs or artist collections unless you upgrade to premium.
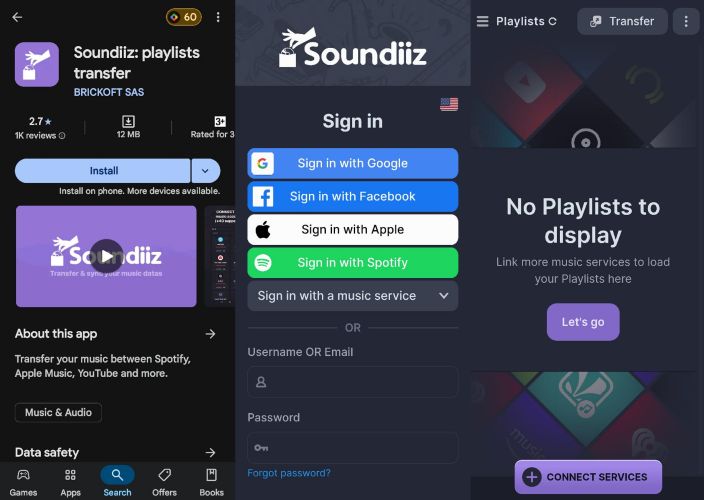
There’s also Soundiiz, another solid tool for moving playlists between platforms. The main difference? Soundiiz also comes as a mobile app, available on the Google Play Store (not on the Apple App Store for now). It works similarly but requires you to sign in and brings its own set of limitations depending on how much you plan to transfer.

Steps to Use Soundiiz to Transfer Playlists from Spotify to YouTube Music
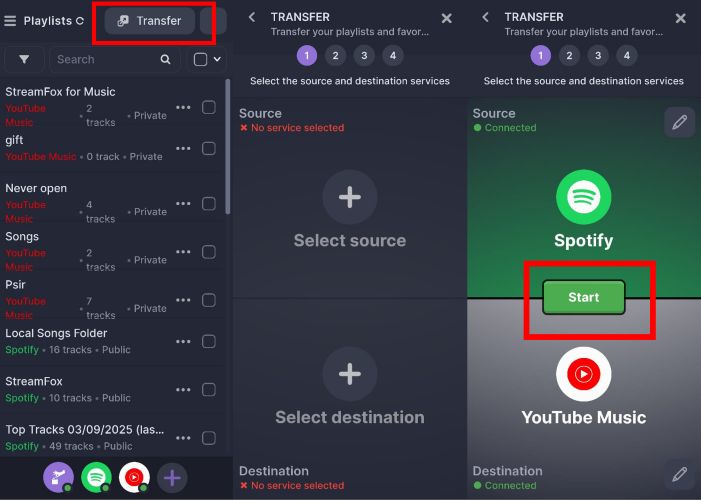
Step 1. Install the Soundiiz app from the Play Store or continue with the web version. Once done, launch it and sign in using your preferred option, Google, Facebook, Apple, or Spotify. On the main screen, tap Connect Services.
Step 2. Choose Spotify from the grid. A permissions screen will appear. Hit Agree to continue.
Step 3. Return to Connect Services and now select YouTube Music. Authorize its access using your Google account just like with Spotify.
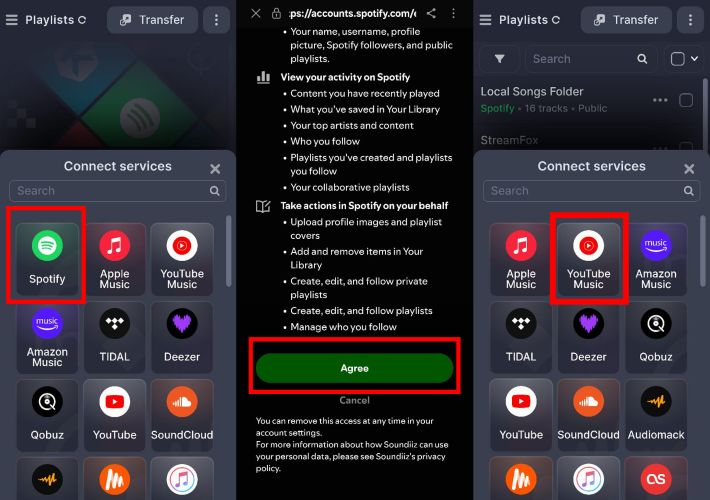
Step 4. From the home screen, tap the Transfer button at the top-right. You’ll now be asked to pick your source and destination. Simply choose Spotify as the source and YouTube Music as the destination. Press Start once both are connected.
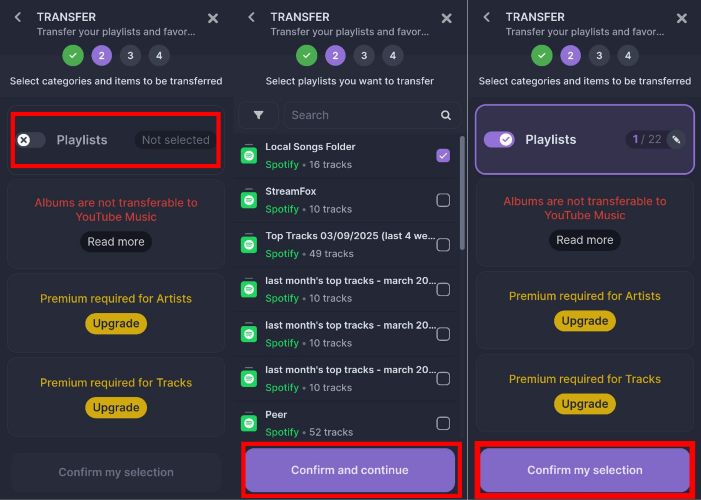
Step 5. On the next screen, toggle on Playlists under "Select categories". Expand the list and check the exact playlist(s) you want to send over. Tap Confirm my selection to proceed.
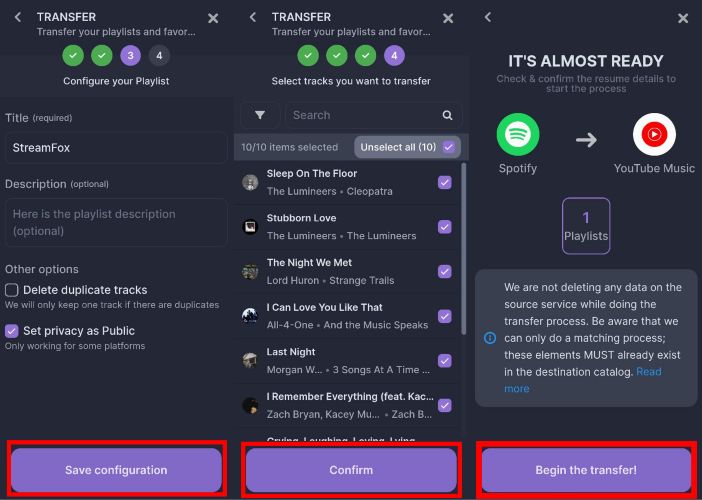
Step 6. Now enter a playlist title and optionally add a description. Tap Save Configuration when you’re ready.
Step 7. Soundiiz will show the full tracklist. Uncheck anything you don’t want to transfer, then tap Confirm, followed by Begin the transfer on the final screen.
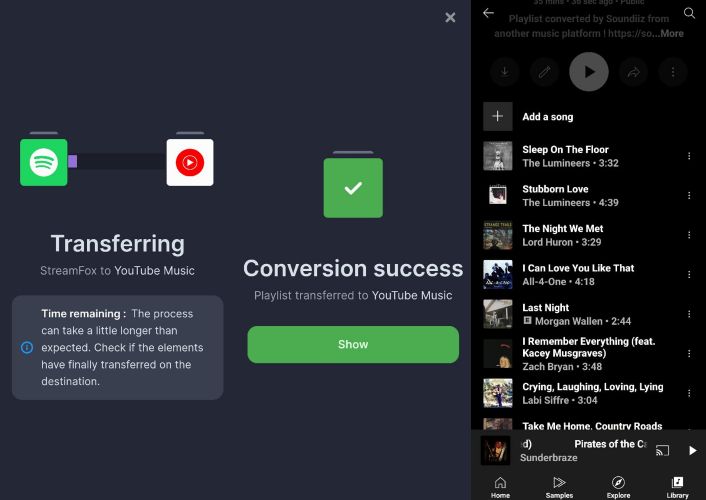
Step 8. Once the success message appears, open your YouTube Music app, head to the Library tab, and you’ll find your newly transferred playlist ready to play.
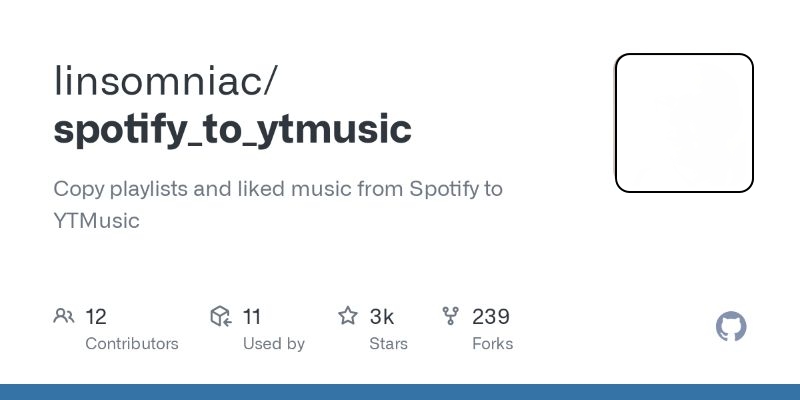
How to Import Spotify Playlists to YouTube Music Using GitHub Tools
Free for: 5,000+ tracks in a single go, completely free
When you’re aiming for a large-scale migration without spending anything, GitHub-based tools like spotify_to_ytmusic are your best bet. Instead of creating new playlists, this utility works by liking the matched tracks directly on YouTube and syncing them with your YouTube Music library.
It’s not the most beginner-friendly approach, as you’ll need to use command line tools like Python and Git, whether you're on Windows, macOS, or Linux.
How to Set up spotify_to_ytmusic for Free Migration on Windows
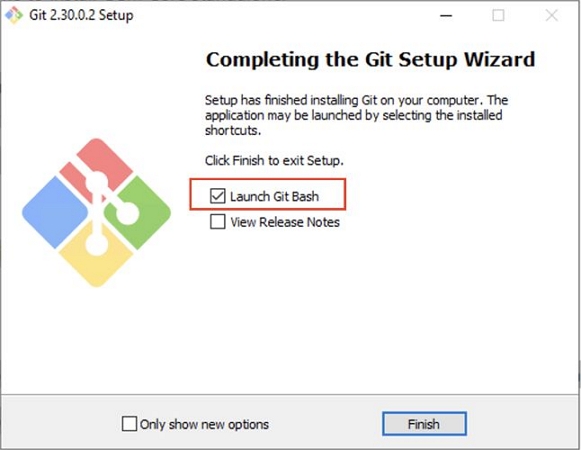
Step 1. Install Git and Python. During Python installation, ensure you check the box “Add Python to PATH”.
Step 2. Open your Command Prompt or Terminal. Navigate to your Desktop (or another folder of choice):
cd Desktop
Clone the script using:
git clone https://github.com/sigma67/spotify_to_ytmusic.git
Once cloned, enter the folder:
cd spotify_to_ytmusic
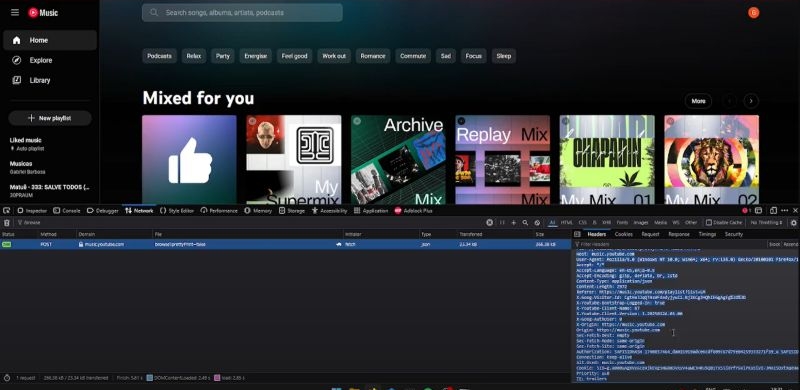
Step 3. To authorize the script with your YouTube Music account:
- Open YouTube Music in a browser (preferably Firefox).
- Press F12 to open Developer Tools.
- Go to the Network tab.
- Type browse in the filter box and reload the page.
- Find a request labeled browse, click on it.
- Go to Headers > Request Headers, then Raw.
- Copy all the raw headers shown.
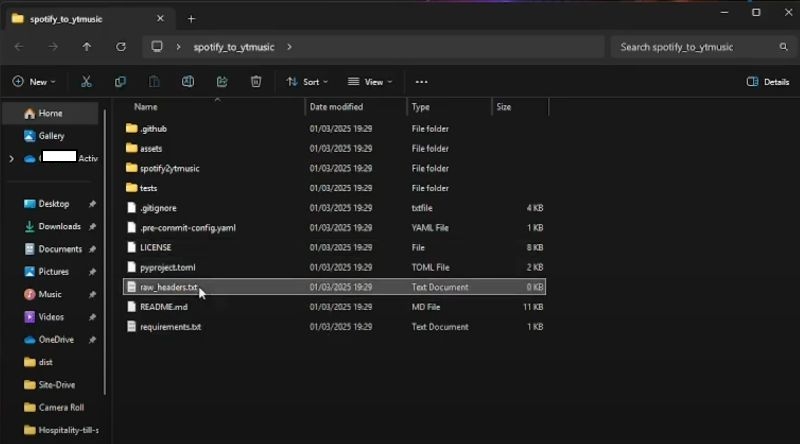
- Back in the script folder, find the file named headers_raw.txt and paste those headers into it.
- Save and close the file.
Step 4. In the script folder, run:
pip install -r requirements.txt
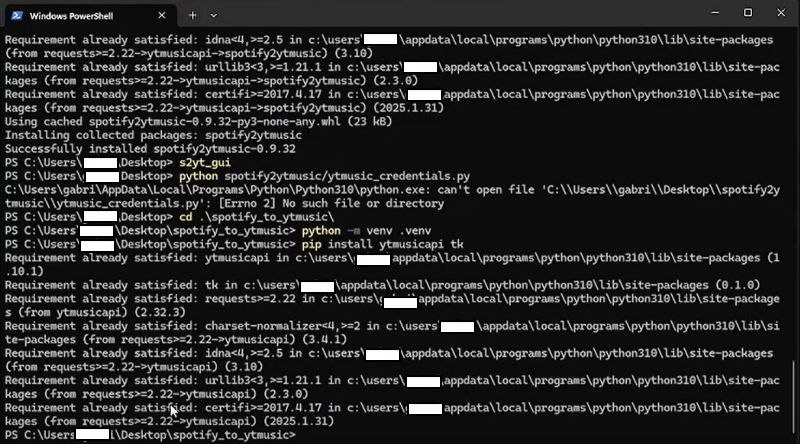
Step 5. Then, start the tool from the same Terminal window:
python start.py
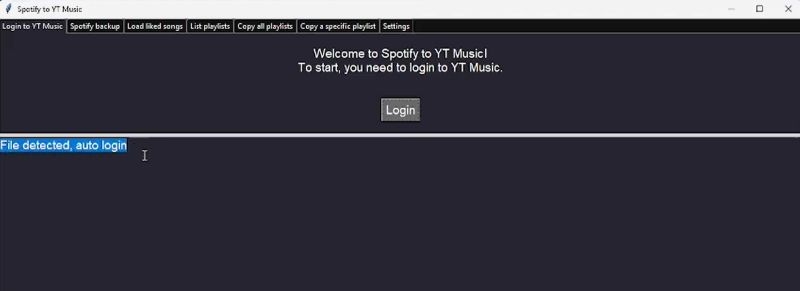
The script will auto-detect your headers file and log you in. It should display:
File detected. Auto-login successful.
You’ll be redirected to a Spotify login window where you can authorize the app to access your playlists.
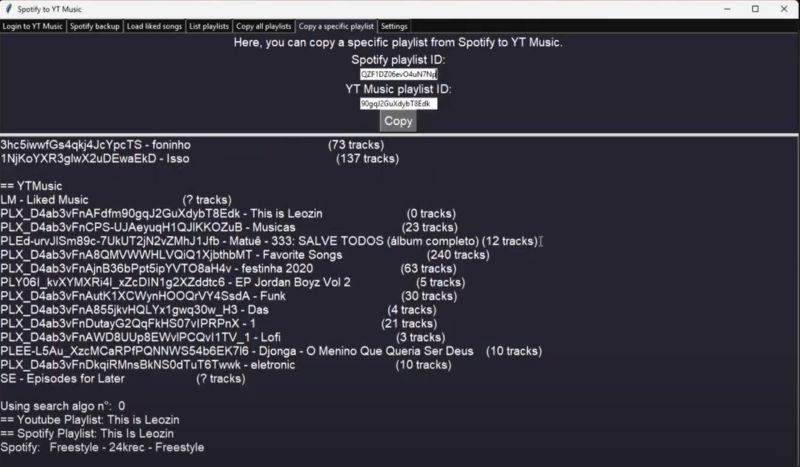
Step 6. After loading, the script displays all Spotify playlists linked to your account.
You have two options: Copy individual playlists or copy the playlist ID shown by the script.
You can use the terminal to initiate the copy process by entering the command:
python start.py --copy-playlist PLAYLIST_ID
Or use this copy all playlists:
python start.py --copy-all
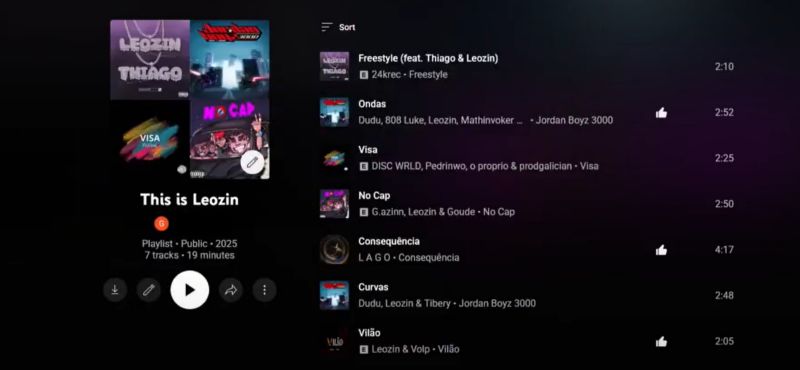
Step 7. Open YouTube Music in your browser and navigate to Library > Playlists. You’ll see the new playlist(s) created and songs gradually appearing.
How to Convert Spotify Playlists to YouTube Music With No Login
Free for: Best suited for small batches, around 200 to 300 songs at a time, for uninterrupted transfers.
iOS users can use a dedicated Spotify-to-YouTube playlist shortcut available on Chrunos. It’s fast, requires only your Spotify playlist link (even if you’ve forgotten your login), and runs smoothly through the Shortcuts app.
The only limitation? It relies on a shared public API key. So if too many users are running it at the same time, you can hit usage limits. When that happens, you can either wait and retry later, or set up your own YouTube API key.
How to Transfer a Spotify Playlist to YouTube Music Using an iOS Shortcut
Step 1. Install the Spotify to YouTube Playlist shortcut on your iPhone, iPad, or compatible Mac via the Shortcuts app.
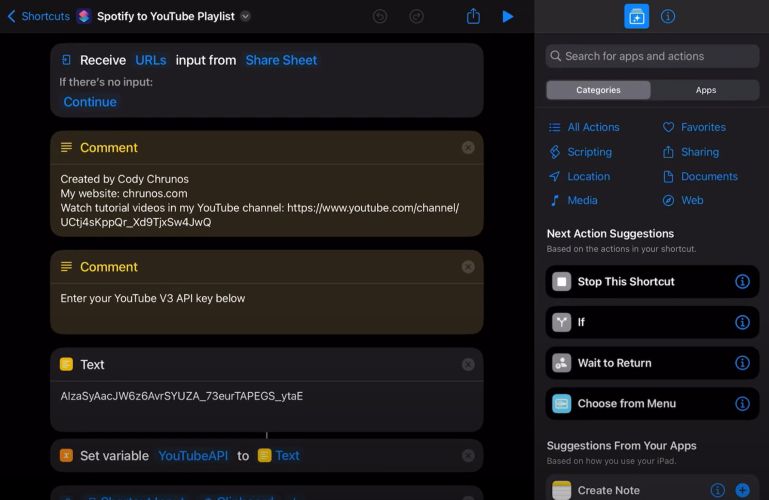
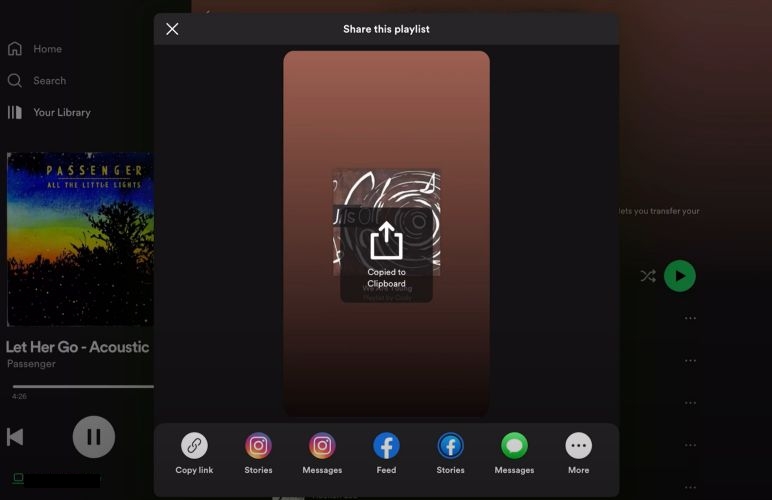
Step 2. Open Spotify and navigate to the playlist you want to transfer. Tap the three-dot menu, select Share, and choose Copy Link. Alternatively, use the Share Sheet to directly run the shortcut as it's already integrated.
Step 3. When the shortcut is triggered, you’ll be prompted to enter an approximate number of songs in the playlist.
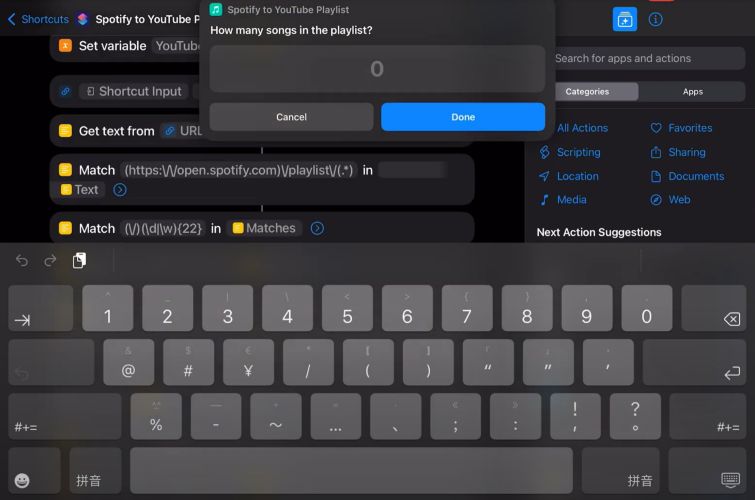
Step 4. The shortcut will begin fetching each track on YouTube.
Step 5. Once done, you will receive a permission pop-up asking whether the shortcut can open Chrome or Safari. Tap Allow Once or Always Allow to continue and let the playlist generate inside your browser.
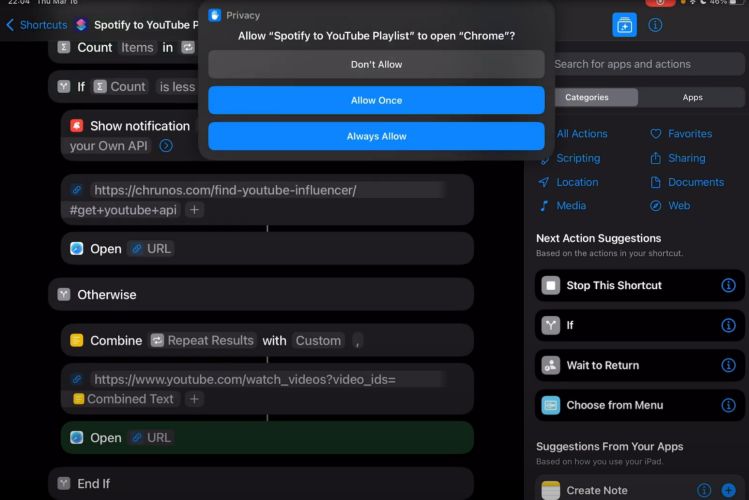
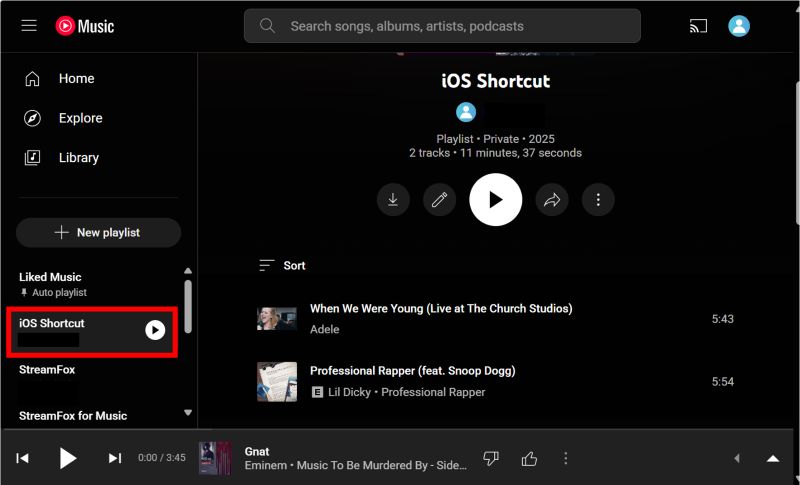
Step 6. A new YouTube playlist will open in your browser.
You can rename it, make it private or public, and ensure it’s saved under your logged-in YouTube account. Once saved, the playlist will also appear automatically inside your YouTube Music app, fully synced and ready to play.
Final Words
There are many ways to transfer your Spotify playlists to YouTube Music but most rely on matching metadata. They’re quick, yes, but it’s common to end up with mismatched versions or missing album art. If you want the exact tracks, a professional screen recorder is the one tool that gets it right every time.
With Eassiy Screen Recorder Ultimate, you get a perfect 1:1 recording of your audio. It preserves the original quality when recording your audio locally to MP3, FLAC, or M4A. From there, you can upload them directly or play them on any device, anytime.