
Updated on 2023-01-13
views
5min read
Unsurprisingly, all Mac computers can capture high-quality screenshots and modify or share them. But unlike Windows computers, Mac does not have a specific screenshot button. Instead, its users use the default screenshot keyboard shortcuts or macOS Print screen tools. So, if you just switched to a Mac computer and you’re finding it difficult to screenshot all your computer screen (print screen) to capture different activities, don’t worry, we’ve summarized the ideal methods that you can use to get the job done in this article. Just keep reading.
Part 1: Print Screen on Mac With the Best Tool - Eassiy
Eassiy Screen Recorder Ultimate is an industry-standard screen recording software that is packed with many features including screenshots, phone screen recording, and lots more. It's popularly known for its simplicity, and it can be used to take full or custom screenshots with just a few clicks. With Eassiy Screen Recorder, you’ll have a plethora of screenshot and screen recording tools at your fingertips. From simultaneously recording your screen and taking screenshots to editing screenshots, recording audio, recording game, etc. And the amazing thing is it's compatible with any device, be it Desktop or Mobile.
In all, you can do a lot with Eassiy Screen Recorder Ultimate without necessarily being a tech-savvy individual. So, don’t hesitate to download the software on your Mac.
Key Features
- Specialized recorders for recording game, webcam, and lots more without lagging.
- Facilitate seamless video recording with or without audio.
- Record a specific window on your PC screen in just one click.
- Simultaneously screen record and take screenshots handily.
- Offers a wide range of editing tools, including text, watermark, and lots more to edit screenshots and recorded videos without hassles.
- Support special real-time annotation tools to highlight essential elements in screenshots.
- Supports helpful hotkeys to make screen recordings and screenshots very straightforward.
- Automatically screen record or screenshot activities on Mac screen using auto recorder.
- Easily recover lost screenshots or videos via Recording History.
- Save screenshots with high-quality in various formats including JPG, GIF, PNG, etc.
Step 1: Download and install the latest version of Eassiy Screen Recorder Ultimate on your Mac computer.
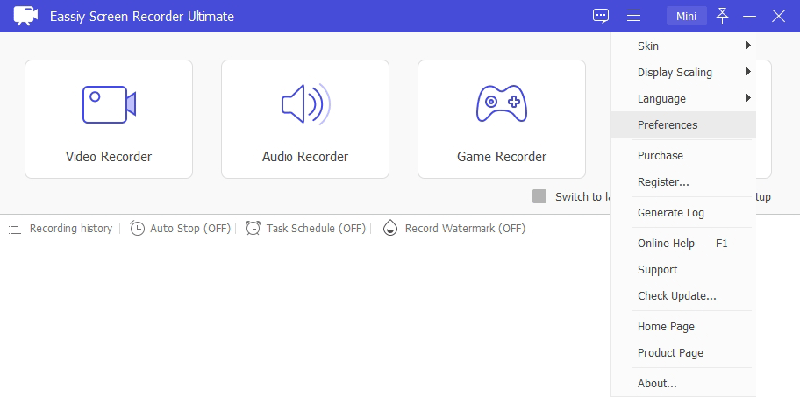
Step 2: Open Eassiy and click the three-line icon at the top-right side. Then select Preference.
Step 3: Click Mouse from the left-hand side and tick the checkbox next to Show Mouse Cursor.
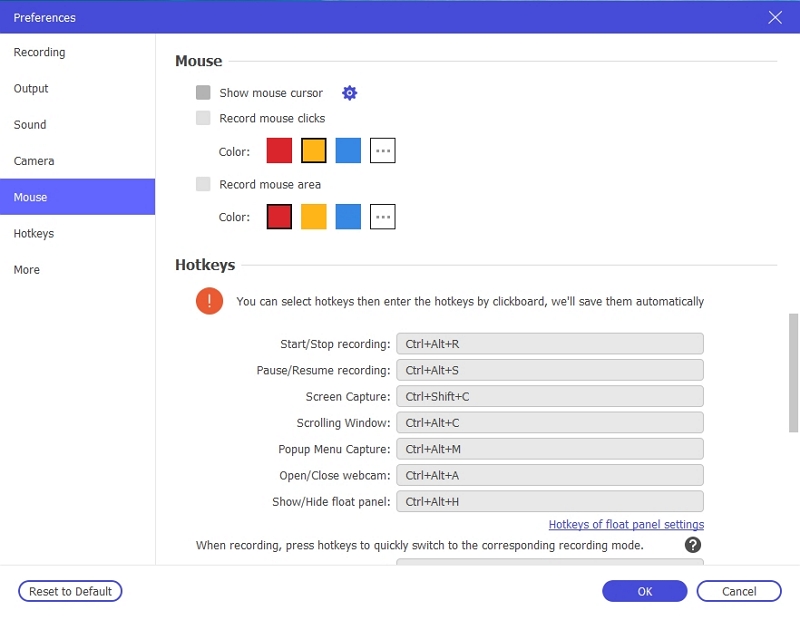
Scroll down and take note of the Hotkey to print screen, which is CTRL + ALT + C. Afterward, click OK to proceed.
Step 4: Now, navigate to the page screen you’d like to print. Then simultaneously press CTRL + ALT + C. Doing so will initiate the Eassiy Screen Recorder Ultimate screenshot feature.
Step 5: Left-click your mouse cursor and use its Wheel or the PC Space Bar to capture your Mac screen to the bottom automatically. By doing so, Eassiy will print the screen instantly.
You can also print specific aspects of your Mac screen by simultaneously clicking the Eassiy screenshot shortcut key and then using the relevant button to take the screenshot.
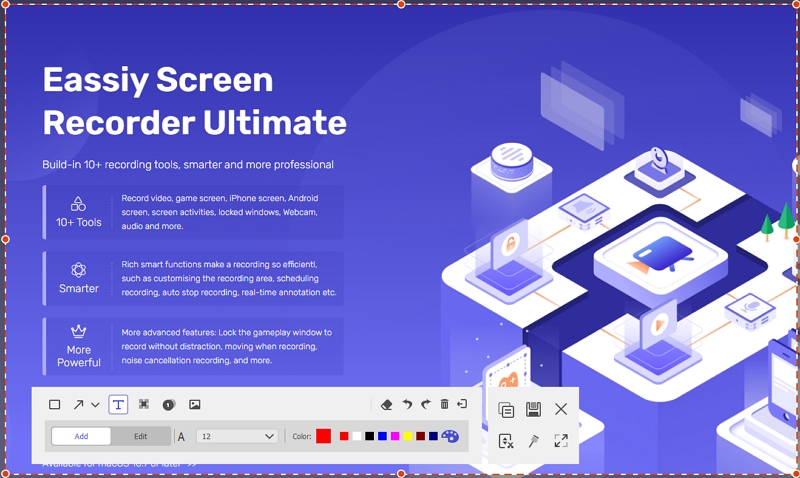
Step 6: A preview of the screenshot will be automatically displayed on your screen afterward. You can annotate, add text, and perform any editing you want on the screenshot from there.
Step 7: Finally, click the Save button at the bottom right corner and save the screen capture to the desired location on your Mac computer.
Part 2: Print Screen Mac With Shortcut Keys
As mentioned earlier, you can only print screen on Mac using shortcut keys. So, if you don’t want to install third-party software, you can just employ these shortcut keys. However, note that, unlike the Eassiy Screen Recorder Ultimate, you don’t have access to many editing tools when you use shortcut keys to print Mac screen.
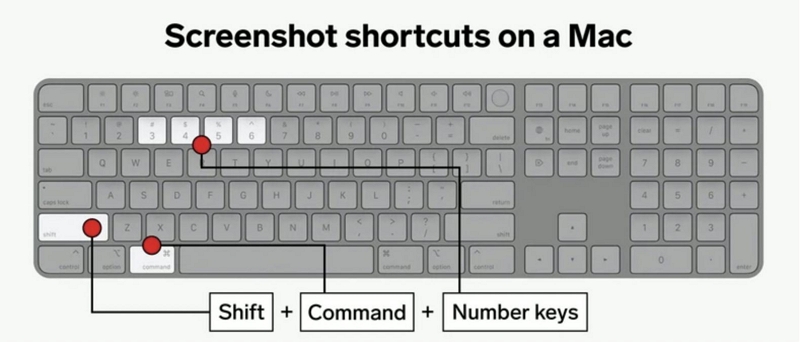
Mac Screenshot shortcuts use mainly below 3 keys:
- Shift Key
- Command Key
- Number Keys
Below are the following Keyboard Shortcut functions to print screen on Mac, and we’ll discuss how to use them in a few minutes. Keep reading.
- Shift + Command + 3 to take an entire screen
- Shift + Command + 4 to capture a portion of the screen
- Shift + Command + 5 to open the Mac screenshot menu
- Shift + Command + 6 to capture the Touch bar
Method 1 : Shift + Command + 3 : Print entire screen
Step 1. Press and hold the Shift, command, and number 3 Keys.

Step 2. A preview of the screenshot will appear at the right bottom of the screen. Click on the preview to view, edit, add text, and add screenshot description/annotation.
Step 3. Click on Done in the upper right corner of the preview screen to save the screenshot. The Screenshot will be automatically saved as "Screen Shot," followed by the date and time it was captured.
Method 2: Shift + Command + 4: Print portion of the screen
- Press and hold Shift, command, and number 4 Keys
- The cursor will turn into a crosshair
- Click and select the area by dragging the crosshair
- Release the mouse button or trackpad to capture the area selected
- Click the ESC button to cancel
- A preview of the screenshot will appear at the right bottom of the screen
- Click on the preview to view, edit, add text, and add screenshot description/annotation
- Click on Done in the upper right corner of the preview screen to save the screenshot.
- Click on the delete icon to delete the screenshot
- Screenshots appear on the desktop by default. It'll automatically be titled "Screen Shot," followed by the date and time it was captured.

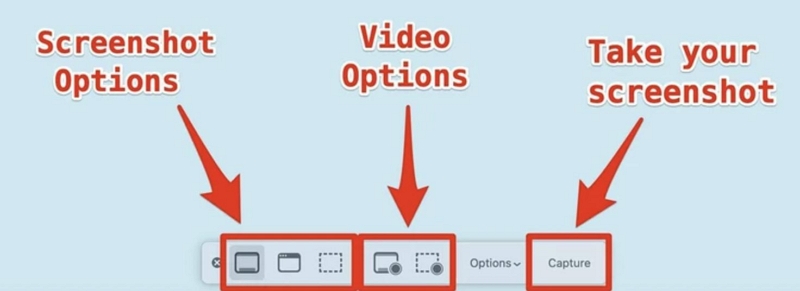
Method 3: Shift + Command + 5: To open Mac Screenshot Menu
- Press and hold Shift, command, and number 5 Keys.
- A small menu panel appears with the below sections of action
- a. Screenshots – Entire screen, Portion of the screen, Entire window
- b. Video recording – Records video of the entire screen or highlighted portion
- c. Options – where to save the screenshot, the time gap between pressing the capture button and capturing the screenshot and more
- d. Capture – capture the screenshot.
- A preview of the screenshot will appear at the right bottom of the screen
- Click on the preview to view, edit, add text, and add screenshot description/annotation
- Click on Done in the upper right corner of the preview screen to save the screenshot.
- Click on the delete icon to delete the screenshot
- Click on ESC to cancel
- Screenshots appear on the desktop by default. It'll automatically be titled "Screen Shot," followed by the date and time it was captured.
Method 4: Shift + Command + 6: To Capture Touch bar
Not all Mac computers have the Touch Bar, but you can take a screenshot of it if there is one.
- Press Shift + Command + 6.
- This will immediately capture everything on your Touch Bar.
- Screenshots appear on the desktop by default. It'll automatically be titled "Screen Shot," followed by the date and time it was captured.
Part 3: FAQs
1. How do I copy and paste the print screen on a Mac?
You can use the following methods to copy and paste the print screen on Mac computer.
Method 1: Hold the control key along with other shortcut keys to copy the screenshot. Example: Press and hold Shift + Command + Control +3, and press command + V to paste the screenshot
Method 2: Find the screenshot save on the desktop or saved path, right-click and select copy, and press command + V to paste the screenshot
2. Where do screenshots go on Mac?
Screenshots appear on the desktop by default. It'll automatically be titled "Screen Shot," followed by the date and time it was captured. Press Shift + Command + 5 to open the screenshot menu, then click Options. Save the screenshot to a new location. Drag the preview thumbnail to the folder or path.
3. How can I print the screen on MacBook Air?
To print screen on MacBook Air, you can use the following keyboard shortcuts;
- Shift + Command + 3 to take an entire screen
- Shift + Command + 4 to capture a portion of the screen
- Shift + Command + 5 to open the Mac screenshot menu
- Shift + Command + 6 to capture Touch bar
Conclusion
The above are the most reliable ways to Print Screen for Mac that can help you capture screenshots quickly and efficiently. You can choose one that is appropriate and start snipping on Mac without hassle. Eassiy is the most versatile tool which provides multiple editing tools to users to edit the screenshots according to preference and need. Eassiy is a multi-functional, simple operation, customized setting and comes with free trial. Mac Keyboard shortcuts Mac’s inbuilt screenshot tool is easy to use, convenient and multifunctional. It works well and gets the job done in most cases. However, there is no annotation function and less versatility.