
Updated on 2023-02-07
views
5min read
Screen-snipping Mac computers can be extremely useful in various situations. Perhaps you’re looking to keep the proof of a chat, make your tutorial blogs to understand, demonstrate things, etc., regardless of what your reason to screen snip on Mac is, the question is, how do you go about it? Well, unlike Windows, there is no in-built Snipping tool on Mac. But as tech experts, we've sum up several workarounds you can employ for the operation. So, let’s dive into the article to find out more.
Part 1: Screen Snip on Mac Without Complications Using the Best Mac Screen Snipping Tool
If you are looking for an easy-to-use yet amazing Mac screen snipping tool, Eassiy Screen Recorder Ultimate is the best tool for you. It’s a tool trusted by many tech experts for taking high-quality screen snippets on Windows and Macbook. With Eassiy Screen Recorder, you can screen snip on Mac within a few clicks. And it supports advanced features that allow you to also edit, annotate or label the screenshot efficiently. Overall, Eassiy Screen Recorder gives you access to a wide range of features you can always count to for taking scrolling screenshot, snipping, screen recording, and doing lots more that regular screen recording tools does not offer.
Key Features
- User-Friendly: Eassiy Screen Recorder is a user-friendly screen capturing and recording tool. Its easy-to-use interface helps you screen snip on Mac and Windows without any hassle. In other words, you don’t need to be tech-savvy in order to use this tool.
- Versatile: Another key feature of Eassiy Screen Recorder is its versatility. You can use this single software to capture your laptop screen, and record Zoom meetings, gameplays, online lectures, video tutorials, live streams, and important presentations.
- Lag-Free: Unlike many screen snipping tools, Eassiy Screen Recorder is extremely fast and lag-free. As a result, users are able to take high-definition screenshots in seconds. Moreover, it is free from ads and other interruptions that can make the process slow.
- Various Export Formats: Eassiy Screen Recorder allows you to export your screen snippet in multiple formats to make sharing screenshots easy. You can export your screen snippet in PNG, JPEG, BMP, TIFF, and many other formats. Similarly, you can share scrolling screenshots in your desired format.
- Real-Time Annotations: Eassiy Screen Recorder supports real-time annotations that allow users to label, mark, or highlight certain regions of their snippet in real-time. Annotations are useful to draw the audience's attention to a specific part of an image or video.
How to Snip Screen on Mac with Eassiy Screen Recorder Ultimate?
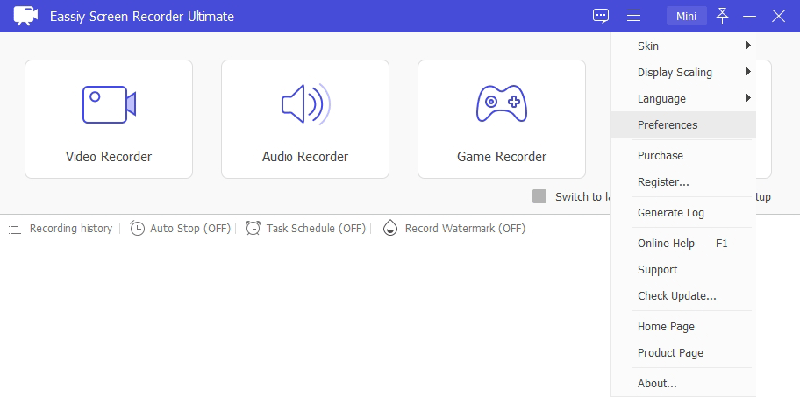
Step 1: Download the latest version of the Eassiy Screen Recorder Ultimate on your Mac and install it. Launch the App and click the Three-line vertical icon at the top-left side. Then, select Preferences.
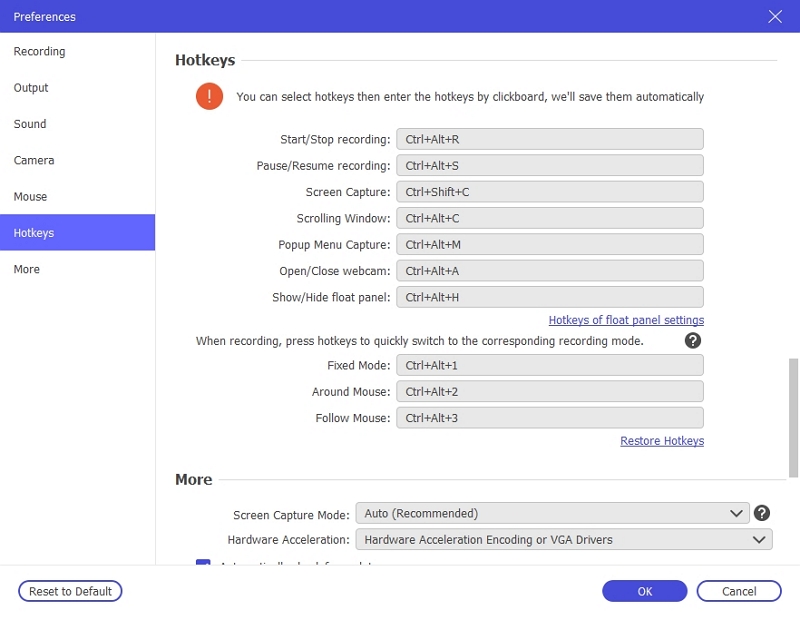
Step 2: Click Hotkeys from the left side of the screen. Then, find Screen Capture from the list of available and take note of its hotkey. You can also change it to a custom key.
Step 3: After you complete the above, go to the screen you intend to screen snip and simultaneously press CTRL + Shift + C or your custom screen capture keys to snip your Mac screen.
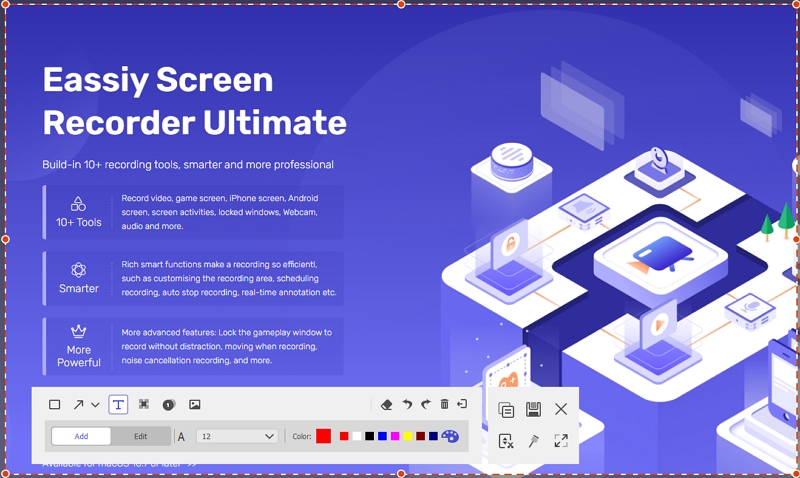
Step 4: Edit the screenshot according to your requirements. Eassiy allows you to use annotation tools to draw and highlight important elements in the screenshots. Also, you can add text if preferable.
Step 5: Once you complete the editing, click the Save icon next to the close icon at the top-right side to save the screenshot to your Mac computer’s local storage.
Part 2: Mac Snip Screen With Shortcut Keys
The above Mac snip screen technique is the most reliable for taking professional-looking screenshots and it requires the installation of software. But if you don't want to install third-party software and snip your Mac screen, you can perform the operation using shortcut keys on your Mac. Read on to find out more.
Method 1: Use Command+Shift+3
To capture the entire screen, press and hold these three keys together: Command+Shift+3.
Method 2: Use Command+Shift+4
In order to take a snap of a particular region/area of your screen, press and hold Command+Shift+4 together.
Method 3: Use Command+Shift+5
In case you want to capture the entire screen, Window, or a portion of the screen or Window, press and hold Command+Shift+5 together.
Part 3: Free Snipping Tools for Screen Snip on Mac
Apart from Eassiy Screen Recorder and Macbook shortcut keys, you can also try to screen snip Mac using free snipping tools like Lightshot, Snagit, and TraitSniper. However, keep in mind that free snipping tools come with their own pros and cons. Moreover, they are not as advanced as Eassiy Screen Recorder.
1. Lightshot
Developed by Skillbrains, Lightshot is a free and easy-to-use snipping tool. This simple tool lets you screen snip on Mac and Windows without any complications. Besides, it supports a web-based version that can be integrated with chrome and other browsers, allowing you to take screenshot via such platforms quickly and easily.

Key Features
- Snip Mac screen efficiently.
- Simple user interface.
- Screenshot Mac with shortcut keys.
- Support annotation tools.
Pros
- It is a free snipping tool available for both Windows and Mac.
- You get some editing features to edit your snippets.
- Allows you to save your file on Cloud and social media.
Cons
- The application stops working at times.
- Unwanted ads and interruptions
- No option for text-customization
- Limited editing features
- Uploading screenshots take time
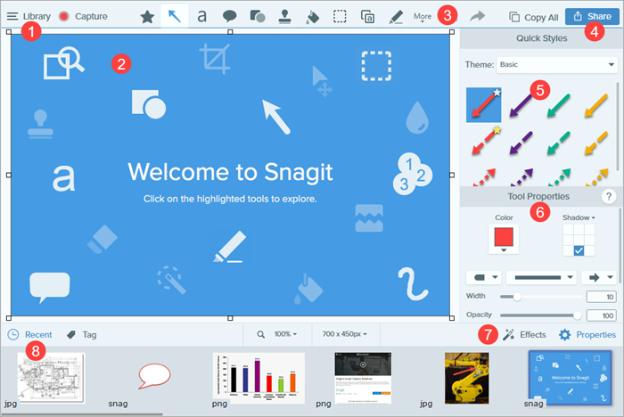
2. Snagit
Snagit is a screen-capturing and recording software developed by TechSmith. Launched in 1990, Snagit is available for both Windows and macOS. Using Snagit, you can annotate your screen snippets using arrows, texts, callouts, etc.
Key Features
- Supports extraction of text from screenshots.
- Great collaboration tools.
- Capture Mac full screen or a specific region.
- Take scrolling screenshots easily.
Pros
- Free of cost
- Advanced editing features and tools
- It’s compatible with various platforms, including Mac, Windows, Chrome, Firefox, etc.
Cons
- The application keeps crashing.
- No advanced features for editing screen recordings.
3. TextSniper
TextSniper is one of the most effective snipping tools that you can also use to snip Mac screens. The tool boasts extensive features that not only allow users to snip screen but also extract text from images and do lots more within a few clicks. Besides, TextSniper supports customizable shortcuts, thus making it easy for you to use commands to snip your Mac screen and perform other in-app operations quickly and effortlessly.
Key Features
- Supports QR and Bar, code reader.
- Efficient OCR tool.
- Customizable shortcuts.
Pros
- Supports text-to-speech feature.
- It supports multiple languages.
- Simple user interface.
Cons
- The free trial is only one week.
- You need to upgrade to paid plan to access all the features.
Conclusion
In this article, we have discussed everything related to screen snip Mac handily. Screen snipping is a useful feature that everyone should be aware of in today’s digital world. If you are a Macbook owner, you might have faced difficulties to screen snip on Mac. However, you can easily take screenshots on Mac using the amazing ways discussed in this blog. Although you can choose from paid and free snipping tools, we advise you to use advanced tools like Eassiy Screen Recorder for hassle-free screen snipping on Mac as free tools have their own disadvantages.