Updated on 2024-01-05
views
5min read
"Please suggest me a creative voice editor who can get the work done quickly as well!"
Are you a creative geek and are passionate about creating a masterpiece? The audio must be perfect and precise, whether composing an instrumental piece or the next big podcast. Any background noise or low pitch can spoil your audio recording. The audio editors are a great help to save you in such situations. But, sometimes, when you are a newbie or your budget is too low to afford the best audio editors, the free audio editor comes as a relief. So, here is our comprehensive blog on the top 5 voice editors plus the best factors for their selection.
Part 1: What factors to consider before purchasing the best voice editor in 2024?
When shopping for audio editing software, it's essential to consider the kind of audio you will edit or record what you're going to do with it. For example, live band and studio recordings are different from electronic dance music production, separate from recording and editing podcasts. Budget is also an essential factor for pro-level tools.
1. Recording options: Can you record from external tools and record with separate channels? Supports several channels: Podcasts may only require three or four tracks, while the singing groups and other bands may need more.
2. Editing features: Based upon your working requirements, you may need to normalize, add effects, or create mixes and basic trims.
3. Plug-ins and add-ons: Some audio editing software has amplified additional features, sounds, and more through add-ons and plug-ins. Some are free, while some cost heavy.
4. Price: Initially and mainly when you're a beginner, you are not required to spend tonnes of money on audio editing software. Still, professionals may need to invest or, you say, pay lots of bucks for top-level software.
5. Operating system: Make sure your favorite software is compatible with your computer or mobile device.
6. Export options: When you're ready for export, it's essential to have extremely high and feature-rich quality options or highly compressed MP3 for a podcast.
Part 2: Top 5 Popular Voice Editors for Singing 2024!
1. Eassiy Audio Editor
Are you ready to learn about one of the best voice editing programs? Let’s get introduced to Eassiy Audio Editor which is considered one of the most powerful voice editors in the market. This tool is able to cut, trim, merge, compress, convert, and much more. As it is totally free, it can be downloaded and used for free on both Windows and MacOS. While converting and compressing the audio, this editor makes sure that the original quality of the file is protected. Additionally, Eassiy is the ultimate tool that allows you to edit, convert and compress other file types like video, GIFs, pictures, etc. It supports 1000+ video/audio formats for conversion and in the supported formats, this tool is industry-leading. With its fast conversion speed, you will need a few seconds to finish your work. Again, you will be able to edit your files as you wish with the built-in editor and enrich your production.
Key Features:
- Both audio and picture can be synchronized simultaneously.
- Helps you to compress sounds as per your demands.
- Ensures the quality while converting audio to any other format.
- Supports audio editing with various tools like split, trim, cut, merge, convert, compress, etc.
- Allows you to edit ID3 tags of your audio file.
Steps to edit voice via Eassiy Audio Editor
Step 1: First of all, you have to download and install Eassiy Audio Editor on your device. After, open the software to start your process of editing. We use audio merging as an example. Select “Video Merger” to launch your audio merger by clicking “Toolbox” on your main menu.
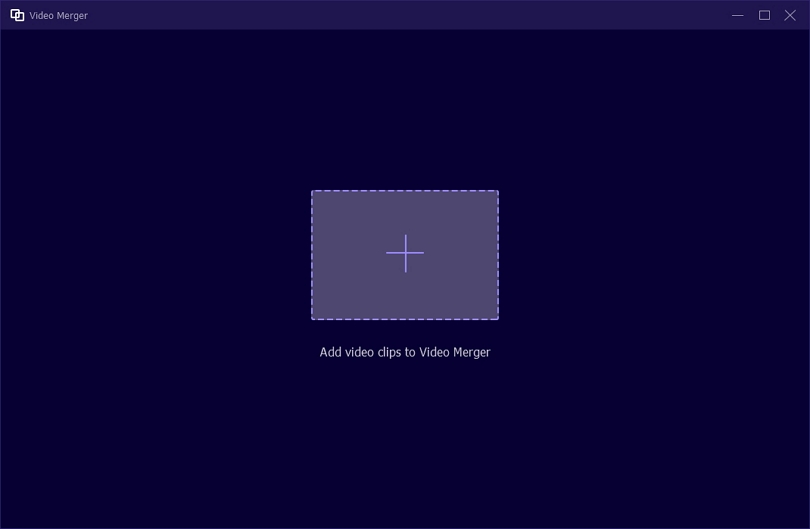
Step 2: Click on the “+” sign and add audio clips or drag and drop audio files on the interface. You will be able to add as many audio clips as possible to the Merge. Eassiy Audio Editor offers a list of features to help you in making changes to your audio before merging them, like:
- Edit – Helps you to add different effects to the audio file, text, etc.
- Trim – You will be able to cut the audio clip in between and stitch to the next part.
- Ahead/Behind – You can respectively add audio before/after the current one.
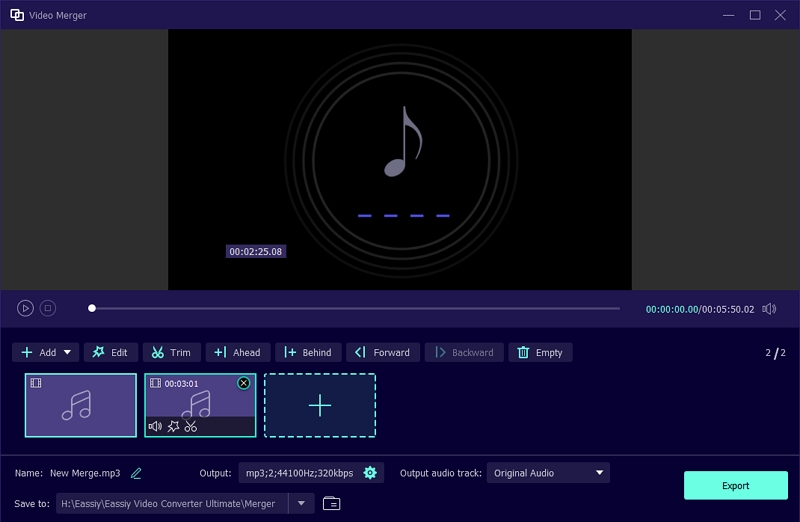
Step 3: After you are done merging your audio based on your requirements, you can give your new file a name. Enter the name of your new file by clicking on “Name”.
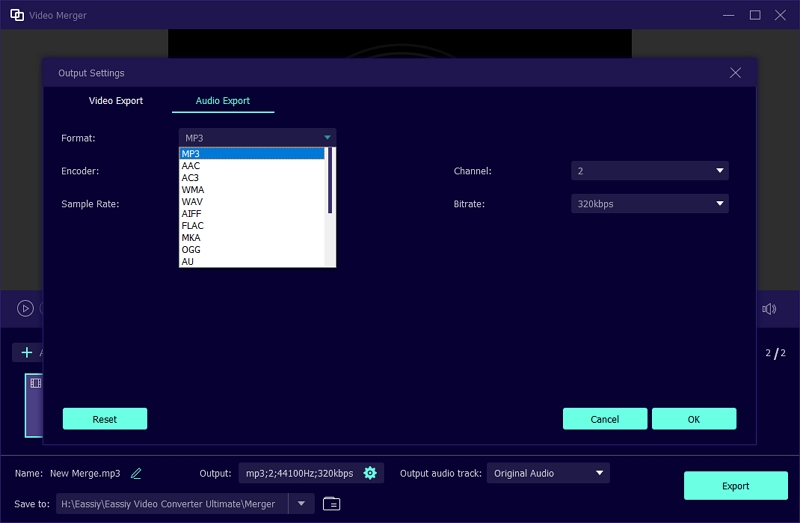
Step 4: Tap on the “Export” button to export your merged audio after adjusting the audio setting. You need to wait until the “Export” is complete. On your screen, a notification will appear, and then, tap OK or Merge Again.
2. Audacity
Audacity is our second choice in terms of voice editors for singing. Yet, it's specifically for high-learning curve editors. The platform is open-source and complimentary to download on Windows. There are lots of advanced editing options available in Audacity, including dithering. Read below to know more!
Key Features
- Can loop play
- Eliminates audio or access to noise reduction
- Access to customizable waveform colorways
- Can import & export MIDI and editing
- Other functions such as Truncate Silence and Sync-Lock
Step-by-Step to edit voice via Audacity
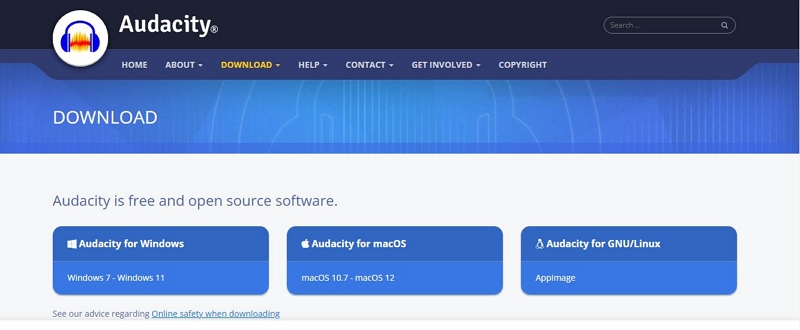
Step 1: Download Audacity
Since it’s an open-source platform, you need to visit the official website of Audacity and download the software.
Step 2: Enter editing panel
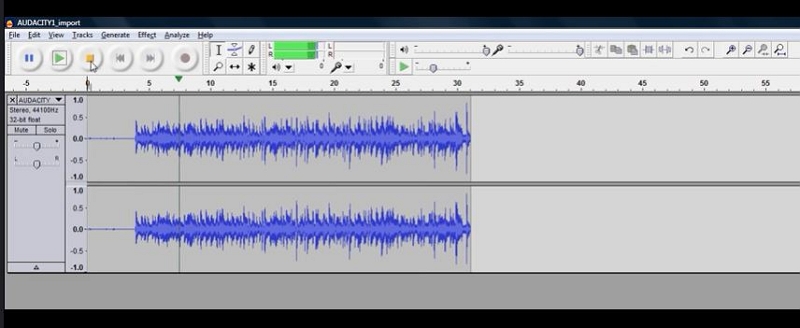
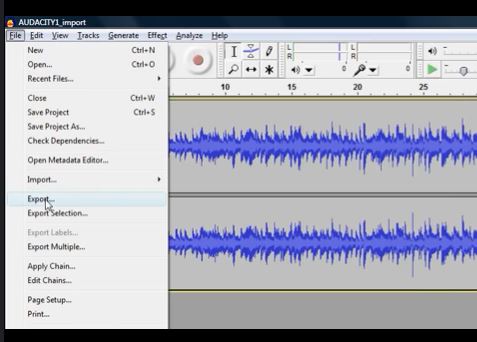
After that, you need to go to the main editing panel from Audacity’s surface. Select the tab File > choose Open from the pooped-up panel and it will help you to open an audio file. Check what audio changes we need to make. To do so, take a preview by hitting the Play option.
Step 3: Edit audio/voice
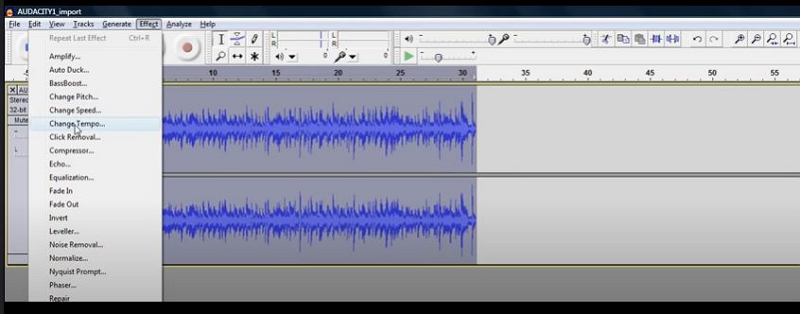
Go to the Effects tab and select various editing options as shown below.
Step 4: Adjust tempo sliders
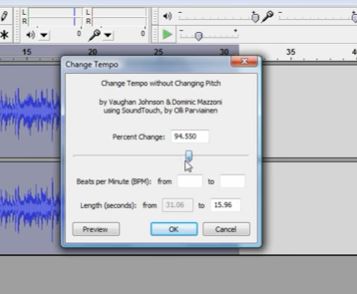
In the above step, we took Change Tempo as an example. After clicking which, you'll have a window. From the popped-up windows, you will be provided options to adjust the sliders. You will see a new window after you hit the Change Tempo tab. You can adjust the sliders.
A positive number indicates faster audio, whereas a negative number means slower audio. You can also change BPM here. Click Ok to confirm.
Step 5: Export project by browsing
Check the File option on Audacity’stab and hit the option. Your selected audio files will show after choosing the Export option. Choose the audio track by browsing the folders.
Pros
- Easy stereo recording
- Simple interface for those with minimal experience
- Easy workflow
Cons
- Lacks good GUI
- Create a version for Mac
- Lacks better VST integration
3. Adobe Audition
Pricing: US Street Price: $20.99
If you are looking for advanced voice editing, Adobe Audition is considered a "premium" choice for different reasons. But it's pretty complex and difficult to understand after using the platform. Firstly, it's a mighty, flexible, and intuitive DAW. Next, it costs a monthly subscription fee. That's where the "Creative Cloud" part comes in.
Key Features
- Record and mix sound projects
- Create remixed or original music
- Easily clean audio from video tracks
- Compile/Edit movie soundtracks
- Produce radio spots
Step-by-Step to edit voice via Adobe Audition.
To change Tempo in Adobe Audition, you need to go through the following slightly different and complex steps than other editors.
Step 1: Download Adobe Audition
Firstly, you need to go to Adobe’s official website and install the Adobe Audition voice editor within your PC.
Step 2: Open the editing panel
Now, you need to enter the main edit panel, and the first thing you can do after importing your audio is to preview it or play it.
Step 3: Dynamics Processing
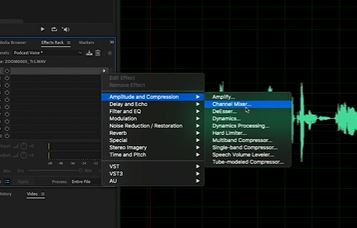
Now, go to the Dynamics Processing tab to open a window for the next step.
Step 4: Edit Voice Note
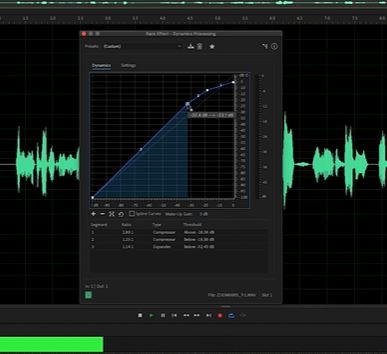
After doing the above step, go through the window opened and move the wave among different values. Those different values will provide a new shape to the audio.
Step 5: Go to Mastering
Hitting the Mastering tab could be your next step. Again, though, we don't want to be audio engineers here! But let's go through this one more aspect of editing voice with Adobe Audition.
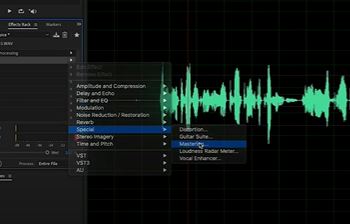
It will then open an editing panel where you can select Preset. For reference, we've taken Bright Hype preset. Also, we've adjusted the values of given pointers like Reverb, etc., down to 20. And, we've kept the High Shelf as well!
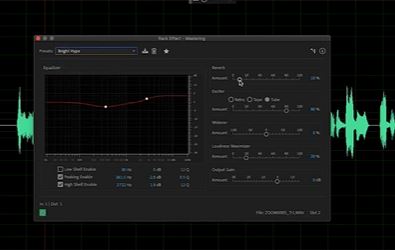
And, there’s much more you can edit with Adobe Audition if you are an audio editing expert or want to be one! However, this software is not at all for beginners.
Step 6: Export audio
Choose File > Export > Session option in Adobe Audition to export your edited media.
Pros:
- Great sound waves
- Automatic special effects and filters
- Analog audio with positive and negative voltage
Cons:
- Various unnecessary settings
- Lacks regular updates
- Lacks features of a simple voice clip editor
4. Avid Pro Tools
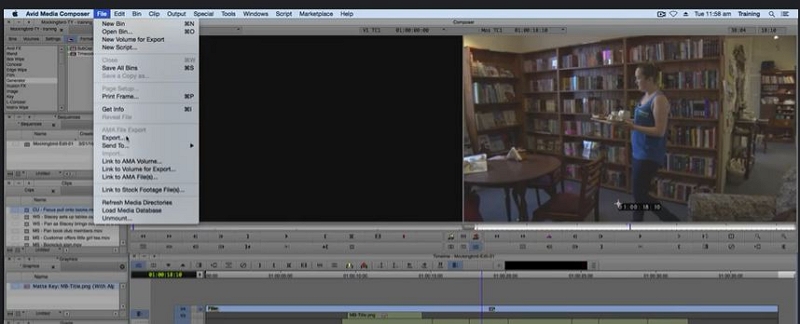
Pro Tools voice editor feels like home for many musicians, producers, and recording engineers alike. Besides its much-maligned move to a model of subscription-based tool, Avid has steadily enhanced Pro Tools over the years. Yet, it is a costly tool needing extensive support networks and outboard hardware, and its workflow remains second to none.
You'll find three main versions of Pro Tools. Pro Tools First provides you with 16 MIDI tracks plus audio tracks, with the potential to record audio.
Key Features
- Supports loop recording
- Available 15+ effects
- Includes MIDI editing tools
- Track freeze feature to save CPU response
- Supports remote collaboration
Step-by-Step to edit voice via Avid Pro Tools
Step 1: Download software
As usual, the first steps begin with launching the software. So, visit the official Avid Pro Tools website to install the software.
Step 2: Check the tempo
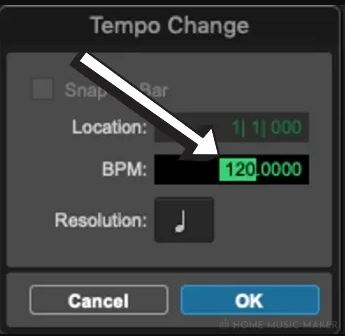
Double click the Red icon shown below to view the tempo information. The number in Green represents the present tempo, which is 120BPM below.

Step 3: Change tempo/BPM (as an example of editing voice).
Type in your chosen tempo in the section labeled “BPM.”
Step 4: Export project
After making all the modifications mentioned above in BPM, go to the File> Export option and select the folder to save the project.
Pros
- Still the cleanest audio editing workflow on the planet.
- Fast 64-bit recording and mixing engine.
- Robust, useful track freeze and commit options.
Cons
- It lacks built-in pitch correction.
- No VST or AU plug-in support.
- Monthly fee required for new software patches past 12 months.
5. Logic
Logic originated from the combination of C-Lab's late 1980s programs Notator and Creator on the Atari ST. Its pro-version, i.e., Logic Pro, currently gives pro-level audio editing at a bargain price for film scoring, multitrack recording, sound design, and post. Now with the potential to make Spatial Audio mixes in Dolby Atmos, version 10.7 puts even more pressure on its recognized digital audio workstation (DAW) competitors.
Key Features
- Audio Capture & Audio Editor
- Audio Mixing
- Audio Recording
- Audio Manipulation
- Score Editor
- Plug-in Integration
Step-by-Step to edit voice via Logic.
Follow the steps given below after you’ve downloaded Logic Pro!
Step 1: Select audio region
Select the audio region you want to match the project tempo in the Logic Pro Tracks area.
Step 2: Locate the Cycle button
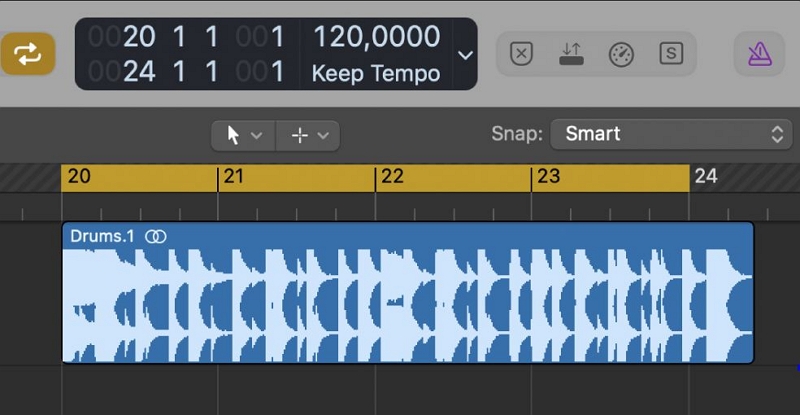
Control-click the Cycle tab in the control bar, and ensure the Auto Set Locators by Region Selection option is not selected.
Step 3: Set locator positions for exact tempo match.
Set the right and left locator positions in the ruler. The locator range must closely sync with the length of the region—generally to the nearest bar.
Step 4: Adjust tempo or edit voice
Select Edit > Tempo > AdjustTempo tab within the Region Length and Locators panel. A dialog looks for if you wish to modify the entire project's tempo or change tempo for the section of the occupied project by the selected region.
Step 5: Consider various options to adjust or change the tempo
Do one of the following:
- Hit the Globally tab to adjust the rhythm of the entire project to the audio region.
- To create a tempo change that spans the length of the audio part: Click Create.
- The project tempo will recalculate to confirm the audio size (and locators).
Pros
- Great library of features of a voice editor
- Supports time-stretching
- Includes various virtual instruments
Cons
- Lacks file management and better organization
Some FAQs
1. What is the best DAW for voiceover?
We believe the simplest DAW works best for everyone, whether a beginner or a professional. And, for the sake of simplicity yet high professionalism, Eassiy Audio Editor works just perfect!
2. What software do voice artists use?
It depends upon the requirements of voice artists. However, they tend to use less complicated tools as they don’t want to interact with the fancy stuff and waste their time.
3. Who has the best voice ever?
In terms of the greatest singing voices of all time, singer Paul Mc Cartney is on the top list right now!
4. Who is the number 1 singer in the world?
BTS currently holds the number 1 position leading with Justin Bieber and Taylor Swift.
5. What is the best voice editor?
The best voice editor is the software application containing audio-editing related tools. To select the best voice editor, you must check all the factors listed above along with your requirements. Also, make sure to find the best mix of simplicity and professionalism!
Conclusion
We hope this list has guided you well towards making the right choice for investing in the best voice editor. While this was by no means a lengthy list, we aimed to summarize professional voice editing software information to help you make a wise decision while purchasing your tool of the trade.


